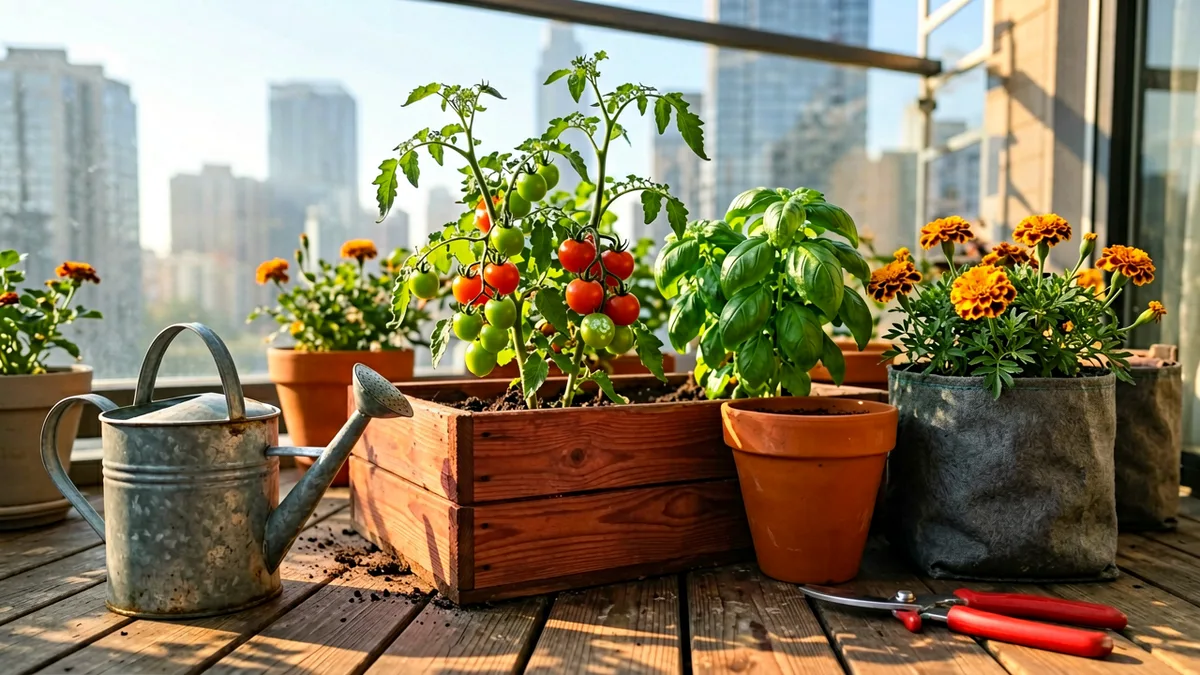
Let us be honest right out of the gate: most people kill their first three container plants because they buy a cute pot without a drainage hole and fill it with cheap dirt from the backyard. I did it, your neighbors did it, and it is a recipe for root rot every single time. Container gardening is not a lesser version of in-ground gardening; it is its own specific discipline with its own rules, and once you get the physics of a pot down, you can grow almost anything anywhere.
You do not need a massive backyard to harvest fresh food or surround yourself with lush greenery. A sunny balcony, a small porch, or even a wide windowsill is plenty of space if you choose the right containers, mix the correct soil recipe, and pick plant varieties bred to thrive in restricted root zones. This guide lays out the exact blueprint to build a high-yielding, resilient potted garden from scratch.
Quick Tips Before You Start
Ditch Backyard Dirt
Never use garden soil in a pot; it packs down tight like brick and smothers roots.
Drainage Is Absolute
If a container has no drainage hole, do not buy it, or drill one yourself immediately.
Track the Sun First
Map your space for six hours of direct sunlight before picking your vegetable varieties.
Go Bigger on Pots
Small pots dry out in hours during July; start with 5-gallon sizes for major crops.
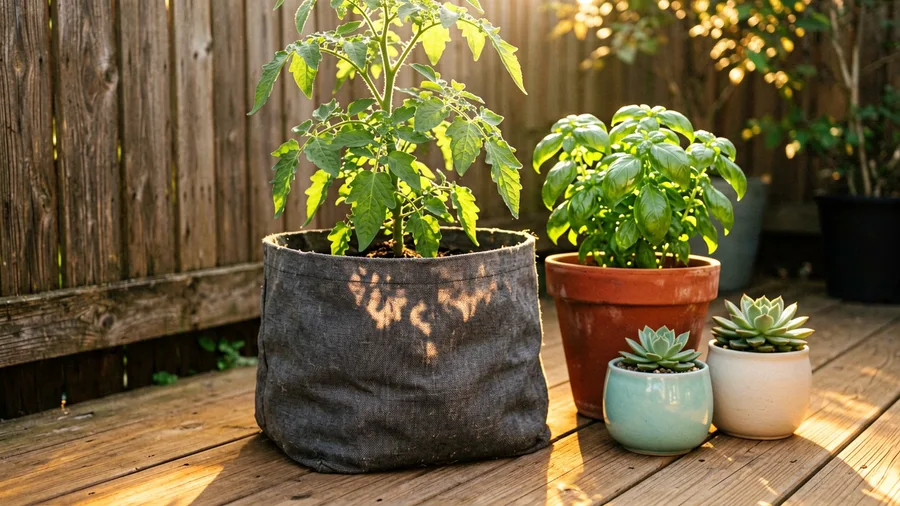
1. The 5-Gallon Fabric Grow Bag Strategy
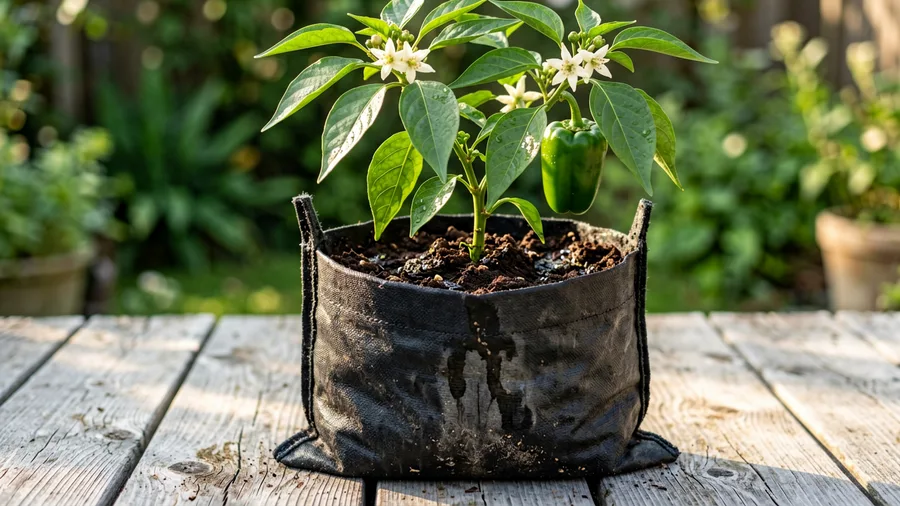
Everyone goes straight for plastic or heavy ceramic pots when they start out, but fabric grow bags like Smart Pots are the ultimate hack for container gardening. The breathable aeration fabric does something regular pots cannot: it air-prunes the roots. When a root reaches the edge of a fabric bag, it stops growing lengthwise and branches out into a massive web of fibrous feeder roots instead of circling the pot until the plant chokes itself.
Buy a pack of 5-gallon bags for your heavy hitters like peppers and eggplants, and opt for 10-gallon bags if you want to grow full-sized determinate tomatoes. They are incredibly forgiving because they naturally prevent overwatering by letting excess moisture escape through the sides. Plus, at the end of the season, you empty the dirt into a storage bin, wash the bags, fold them up flat, and stuff them in a drawer.
🪴 How to Prepare and Plant Any Container
Verify Drainage Holes
Check that your container has at least one half-inch drainage hole at the lowest point.
Fill with Pre-Moistened Mix
Hydrate your premium potting mix in a bucket first, then fill the pot within two inches of the rim.
Mix in Organic Fertilizer
Blend a high-quality granular organic fertilizer thoroughly into the top four inches of the soil.
Settle the Plant Roots
Dig a hole matching the root ball size, insert the plant, and press the soil firmly to remove air pockets.
Mulch the Surface Layer
Add a one-inch layer of shredded straw or clean wood chips to trap moisture and protect the soil.
2. Uncompromised Premium Potting Mix Selections
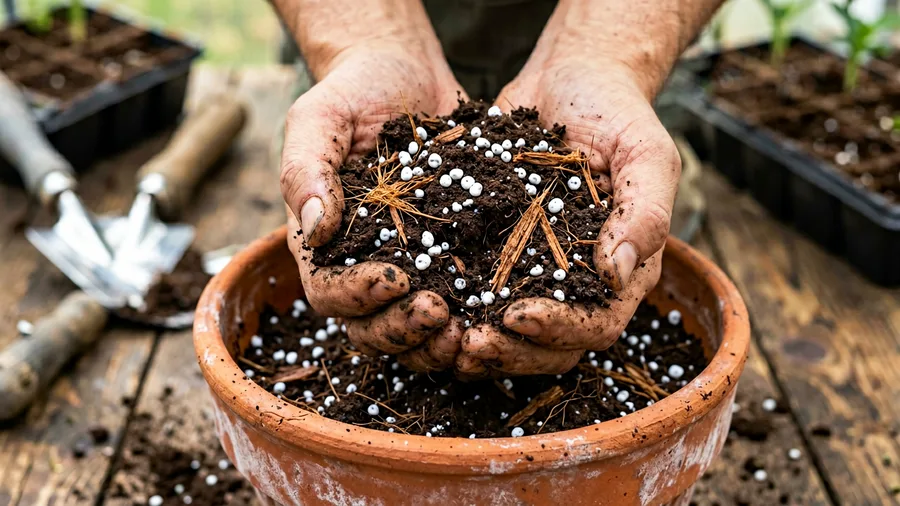
If you try to save five dollars by buying the cheapest, heaviest bag of dirt at the big-box store, you will pay for it with dead plants by July. Potted plants need a mix that stays fluffy, retains moisture without waterlogging, and leaves plenty of space for air pockets around the roots. Look for a mix that lists peat moss or coconut coir, perlite, and organic compost as the primary ingredients.
Brands like FoxFarm Ocean Forest or Espoma Organic Potting Mix are gold standards for a reason. They do not compact into cement when dried out. If you find your mix feels too heavy or dense out of the bag, buy a separate bag of coarse perlite and mix it in at a ratio of one part perlite to four parts potting mix to guarantee perfect aeration.
⚠️ COMMON MISTAKE
The Fake Drainage Gravel Myth
Never put a layer of gravel or rocks at the bottom of a pot to 'improve drainage.' Physics dictates that water clings to fine textures before moving to coarse textures, creating a perched water table that actually drowns your roots faster. Fill the entire pot with uniform potting mix.
3. Suncatcher Sweet 100 Cherry Tomatoes

Do not try to grow a massive beefsteak tomato in a small pot for your first project; you will end up with blossom end rot and a sad harvest. Instead, get a 'Super Sweet 100' or 'Sun Gold' cherry tomato plant. These varieties are absolute powerhouses in containers because they produce hundreds of sweet fruits even when their root space is limited compared to an open garden bed.
Provide a sturdy tomato cage right at planting time—do not wait until the vines are falling over the sides. A standard 42-inch wire cage pushed down into a 5-gallon or 10-gallon pot will give the vigorous vines the support they need as they climb. Place this container in the absolute sunniest spot on your balcony where it gets at least seven to eight hours of direct light.
Super Sweet 100 — At a Glance
🌡️ Season
Warm Season (Summer)
📏 Pot Size
5 to 10 Gallons
☀️ Sun Needs
7+ Hours Direct Sun
🥗 Yield
High (Hundreds of fruits)
Superpower
Highly resilient to heat spikes and incredibly forgiving if you skip a single day of watering.
4. Genovese Basil as the Perfect Companion
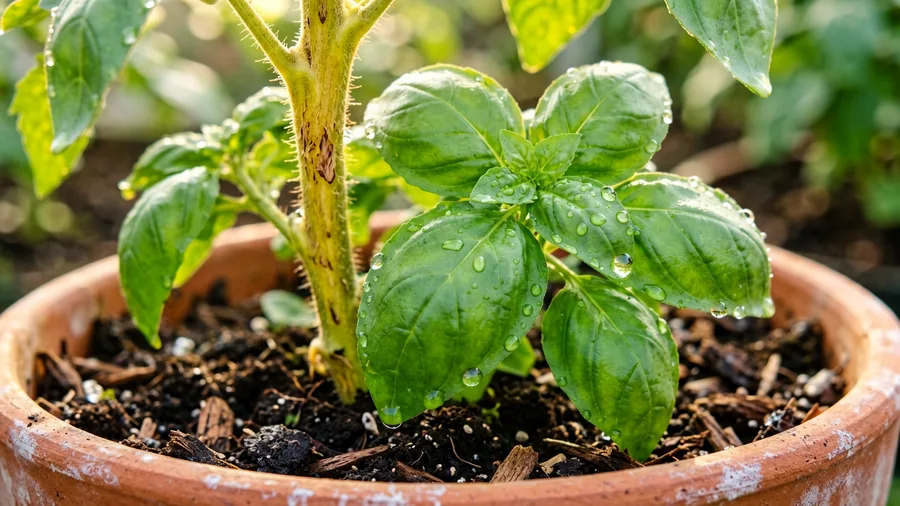
You know what nobody tells you about companion planting in containers? You do not need separate pots for everything. Planting Genovese basil directly at the base of your potted tomato plant is an incredible space-saver that benefits both plants. The broad leaves of the basil act as a living mulch, shading the soil surface and keeping the tomato roots cool during blistering mid-day heat.
Buy a 4-inch starter plant of traditional Genovese basil and tuck it into the same 5-gallon or 10-gallon container as your cherry tomato, about six inches away from the main tomato stem. Pinch off the top center growing tips of the basil every single week to force it to grow bushy and wide rather than tall and woody. This guarantees a non-stop supply of leaves for pesto all summer.
5. The Unglazed Terracotta Moisture Advantage
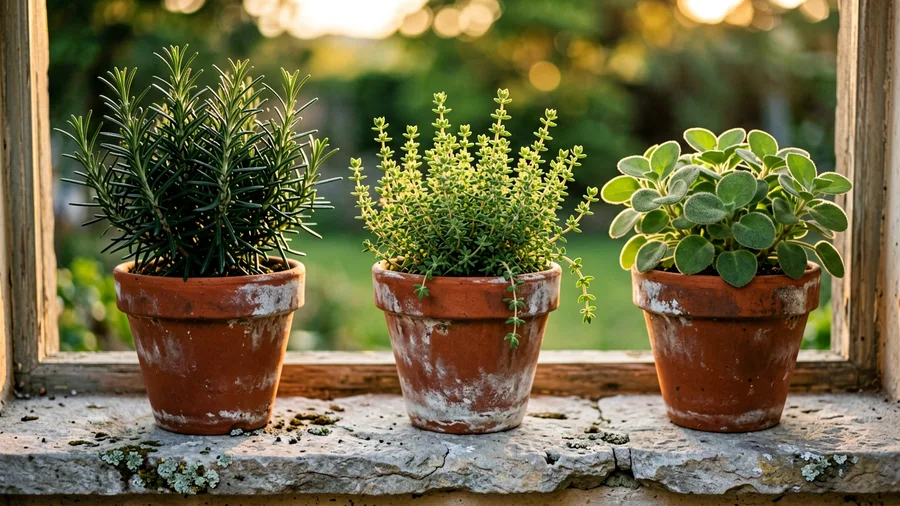
I am highly opinionated about pot materials, and for herbs like rosemary, thyme, and oregano, unglazed terracotta is non-negotiable. These Mediterranean herbs absolutely hate soggy roots and thrive when the soil dries out thoroughly between waterings. Plastic pots trap moisture inside for days, which quickly leads to root rot for sensitive herbs.
Unglazed terracotta is porous, meaning it allows air and water to pass through the walls of the pot. This breathes life into the root zone and evaporates excess moisture away from the sides. Buy thick, heavy Italian terracotta pots with a minimum diameter of 10 inches for your perennial herbs. They develop a beautiful, rustic white patina over time that looks incredible on any patio or window ledge.
Best For Terracotta
6. Patio Snacker Cucumbers on Trellises
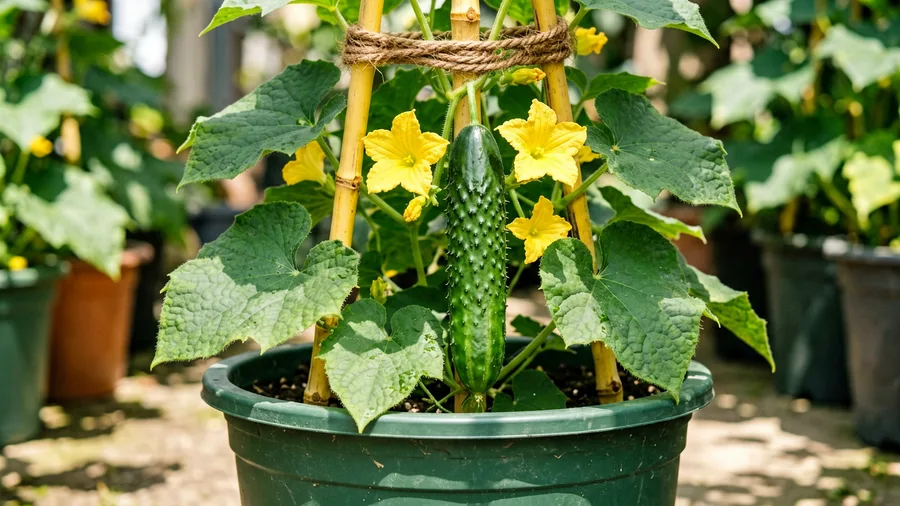
Most people assume cucumbers are completely off-limits for small spaces because wild vining types will crawl 10 feet across a yard. But plant breeders have solved this with compact bush varieties. Look specifically for 'Patio Snacker' or 'Bush Champion' at the nursery. These plants stay contained in a tight, compact mound but still produce full-sized, crisp slicing cucumbers.
Plant one bush cucumber in a 5-gallon container and insert a simple three-foot bamboo teepee trellis directly into the pot. As the central vine grows, gently wrap its tendrils around the bamboo stakes. Keep the soil consistently damp like a wrung-out sponge; cucumbers are mostly water, and if the container dries out completely while fruits are forming, your cucumbers will taste incredibly bitter.
🌱 GROWING TIP
Preventing Bitter Container Cucumbers
Inconsistent watering causes a compound called cucurbitacin to move into the fruit, making it bitter. Water your potted cucumbers at the exact same time every morning during heatwaves, ensuring moisture penetrates all the way to the bottom of the container.
7. Liquid Seaweed and Fish Emulsion Feeds
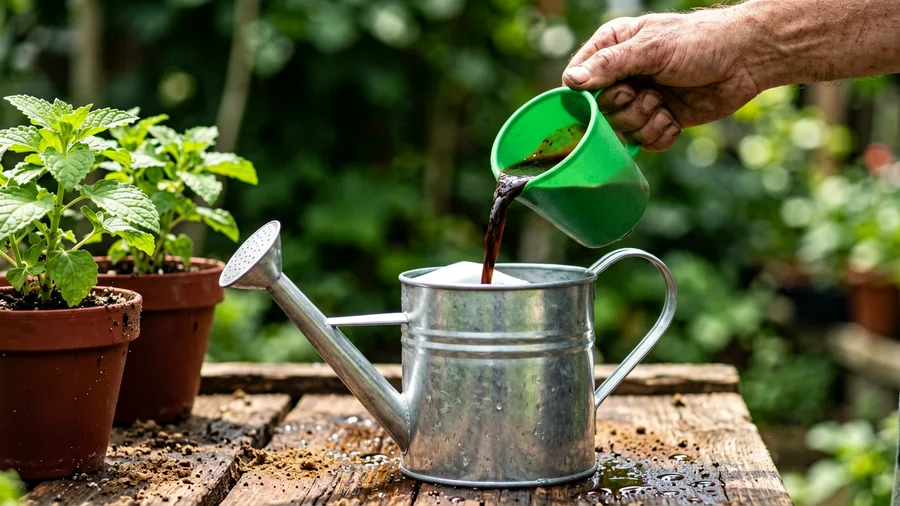
Here is a hard truth: nutrients leach out of the bottom of a container every single time you water. Because you are using a soil-less potting mix that contains very little long-term fertility, your plants will exhaust the built-in nutrients within four to six weeks. If you do not feed them, they will turn yellow and stop producing.
Do not use harsh chemical synthetic fertilizers that burn soil biology. Instead, buy a bottle of liquid fish emulsion and seaweed extract, such as Neptune's Harvest. Mix two tablespoons into a gallon of water and apply it to your pots every two weeks. It smells intensely like the ocean for about two hours, but it delivers an immediate hit of bioavailable nitrogen and trace minerals that keeps foliage emerald green.
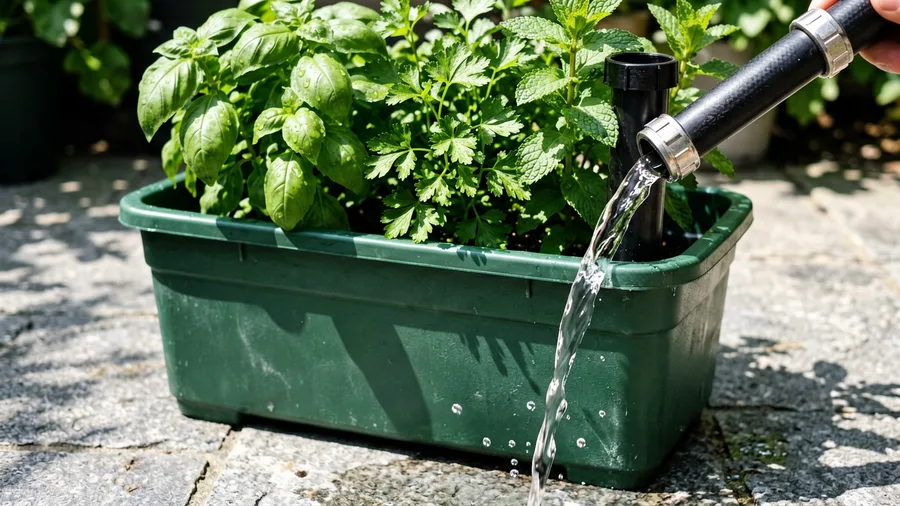
8. Deep Watering Until the Saucer Fills
Giving your potted plants a tiny splash of water every evening is the fastest way to kill them. This bad habit creates a shallow layer of moisture at the very top of the pot, forcing the roots to grow upward where they immediately bake and fry in the sun. You must water deeply, thoroughly, and less frequently.
Pour water slowly onto the soil surface until you see it running freely out of the drainage holes at the bottom and collecting in the saucer. This guarantees that every single inch of the root ball is saturated. Once the saucer fills, wait fifteen minutes, then dump out the standing water so the bottom roots do not sit in stagnant pools and suffocate.
Watering Habits Comparison
Deep Watering (The Right Way)
- Water until it flows out the bottom drainage hole.
- Forces roots to grow deep and strong.
- Performs best when done early in the morning.
- Allows soil to dry slightly between applications.
Shallow Splashing (The Wrong Way)
- Only wets the top inch of potting soil.
- Creates weak, upward-growing root systems.
- Evaporates within an hour during hot afternoons.
- Leaves the deep core of the root ball bone dry.
9. French Marigolds for Natural Pest Shielding
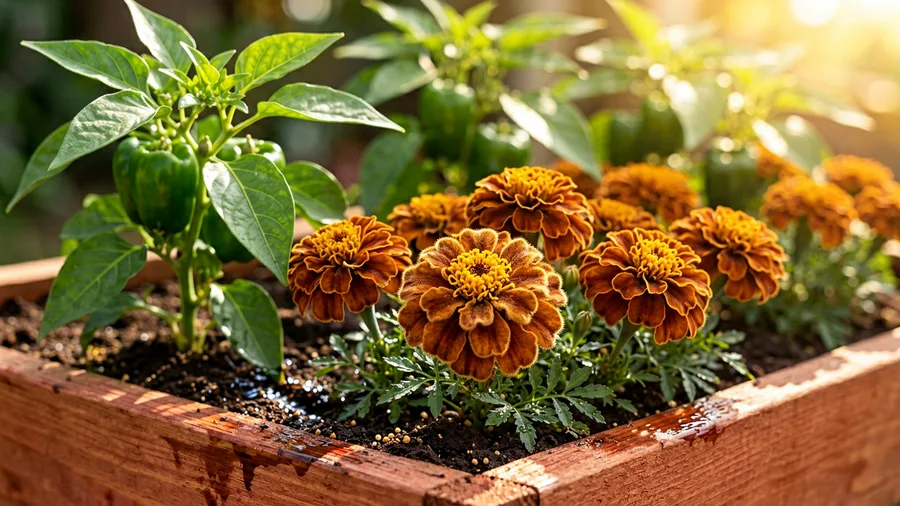
Everyone tells you to plant marigolds and leaves it there. The part they skip is which variety, where, and why. Do not buy giant African marigolds for containers; get compact French marigolds like the 'Bonanza' or 'Boy O' Boy' series, which top out at just 8 to 10 inches tall.
Tuck these colorful little workhorses into the corners of your larger planter boxes or grow bags. Their roots exude a chemical compound that deters harmful root-knot nematodes in the soil, while the pungent aroma of their bright orange and yellow blooms confuses pests like aphids and whiteflies that are looking for your prized vegetables. Plus, they draw in predatory beneficial insects like hoverflies that eat pests for breakfast.
10. Shredded Straw Mulch for Moisture Lock
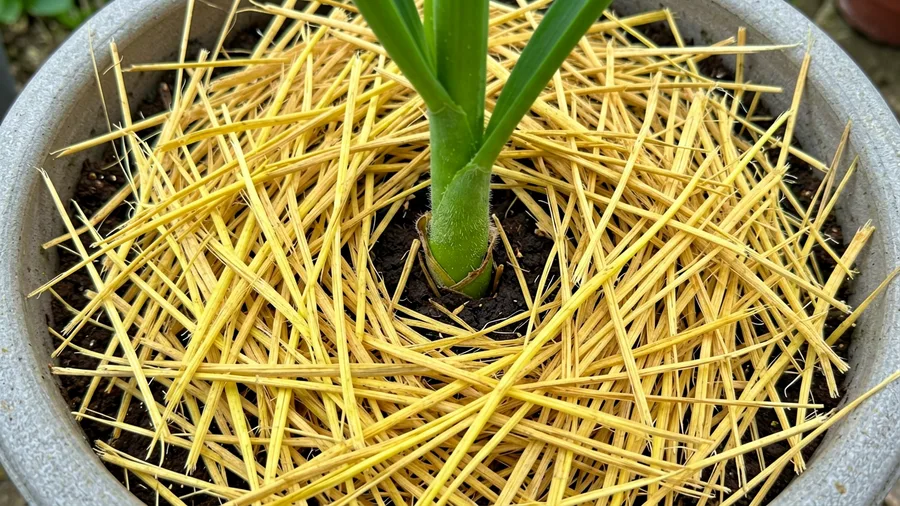
The absolute biggest enemy of a container gardener is evaporation. Because a pot is elevated above the ground and exposed to air on all sides, the soil temperature can easily rocket past 90 degrees on a hot July afternoon, baking the delicate feeder roots and drying the soil to dust. You must insulate the surface.
Buy a mini-bale of clean, weed-free shredded straw or fine orchid bark chips. Spread a thick one-inch layer across the entire exposed soil surface of every single container, keeping it tucked a half-inch away from the main stems of the plants to prevent rot. This simple barrier slashes your watering needs by half and keeps the top layer of soil active and full of life.
💡 PRO TIP
The Pot Elevator Trick
Set your large heavy pots on rolling plant caddies or small plastic pot feet. Raising them just one inch off hot wooden decks or concrete balconies prevents heat transfer from the surface and lets air flow cleanly underneath, stopping roots from growing out the bottom holes.
11. Little Finger Baby Carrots in Deep Pots

Most beginners think root crops are completely impossible in containers, but that is a total misconception. While a standard 10-inch Danvers carrot will hit the bottom of a pot and curve into a weird knot, baby gourmet varieties thrive in deep planters. Look specifically for 'Little Finger' or 'Paris Market' seeds.
Use a pot that is at least 12 inches deep, fill it with your fluffiest potting mix, and sow the seeds directly onto the surface, spacing them one inch apart. Cover them with a paper-thin layer of vermiculite to hold moisture during germination. Within two months, you will be pulling perfectly formed, intensely sweet baby carrots out of loose soil with zero resistance.
Little Finger Carrots — At a Glance
📏 Depth Required
12 Inches Minimum
🌱 Planting Method
Direct sow seeds
⏱️ Days to Harvest
55 to 60 Days
✂️ Thinning Space
1 Inch Apart
Superpower
Completely immune to the stony, compacted soil issues that ruin in-ground carrot crops.
12. Buttercrunch Looseleaf Lettuce for Cut-and-Come-Again
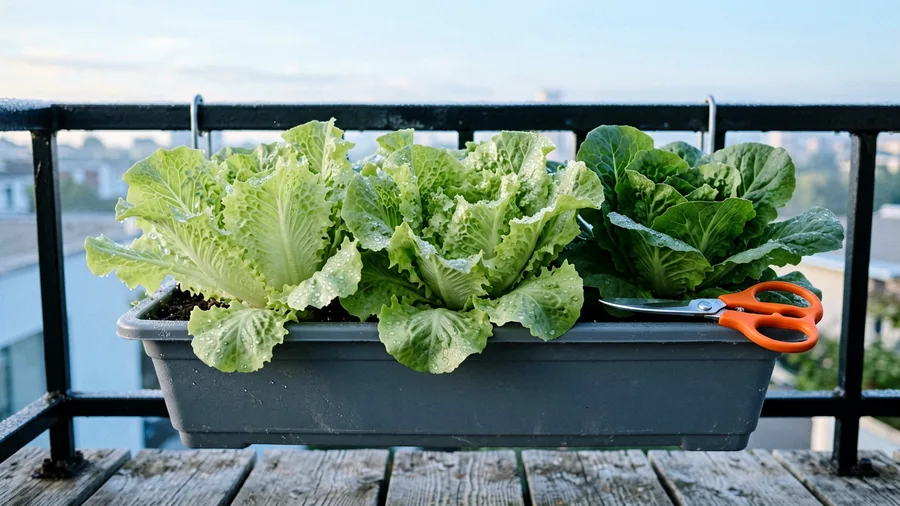
Do not bother trying to grow tight heads of iceberg lettuce in a pot; it takes too long and fails when the heat hits. Instead, buy a packet of 'Buttercrunch' or 'Black Seeded Simpson' looseleaf lettuce seeds. These are cut-and-come-again varieties, meaning you harvest the outer leaves for dinner, and the center keeps pumping out new growth.
You can use wide, shallow bowls or rectangular window boxes just six inches deep for lettuce since their root systems are incredibly shallow. Sow seeds every two weeks starting in early spring. Place the containers in a spot that gets morning sun and afternoon shade to shield the tender leaves from burning and delay the plant from bolting to seed.
13. Smart Plant Selection with Bush Sugar Pod Peas
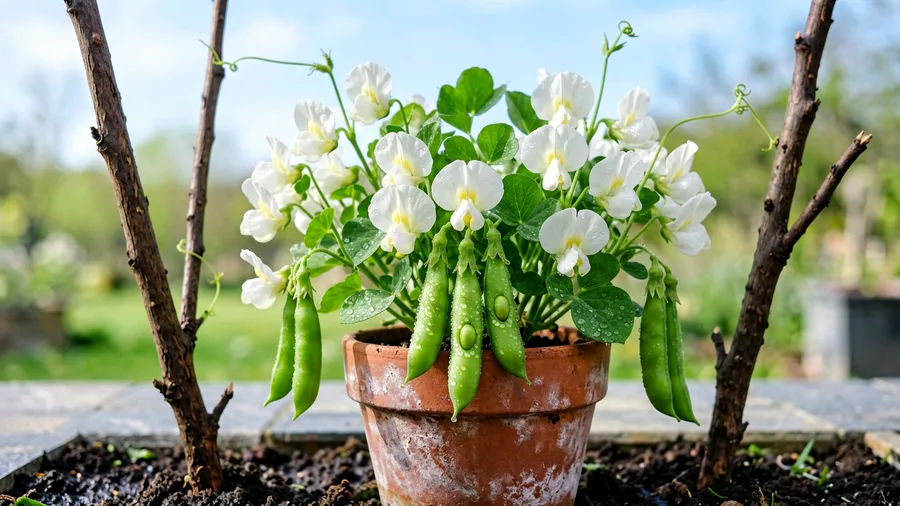
If you want the absolute highest joy-to-effort ratio in early spring container gardening, plant 'Sugar Ann' or 'Bush Sugar Pod' snap peas. Traditional peas require massive, complex trellises and climbing networks, but these specialized bush selections grow in a tidy two-foot mound while producing crisp, sweet pods you can snap and eat right off the vine.
Direct sow the seeds into a medium-sized container right around the time of your last spring frost. Pop a small, decorative branch or a low tomato cage into the center of the pot just to give the small vines something to lean against as they produce. Keep them in full sun and harvest the pods daily once they fill out; the more you pick, the more flowers the plant will produce.
14. Self-Watering Sub-Irrigated Planter Boxes
If your job requires you to travel for the weekend or you know you lack the personal discipline to water every single morning, traditional pots will fail you. You need a Sub-Irrigated Planter (SIP), commonly known as a self-watering box, like the EarthBox or the Misco Self-Watering Planter. These containers use a clever internal reservoir design.
You pour water down a dedicated fill tube directly into a hidden tank at the bottom of the planter. The soil sits just above this water chamber on a perforated screen, wicking moisture upward into the roots as needed via capillary action. This system eliminates all the guesswork, prevents overwatering entirely, and can keep a thirsty tomato plant thriving for three full days without a single drop of manual care.
15. The Strategic Grouping Multi-Pot Microclimate
Never leave a lone, small plastic pot sitting completely by itself out in the middle of a baking hot concrete balcony. The sun will strike the sides of that container, heat the soil to extreme temperatures, and scorch the root network within hours. Instead, harness the power of community by grouping your containers tightly together.
Cluster your pots in clusters of three or four, placing your largest, heaviest pots on the side that receives the harshest afternoon sun. The large containers act as a physical heat shield, throwing protective shade onto the smaller, more vulnerable pots behind them. As the clustered plants transpire moisture through their leaves, they create a localized, humid microclimate that keeps everyone happy and resilient.
Avoid These Container Gardening Mistakes
Frequently Asked Questions
Can I reuse my container potting mix again next year?
Yes, but you cannot just plant directly into it without refreshing it first. Empty the old mix into a large plastic tub, break up any hardened root balls, and mix in a 50/50 blend of fresh organic compost and a few handfuls of granular organic fertilizer to rebuild the structure and nutrient levels.
How do I know exactly when it is time to water my pots?
Forget calendar schedules. Push your index finger two inches deep directly into the potting mix. If it feels completely dry and warm at the tip, it is time to water deeply. If it feels damp and cool like a fresh sponge, leave it alone for another day.
Why are the lower leaves on my potted tomato plants turning yellow?
This is almost always a classic sign of nitrogen deficiency caused by nutrients leaching out of the bottom drainage holes during routine watering. Start applying a liquid fish emulsion and seaweed fertilizer blend every 14 days to restore the nitrogen levels.
What pots work best for a windy apartment balcony?
Avoid lightweight plastic pots or flimsy fabric bags if you live on a high, windy floor, as they will blow over easily. Opt for heavy, wide-bottomed terracotta or glazed ceramic pots, and choose low-profile crops like looseleaf lettuce, bush herbs, and dwarf bush varieties.
Final Thoughts
If you only add one thing from this list to your setup this week, make it the premium potting mix coupled with a 5-gallon fabric grow bag. It completely eliminates the two biggest killers of potted crops—soil compaction and root circling—giving you an immediate safety net while you learn the daily rhythm of watering and feeding your new micro-garden.
Ready to Grow Big in Small Spaces?
Grab a high-quality organic potting mix and your favorite compact plant variety today to jumpstart your lush container oasis.

John Smith is the founder and CEO of Karaoke Machines Guru. He is a karaoke tutor and karaoke enthusiast and has been passionate about karaoke since he was a child. He also writes about karaoke-related tips, guides, and product reviews on this website.
He overlooks the whole website and makes sure that everything is running smoothly. Learn more!