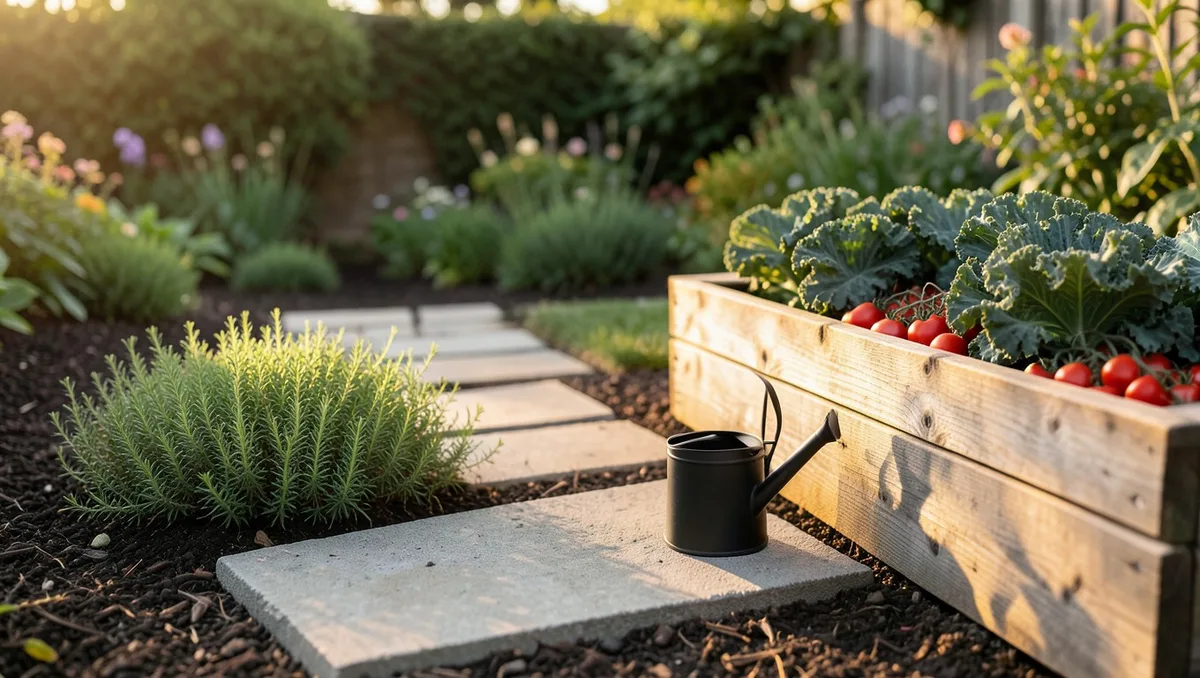
Every single year, homeowners stare at patchy grass or muddy corners in their backyard and assume a proper hardscape requires thousands of dollars and a professional crew. I used to think the exact same thing until I ruined my first set of boots trying to lay stone without a plan. You do not need a massive budget or heavy machinery to build a stunning, functional patio space that anchors your vegetable beds and outdoor seating.
This weekend, you are taking control of your gardening layout by installing a durable, budget-conscious paver footprint. By focusing on smart material choices like standard 12-inch concrete step stones, pea gravel borders, and native creeping groundcovers, you can bypass the premium masonry costs. Let us bypass the generic design advice and walk through fifteen concrete, real-world layout ideas that cost less than $300 and completely transform your backyard flow.
Quick Tips Before You Start
Call 811 First
Never dig without verifying utility lines, even for a shallow three-inch patio base.
Check Your Level
Slope your patio one-quarter inch per foot away from your house foundation.
Sod Removal
Use a sharp kick-cutter spade to slice grass off cleanly at the roots for composting.
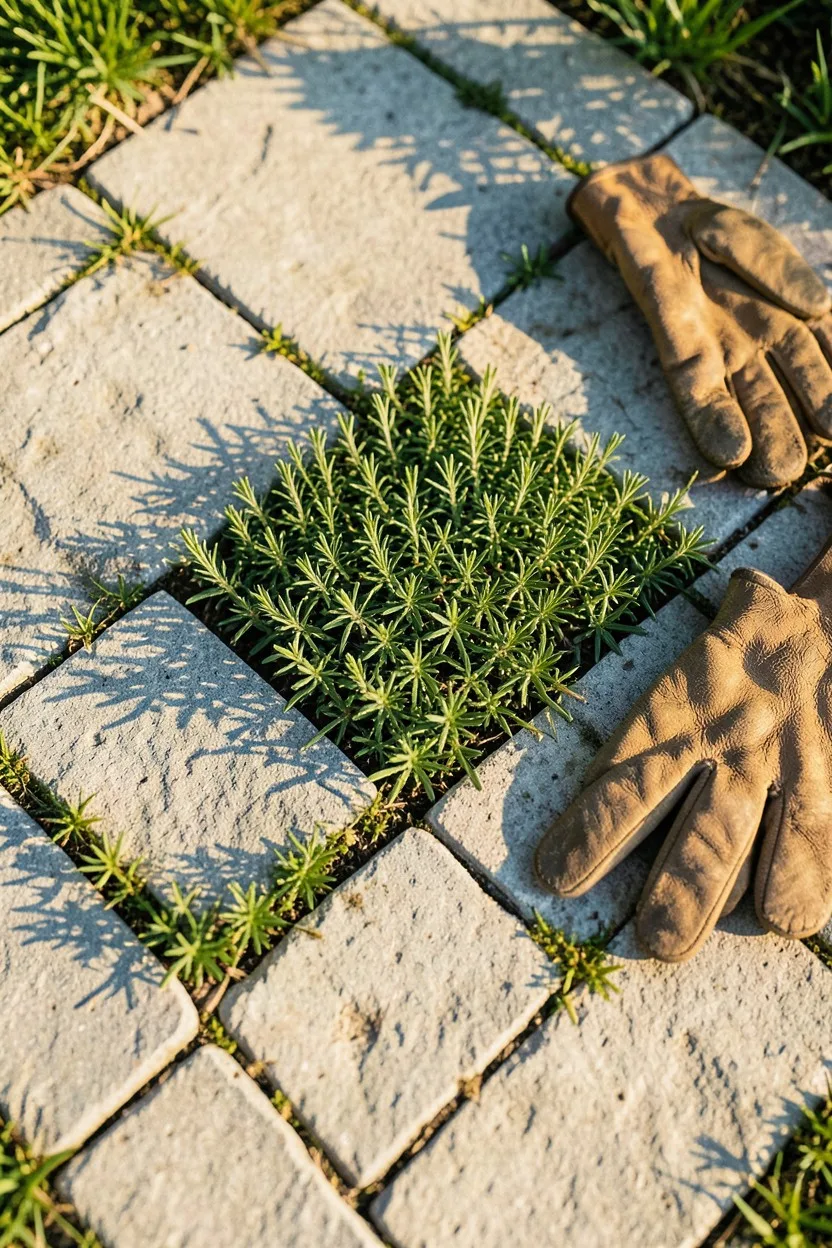
1. Classic Square Stepping Stones with Creeping Thyme
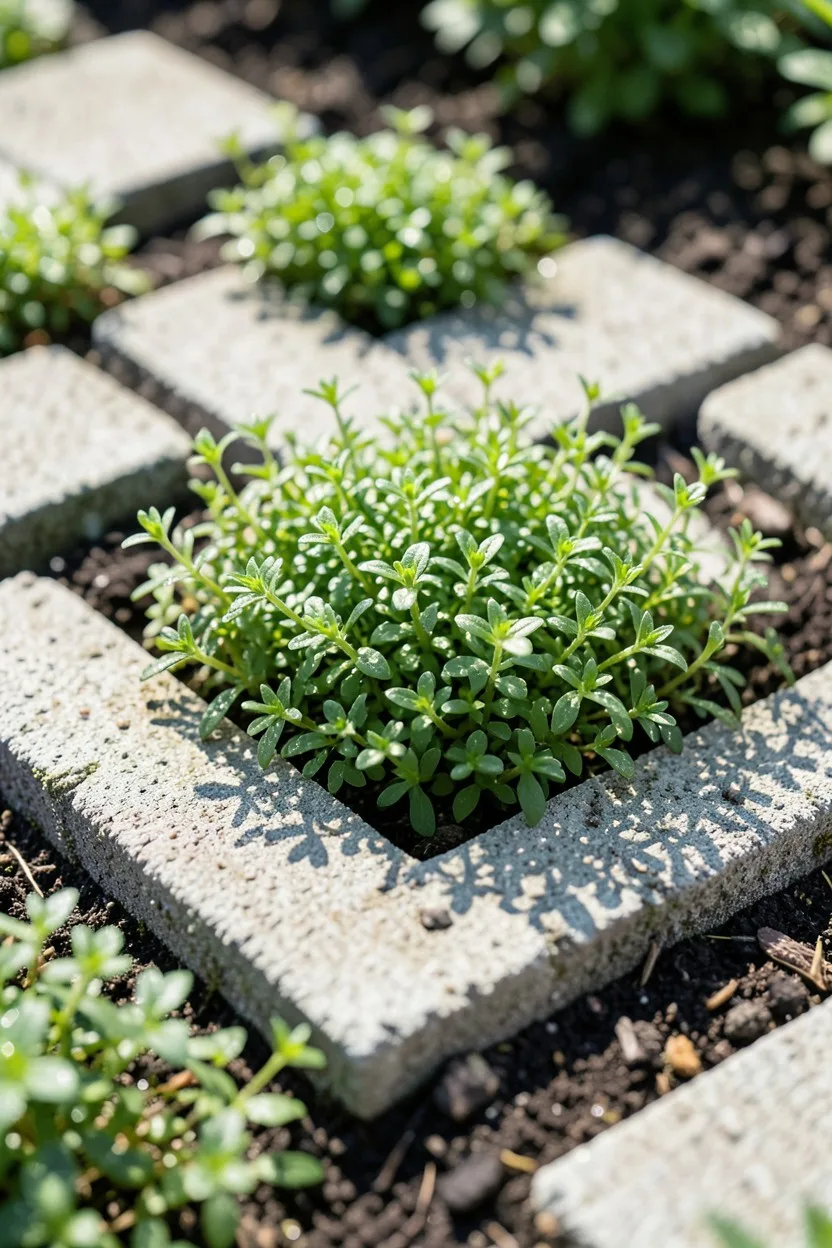
Everyone tells you to use interlocking pavers for stability, but honestly? That advice means spending your entire weekend renting a heavy plate compactor and buying tons of specialized joint sand. Instead, select standard 12-inch by 12-inch gray concrete step stones from your local big-box nursery. They cost around two dollars a block, meaning a ten-by-ten grid fits easily inside your budget.
Space the blocks exactly three inches apart rather than butting them tight against each other. Fill those gaps with premium organic topsoil and plug in Thymus serpyllum (Creeping Thyme). As the thyme fills in, it locks the pavers into place naturally with its dense root system. When you walk on it, the foliage releases an incredible herbal aroma that floating deck designs can never replicate.
💡 Tip: Plant the thyme plugs slightly lower than the stone surface so you do not bruise the crowns when walking.
Creeping Thyme Patio — At a Glance
🌡️ Best Season
Early Spring
🌱 Plant Choice
Creeping Thyme
📐 Paver Spacing
3 Inches Apart
💰 Material Cost
Under $180 Total
Superpower
Releases a sweet, aromatic fragrance every time you step on the living joints.
2. Pea Gravel Framework with Red Brick Edging
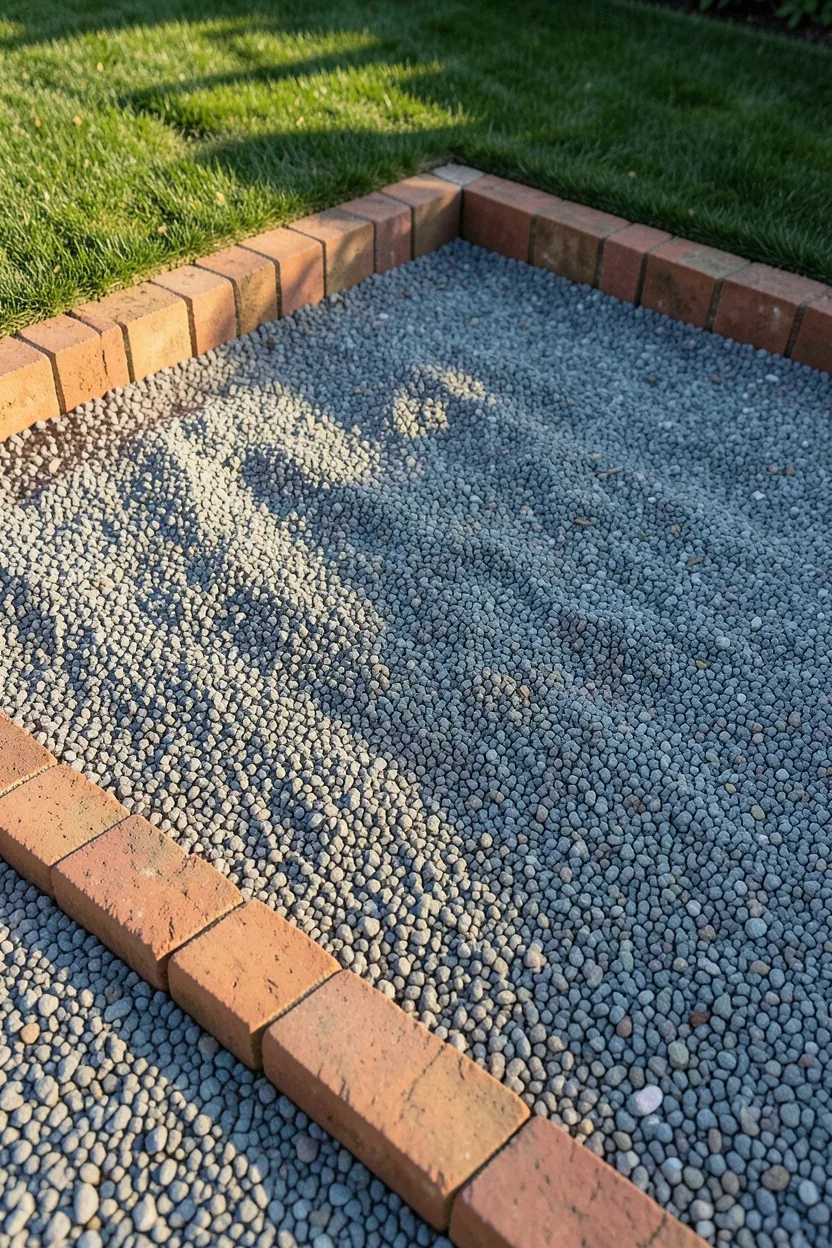
Back in my early gardening days, I tried laying a solid brick patio directly on dirt, and it turned into a wavy, muddy roller coaster after the first winter freeze. Avoid that disaster entirely by building a recessed gravel pocket. Excavate your zone down four inches, line it with heavy-duty commercial landscape fabric, and border the perimeter with reclaimed red clay construction bricks set vertically.
Fill the interior matrix with washed pea gravel from a local landscape supply yard. Buying it by the half-yard in the back of a pickup truck keeps costs around forty dollars. This design provides immediate drainage for your nearby perennial borders, preventing root rot in wet climates like the Pacific Northwest.
⚠️ COMMON MISTAKE
Never Skip Commercial Landscape Fabric
Cheap plastic sheeting rips during installation and traps water underneath. Use heavy woven needle-punch fabric to keep gravel from sinking into the native clay soil.
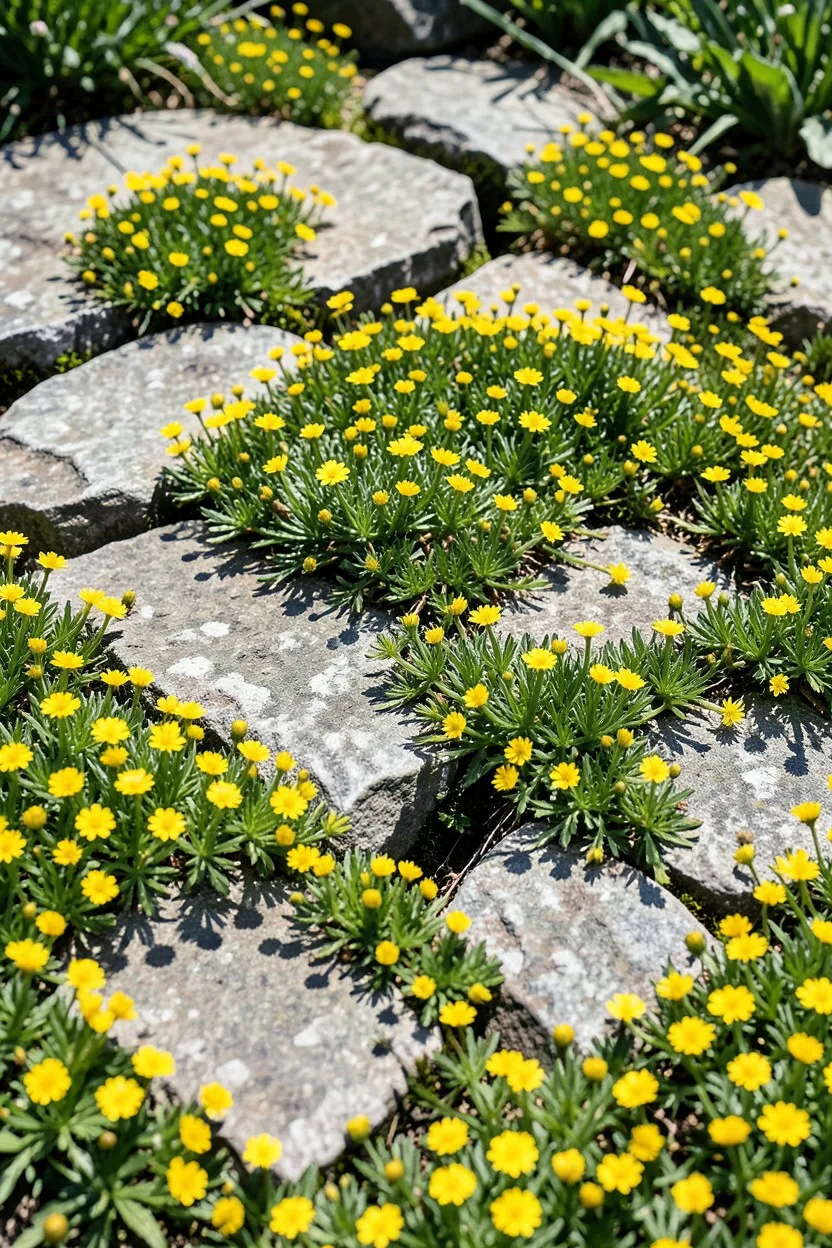
3. Checkerboard Concrete and Irish Moss Layout
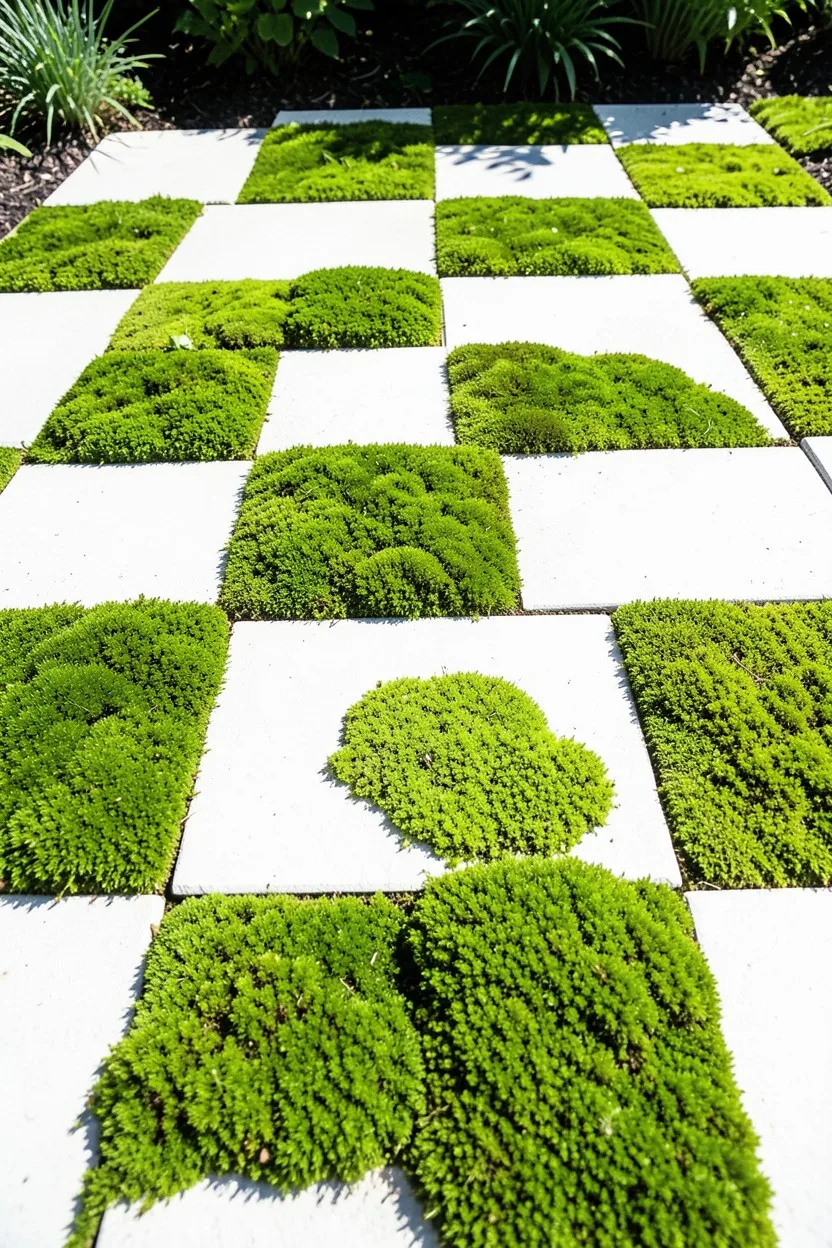
If you want a high-contrast look that highlights your nearby raised beds, the checkerboard pattern is your absolute best route. You will need twenty-five large 16-inch square white concrete pavers. Lay them in an alternating grid pattern, leaving half of the spaces completely open to expose the underlying soil.
Fill the empty voids with Irish Moss (*Sagina subulata*). This plant looks exactly like rich, velvet green carpeting but thrives in partial shade zones where grass refuses to grow. It provides a stunning geometric anchor right next to an organic kitchen garden, making the whole backyard look highly structured.
4. Herringbone Pavers Enclosed by Cedar Mulch

You know what nobody tells you about complex herringbone patterns? They usually require hundreds of precise cuts with an expensive rented wet stone saw. You can bypass that entire headache by creating a floating herringbone island that never hits a solid edge wall.
Lay out standard 4-inch by 8-inch red concrete pavers in a interlocking 90-degree V-shape right over a level sand base. Once your main island shape is built, fill the ragged outer perimeter with premium shredded cedar mulch. The mulch completely hides the uncut edges and creates a gorgeous, rustic transition directly into your flower beds.
Best For
5. Circular Flagstone Hearth with Dark River Rock
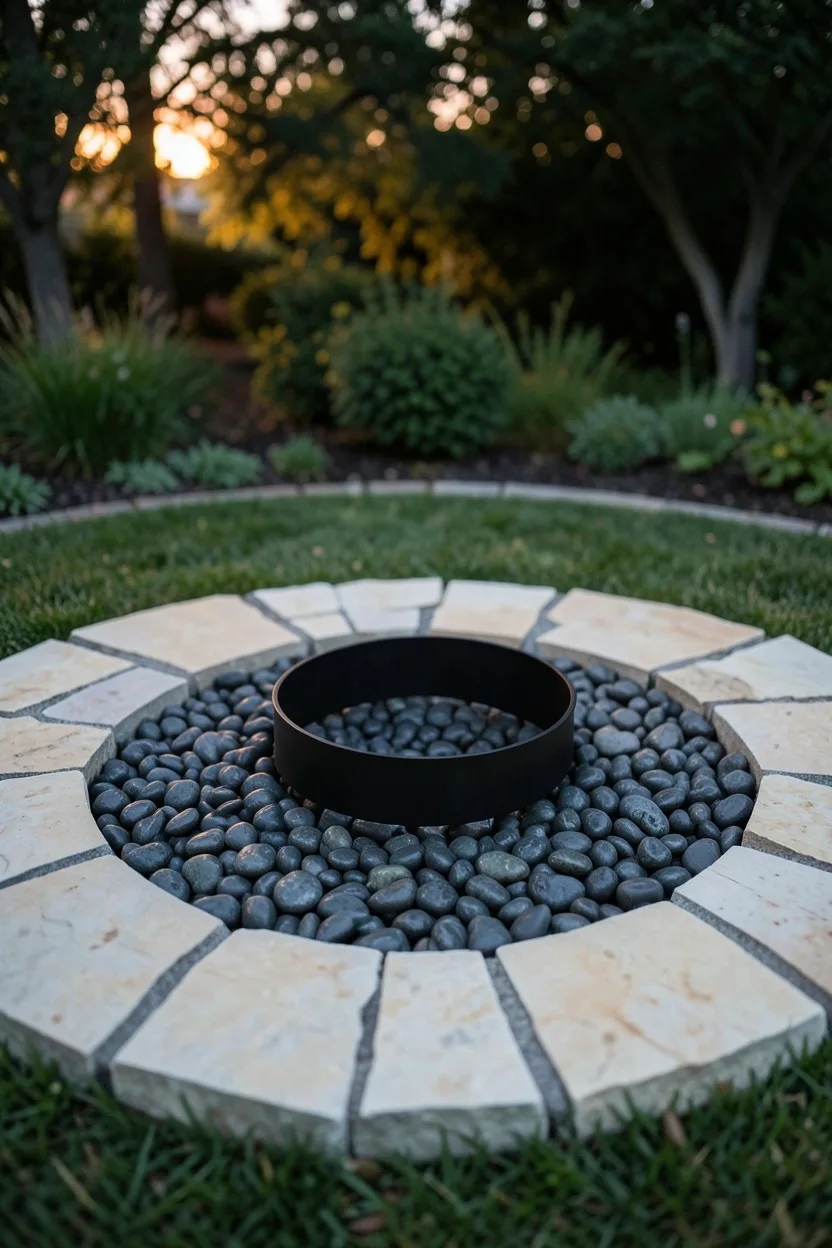
I am completely obsessed with creating dedicated destination zones in a yard rather than one massive sheet of boring concrete. Pick a corner of your property, lay down a steel fire ring, and arrange irregular pieces of natural slate or flagstone in a sweeping circle around it.
Do not sweat making the stones fit together perfectly like a puzzle. Instead, leave three-to-four-inch gaps between the irregular flagstone pieces and pour in half-inch Mexican beach pebbles or dark river rock. The dark stone emphasizes the light color of the flagstone, making your DIY fire pit look like an artisan installation.
6. Diamond Pattern Pavers and Elfin Thyme
Turning your design layout 45 degrees changes everything. Instead of tracking parallel with your house, lay your square pavers on a diagonal diamond axis. This optical trick makes tiny backyard spaces near townhouse patios feel twice as wide as they actually are.
For this layout, use Thymus praecox 'Elfin'. This specific variety grows slower and tighter than standard creeping thyme, topping out at a mere quarter-inch in height. It will not overtake your stones, ensuring your crisp diamond lines stay visible throughout the heavy summer gardening season.
🌱 GROWING TIP
Establish the Living Borders Early
Water your thyme plugs daily for the first three weeks after planting between pavers. Once their root systems touch beneath the stone, they become completely drought-tolerant.
7. Deconstructed Runways with Black Basalt Crushed Stone
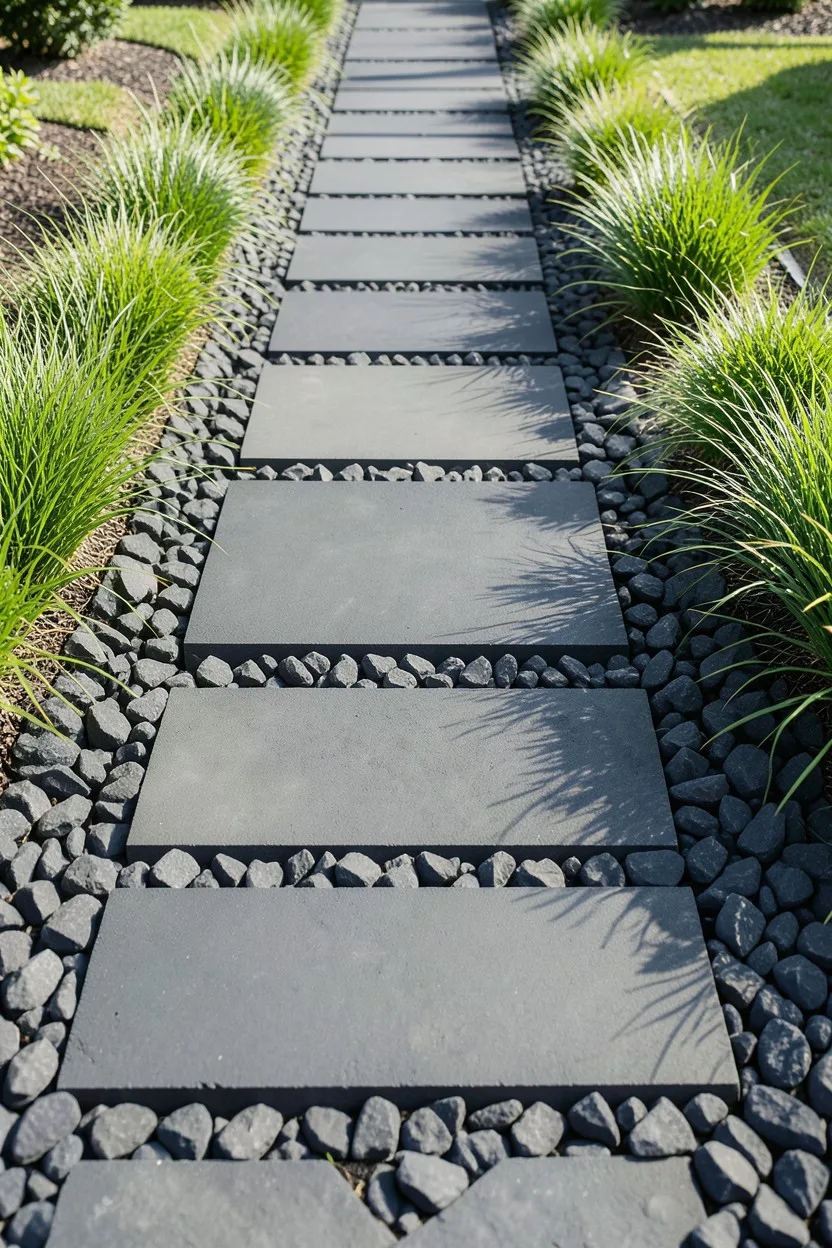
If your style leans modern or minimalist, ditch the traditional square patio completely. Buy large 12-inch by 24-inch charcoal concrete slabs and lay them end-to-end to create distinct paths or floating rectangle platforms that lead right up to your greenhouse door.
Surround these dark slabs with high-contrast, angular black basalt crushed stone rather than rounded pebbles. The angular rocks lock together when stepped on, meaning they will not shift or spill into your clean lawn borders when you roll a heavy wheelbarrow over them.
8. Reclaimed Brick Mosaic with Sand-Set Guts
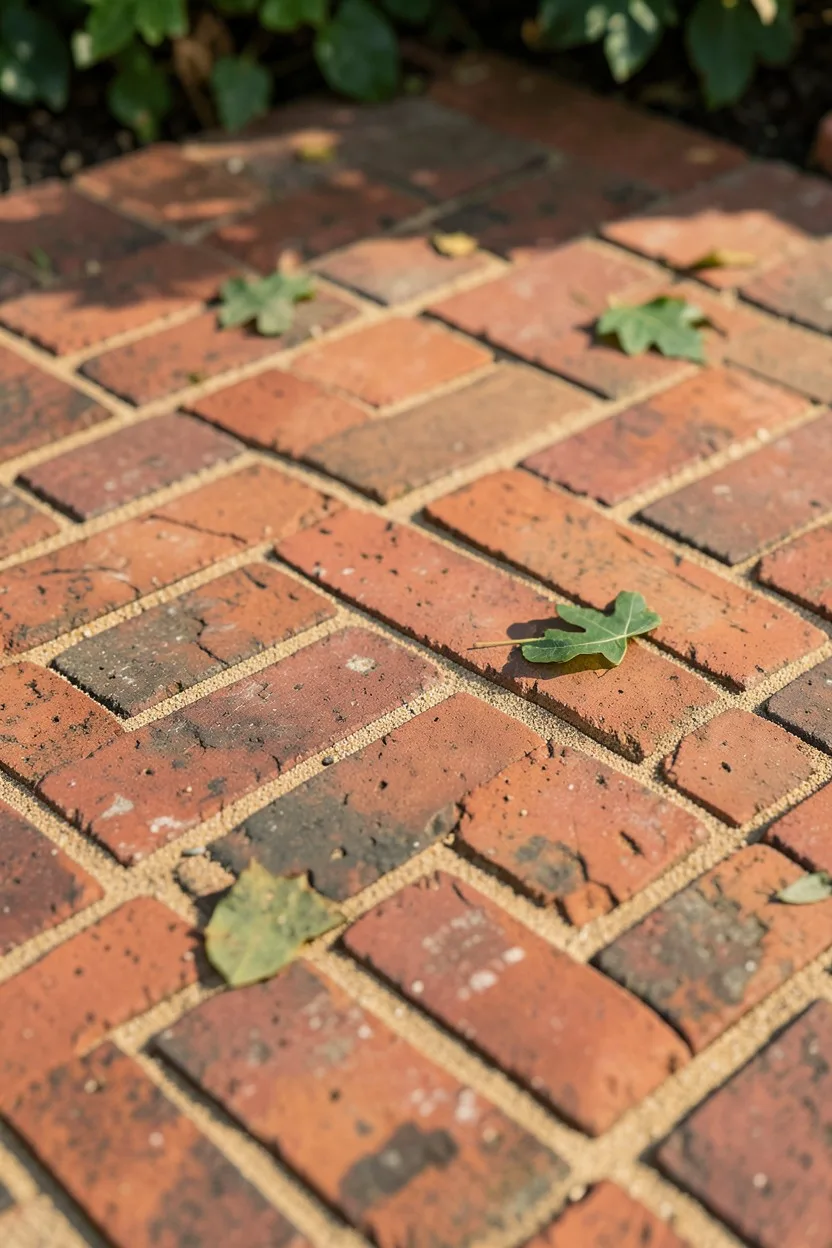
Here is a hard truth about budget projects: new, manufactured bricks often look cheap and clinical. Instead, scan online local classifieds for old chimneys or patios being torn down. You can often score hundreds of antique, weathered bricks for absolute pennies or even completely free.
Character: Every brick features unique mineral swirls and chips.
Flexibility: Lay them in a tight spiral pattern or traditional basketweave.
Permeability: Setting them over fine leveling sand allows rain to soak straight down.
Lock the whole mosaic together by sweeping polymer joint sand across the surface and misting it with a garden hose to activate the binding glues.
9. Cobblestone Courtyard for Shady Under-Tree Seating
Trying to grow a lush lawn under a mature oak or maple tree is a recipe for heartbreak and wasted seed money. The deep shade and aggressive tree roots steal all the moisture. Stop fighting nature and install a small cobblestone courtyard instead.
Select tumbled concrete cobblestones, which mimic vintage European squares. Because these stones are smaller (usually 6-by-6 inches), you can easily snake the patio boundary around protruding tree surface roots without cutting or damaging the tree's health. Fill the outer edges with shade-loving sweet woodruff to complete the look.
🛠️ How to Build a Stable Base in One Afternoon
Excavate the Site
Dig out your chosen footprint exactly four inches deep and rake the soil flat.
Tamp the Dirt
Use a heavy steel hand tamp to compress the raw earth until it feels rock solid.
Lay Fabric and Gravel
Roll out woven weed barrier fabric and add a two-inch layer of crushed gravel.
Add Leveling Sand
Screed a one-inch layer of coarse paver sand smoothly using a straight 2×4 board.
Set Stones and Lock
Place your concrete pavers firmly on the sand and sweep joint sand into all gaps.
10. Interlocking Deck Tiles over Simple Pea Stone
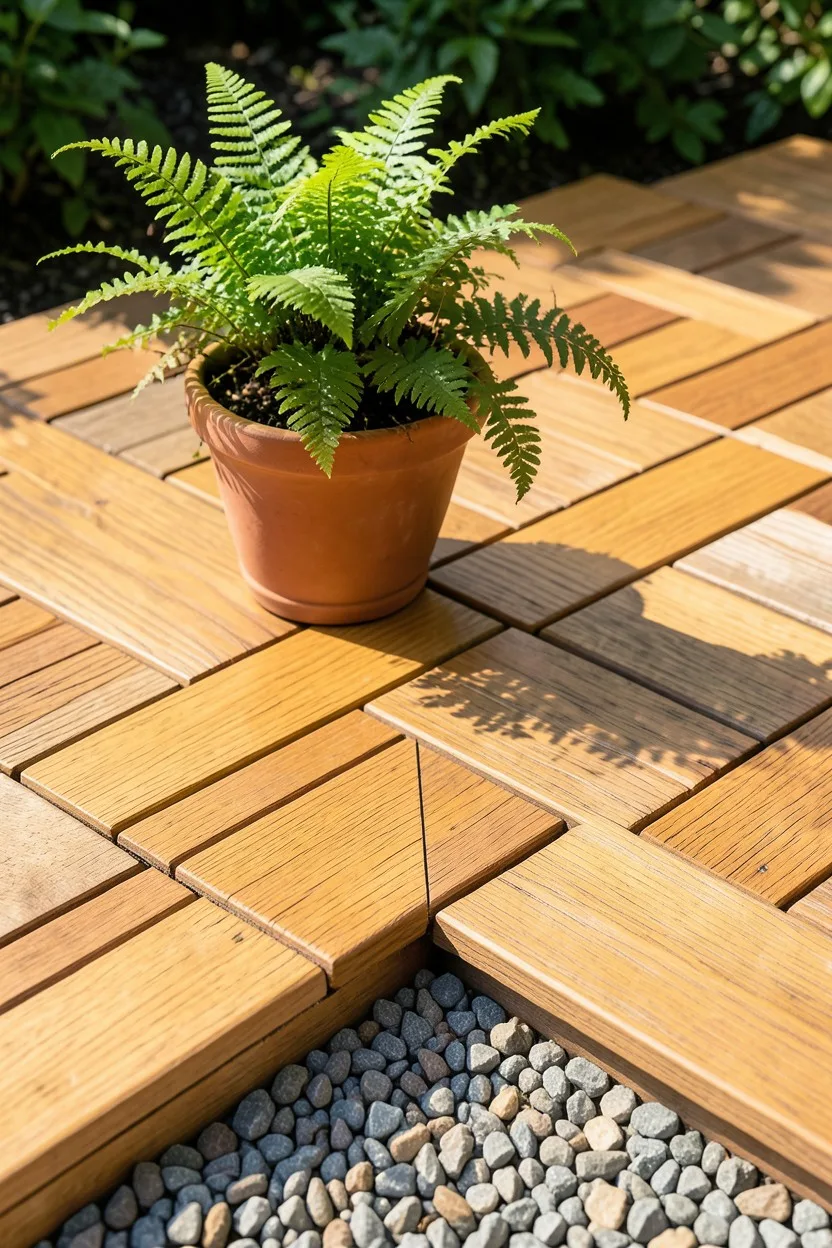
I used to assume that building a wooden patio space required digging deep post holes, pouring heavy concrete footings, and dealing with expensive permits. You can cheat that entire process by utilizing weather-resistant cedar interlocking deck tiles.
Prep your ground exactly like a paver patio with a compacted dirt base and a thin layer of pea stone. Snap the 12-inch square wood tiles directly together right on top of the level stone. This method gives you the warm, high-end look of a custom timber deck without touching a single power miter saw or structural screw.
11. Flagstone and Sedum Living Mosaic
If you want your backyard to feel like a timeless English cottage garden, stop buying perfectly square manufactured stones. Collect irregular pieces of fieldstone or quarry flagstone. Lay them down loosely, ensuring the surface planes align perfectly so nobody trips over an edge.
Instead of moss or herbs, fill the wide gaps with low-growing stonecrop sedum varieties like Sedum acre (Golden Carpet) or Sedum album. These succulents store water in their fleshy leaves, meaning they can survive blistering hot summer sun radiating off the surrounding rocks without ever scorching or turning brown.
💡 PRO TIP
Propagate Sedum for Free
You do not need to buy dozens of sedum pots. Buy three or four, chop them into small single-inch stem pieces, and press them directly into the dirt gaps. They root and spread effortlessly within weeks.
12. Pre-Cast Concrete Hexagons with white Quartz Sand
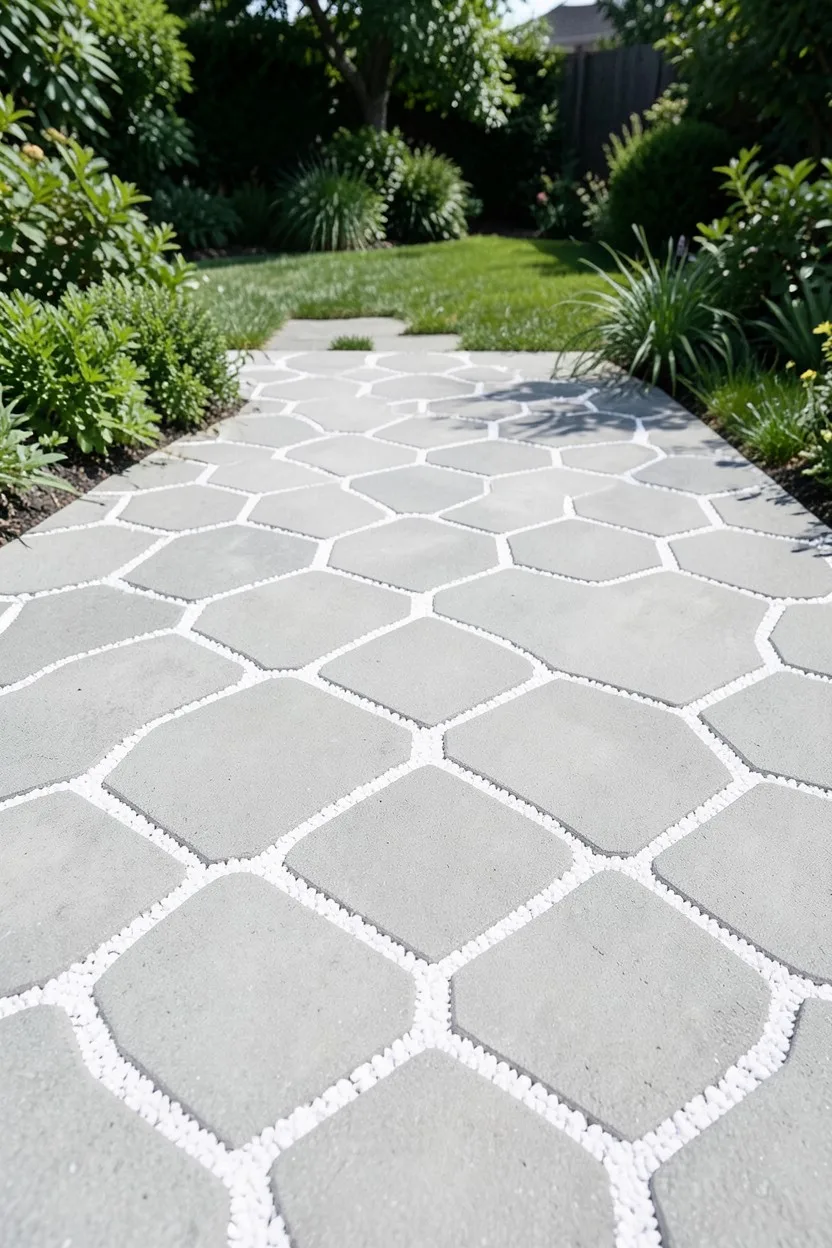
Geometric shapes are having a massive moment in landscape design, but natural hexagonal stone is brutally expensive. You can steal this high-end editorial look by purchasing pre-cast concrete hexagon pavers, which run about three dollars a piece at commercial masonry yards.
Lay them out in a tight honeycomb cluster, but leave the outer edges ragged and stepped rather than cutting them straight. Fill the joints with bright white quartz sand. The brilliant white lines map out the hexagon shapes perfectly, creating a highly striking patio floor that pairs beautifully with modern black metal patio furniture.
13. Slate Slate Border with Center Grass Plot
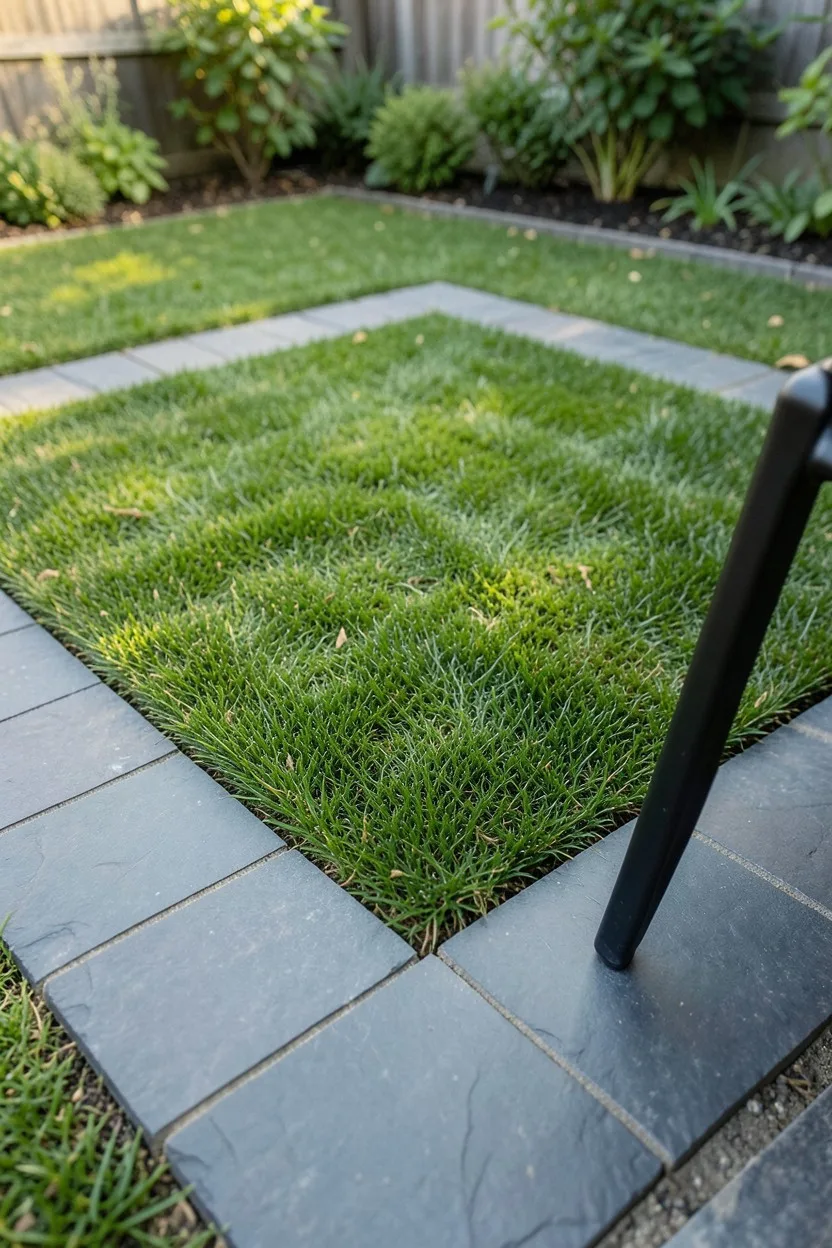
You do not actually need to pave the entire seating area to create a successful patio footprint. Build a wide, two-foot-wide perimeter border using dark, square slate tiles over a standard gravel base. Leave a clean rectangle of open lawn right in the middle of the frame.
Place your outdoor chairs and side tables directly on the stable slate border while keeping your bare feet resting on the cool, lush center grass. This hybrid approach slashes your material costs by more than fifty percent while maximizing the natural green feel of your organic gardening space.
14. Wood-Slice Rounds Imbedded in Fine Granite Dust
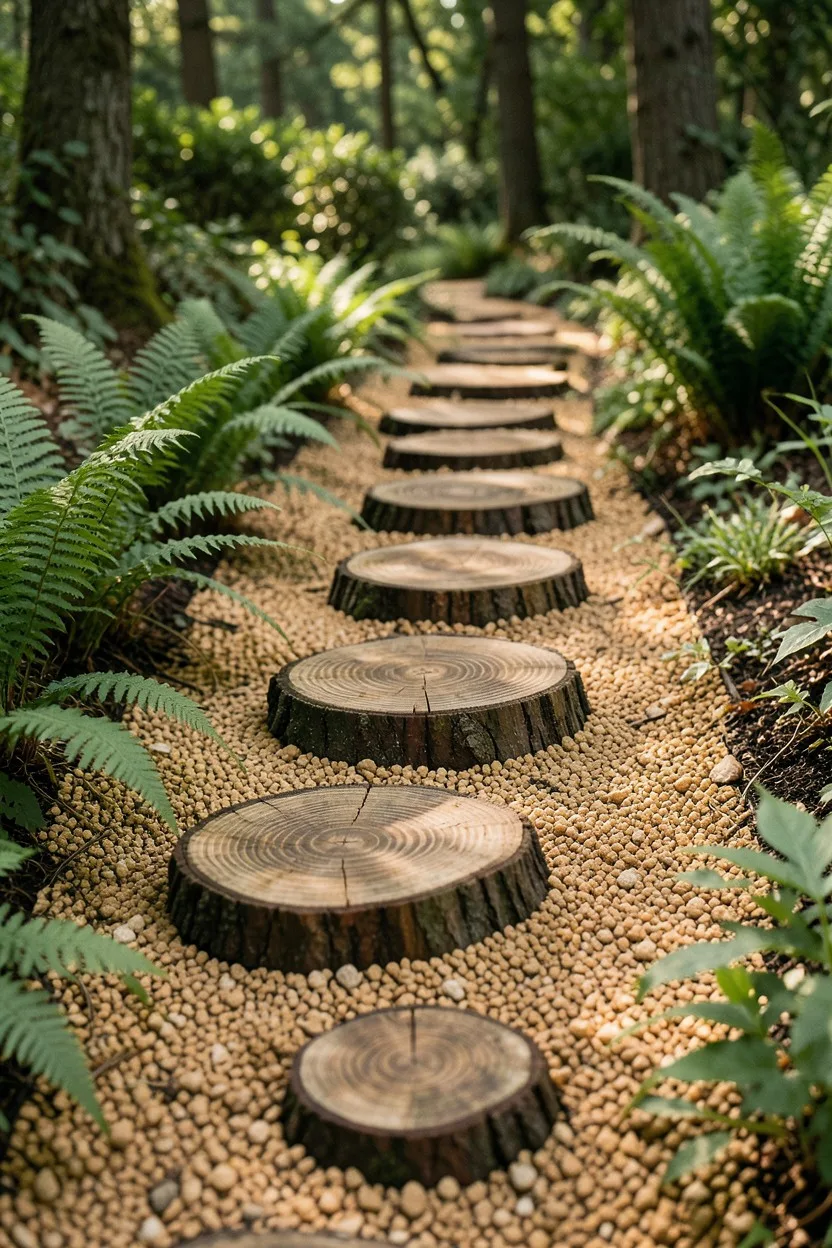
For a deeply rustic or permaculture-focused garden layout, bypass concrete completely in favor of salvaged hardwood logs. Cut seasoned cedar, oak, or black locust logs into uniform four-inch thick rounds using a chainsaw. Treat the bottoms with eco-friendly wood preservative before installation.
Set these organic wooden rounds directly into a packed base of fine decomposed granite or crushed stone dust. Pack the stone dust tightly around the logs to prevent shifting. Over time, the wood weathered to a beautiful silver-gray patina that looks completely integrated into a shaded forest garden landscape.
15. Mixed Media Pavers and Polished River Pebble Ribbon
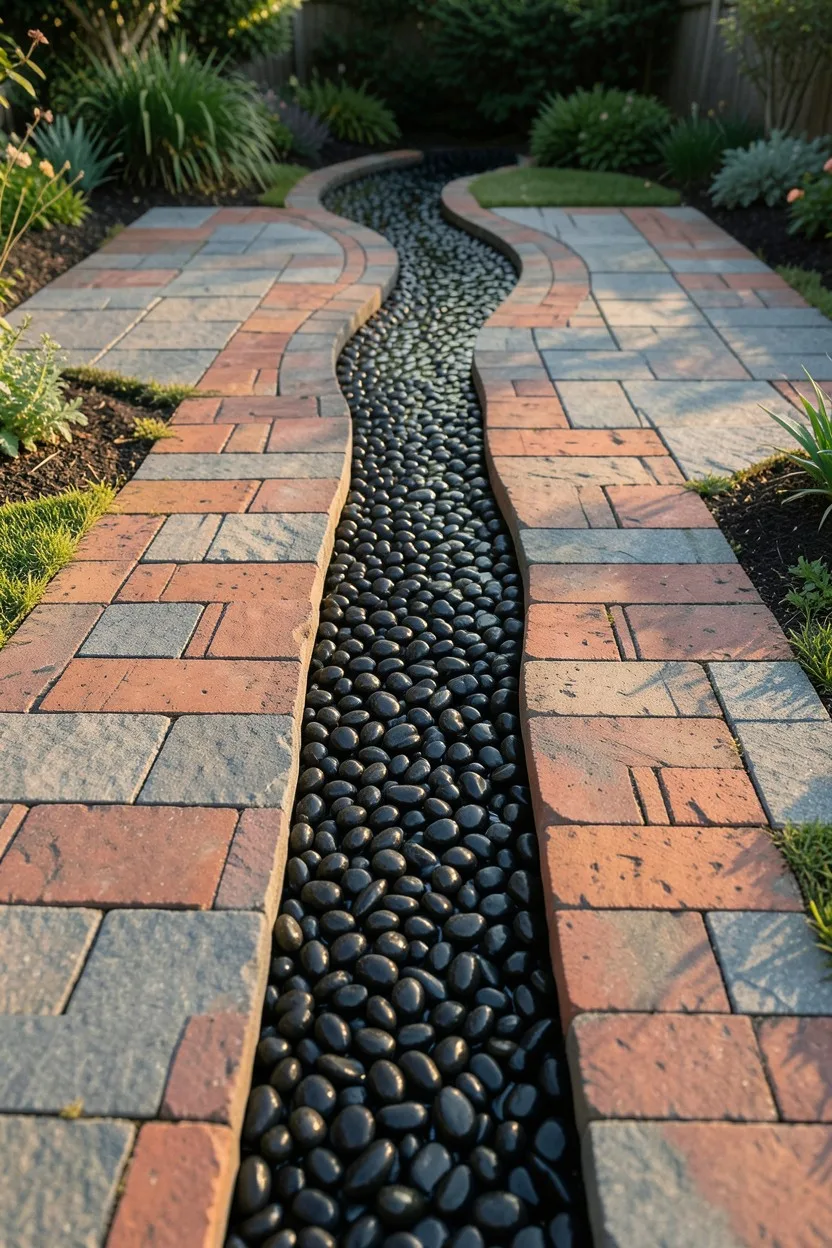
When you are working with a tight budget, you often end up with mismatched leftover stones from previous backyard landscaping tasks. Embrace that variation intentionally by creating a stunning mixed-media mosaic patio layout.
Combine square stepping stones, rectangular concrete blocks, and antique bricks into an asymmetric layout. Tie the disparate elements together by cutting a sinuous, curving ribbon channel right through the center of the patio space. Fill that dedicated channel with highly polished black river pebbles to make the entire design look like a deliberate piece of modern landscape art.
Choosing Your Joint Filler Material
Living Groundcovers
- Smells incredible when stepped on
- Naturally suppresses weed seeds
- Locks stones together with roots
- Absorbs rainfall instantly
Crushed Pea Gravel
- Zero watering required
- Provides instant stable drainage
- Cheap to buy in bulk quantity
- Can shift under heavy furniture
Frequently Asked Questions
Will these budget patios shift during winter freezes?
They will only shift if you skimp on the base compaction. If you dig down four inches, use proper woven landscape fabric, and tamp your gravel base thoroughly, your stones will remain flat and stable through intense freeze-and-thaw cycles.
How do I prevent weeds from growing between my stepping stones?
The best defense is a strong offense. Plant dense living groundcovers like creeping thyme or Irish moss immediately. These beneficial plants outcompete weed seeds for light and nutrients, eliminating the need for toxic chemical sprays.
Can I lay concrete pavers directly onto bare garden soil?
Never do this. The soil will compress unevenly during rainstorms, causing your patio stones to tilt, sink, and crack within a few weeks. Always utilize a thin sand or gravel leveling bed.
Where is the cheapest place to buy natural flagstone?
Skip the commercial retail nurseries and call local stone quarries or bulk landscape supply yards directly. Ask for their 'pallet ends' or broken scrap piles, which they often sell at a massive discount.
Final Thoughts
If you only add one design from this list to your property this weekend, make it the classic square stepping stones paired with creeping thyme. It requires zero precision cutting, costs less than two hundred dollars for a massive footprint, and the aromatic payoff every time you walk out to harvest tomatoes is unmatched. Stop overthinking the construction process, grab a flat spade, and start mapping out your layout grid today.

John Smith is the founder and CEO of Karaoke Machines Guru. He is a karaoke tutor and karaoke enthusiast and has been passionate about karaoke since he was a child. He also writes about karaoke-related tips, guides, and product reviews on this website.
He overlooks the whole website and makes sure that everything is running smoothly. Learn more!