
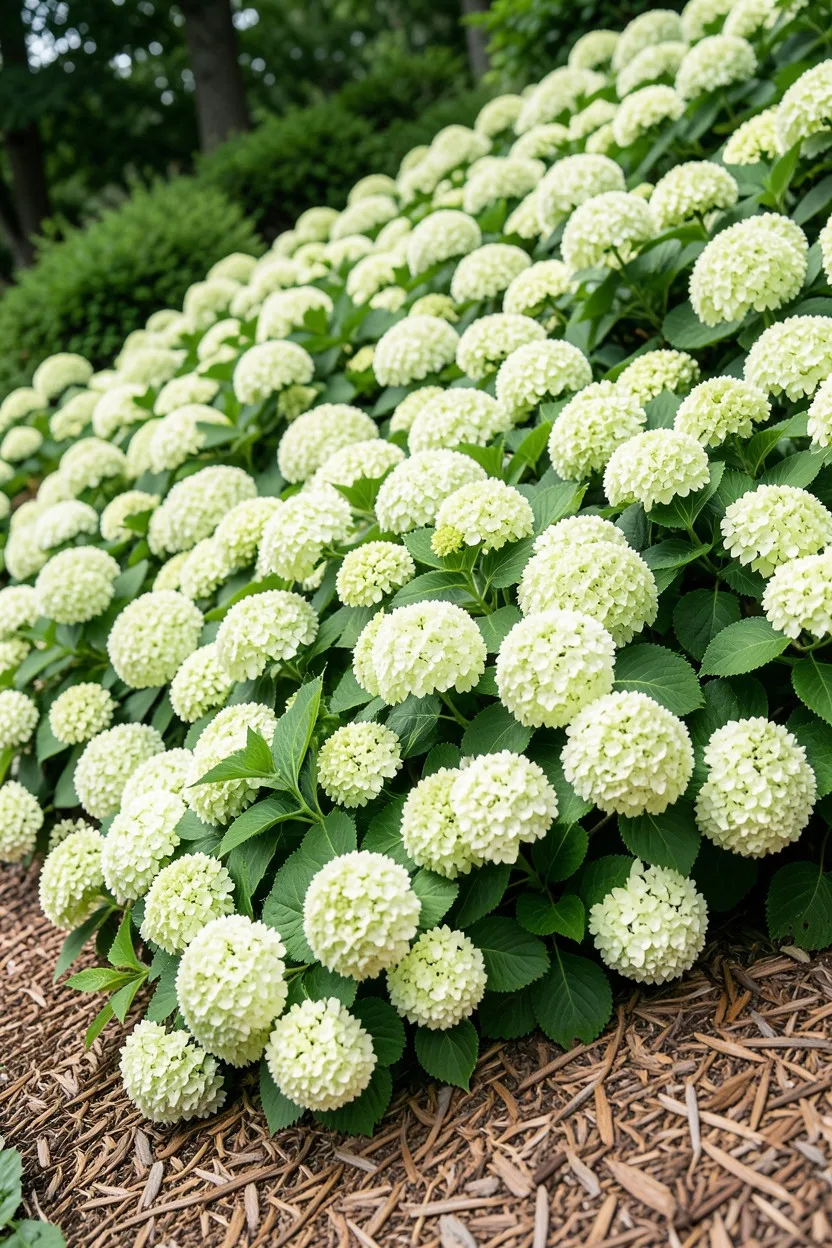
Everyone tells you to plant Limelight hydrangeas because they are tough, and honestly, that advice is completely right. But most people miss what makes Hydrangea paniculata 'Limelight' a true workhorse: its massive, color-shifting flower cones open a crisp celadon green in July, fade to a bright cream in August, and finish a rich, antique pink by October. After growing these in tight urban courtyard spaces and sprawling suburban borders, I have learned that the key to avoiding a messy, flopping bush is all about structural placement and brutal pruning.
You do not need a massive estate to utilize these stunning shrubs, but you do need a concrete design plan. If you plant them too close to a walkway, their massive 6-foot mature spread will swallow your path by year three. This guide delivers 15 specific layout strategies, exact spacing measurements, and companion plant pairings to integrate Limelights into your existing landscape style without creating a crowded maintenance nightmare.
Quick Tips Before You Start
Sun Requirements
Give them 6 hours of direct sun for the strongest stems and brightest green blooms.
Pruning Window
Cut the canes back by one-third in late winter before new growth emerges.
Mature Spacing
Space center-to-center at 5 feet for a hedge, or 8 feet for standalone specimens.
Watering Protocol
Soak the root zone deeply twice a week rather than giving light daily sprinkles.
1. The Living Privacy Screen Privacy Border
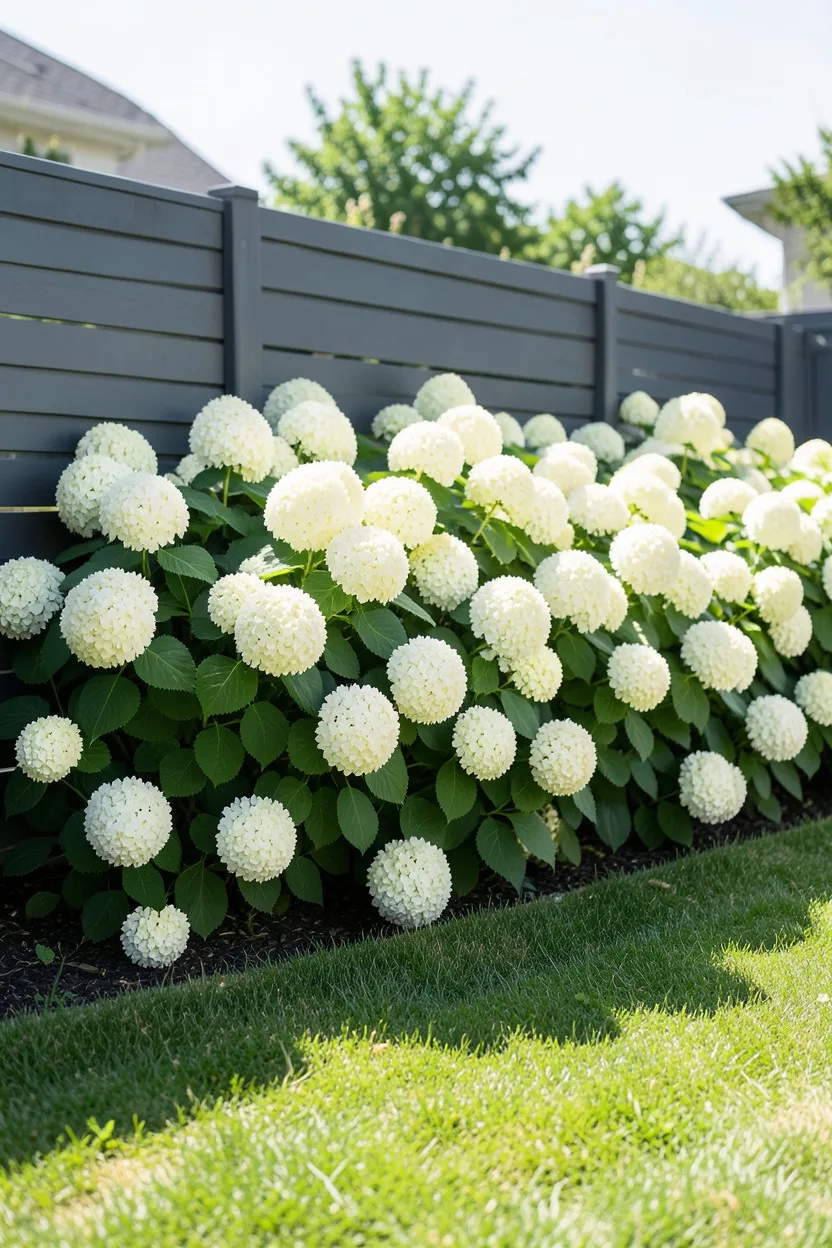
Stop installing boring, high-maintenance arborvitae lines that turn brown and die from the inside out. Use a linear row of Limelight hydrangeas to block out your neighbors instead. To create a dense green wall that smothers views from July through November, buy five-gallon containers and plant them exactly 4.5 feet apart from the center of one root ball to the next.
This tight spacing forces the branches to interlock within two seasons, creating a solid boundary wall. Dig a continuous trench 2 feet wide and 18 inches deep rather than individual holes. Backfill the native soil with a 30 percent mix of aged pine bark mini-nuggets to ensure the drainage is fast enough to prevent root rot during rainy spring weeks.
Leave a clear 4-foot buffer zone between the hedge row and your property line fence. You will need this physical space to walk behind the shrubs with your pruning shears every March without scraping against the wood paneling.
The Privacy Hedge — At a Glance
📏 Spacing Center-to-Center
4.5 Feet
🪵 Soil Amendment
Pine Bark Nuggets
🪓 Pruning Height
Cut down to 3 feet
⏱️ Time to Maturity
2–3 Seasons
Superpower
Blocks eye-level views completely from mid-summer until heavy winter snow breaks the dried cone structure.
2. Symmetrical Front Entry Porch Anchors
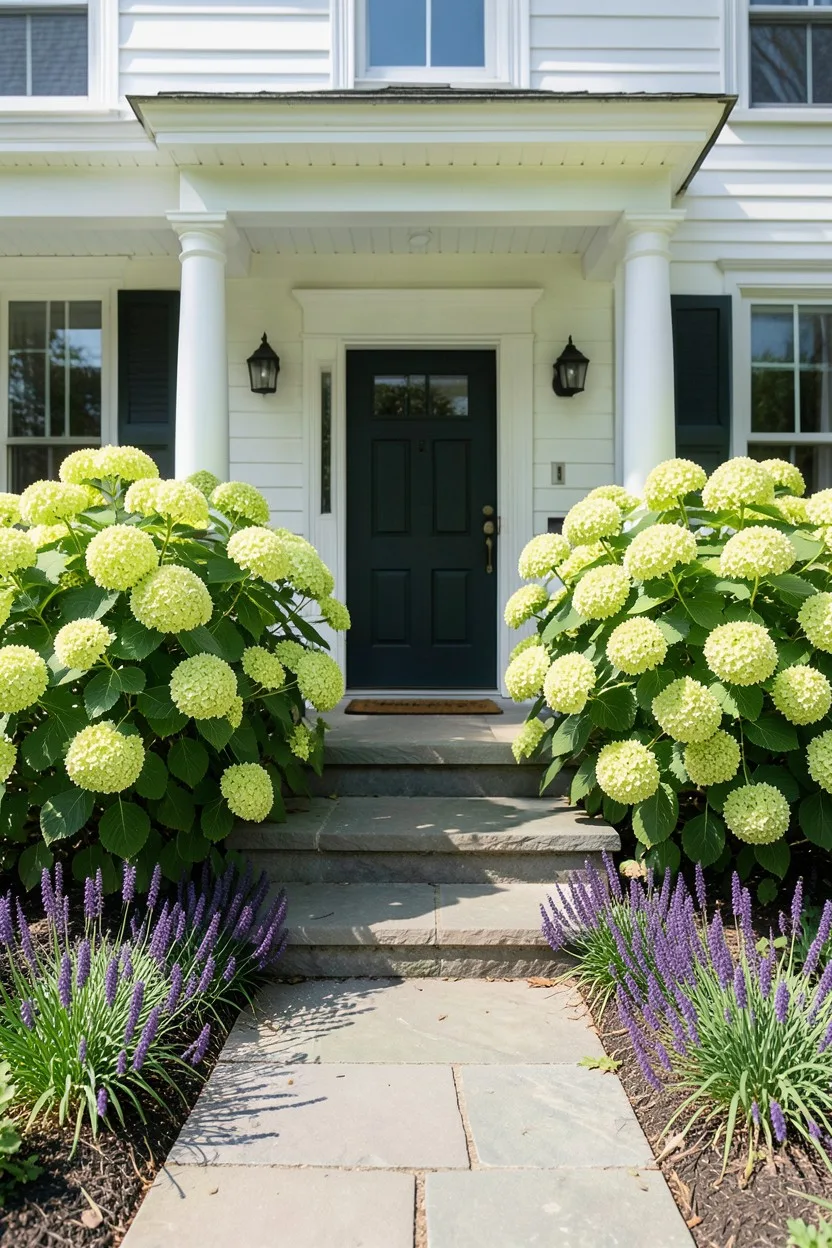
Flanking your front door with traditional evergreens often looks stiff and sterile. Instead, use the soft, billowing texture of Limelights to frame your entryway. Plant one individual shrub exactly 5 feet away from each side of your front porch steps to allow the heavy branches to curve naturally toward the walkway without blocking the handrails.
Underplant these anchors with a thick carpet of deep purple coral bells like Heuchera 'Palace Purple'. The dark, moody foliage of the coral bells creates an immediate visual anchor at the base of the hydrangea, preventing the shrub from looking leggy or bare around its bottom 18 inches during early June.
If your front entry faces north, skip this idea. Panicle hydrangeas require at least five hours of direct sun to support the weight of their massive flower cones. Without it, the stems grow weak, thin, and floppy, sending the heavy flower heads straight into the dirt after the first heavy August rain.
⚠️ COMMON MISTAKE
Do Not Plant Too Close to Foundations
Never plant a Limelight closer than 4 feet to a concrete foundation. Foundation soil stays alkaline and dries out instantly, starving the roots of the moisture required to pump up those huge flower panicles.
3. Layered Backyard Corner Foundation Grouping

Empty, gaping corners where two backyard fence lines or foundation walls meet can make a yard feel harsh and unfinished. Build a three-tier plant matrix to soften the right angle. Position a single Limelight directly in the deepest point of the corner, keeping its trunk 5 feet away from both surfaces.
In front of the hydrangea, plant three Karl Foerster feather reed grasses in a loose crescent shape. The vertical, straw-colored spike texture of the ornamental grass pierces straight up through the horizontal cloud of hydrangea leaves, creating an immediate architectural contrast.
Finish the front boundary of the corner bed with a low border of Walker's Low catmint. The catmint spills over the grass edge with dusty purple flowers that bloom continuously from May until frost, filling the space with color long before the Limelight opens its first green buds in mid-summer.
4. Single Specimen Patio Accent Tree
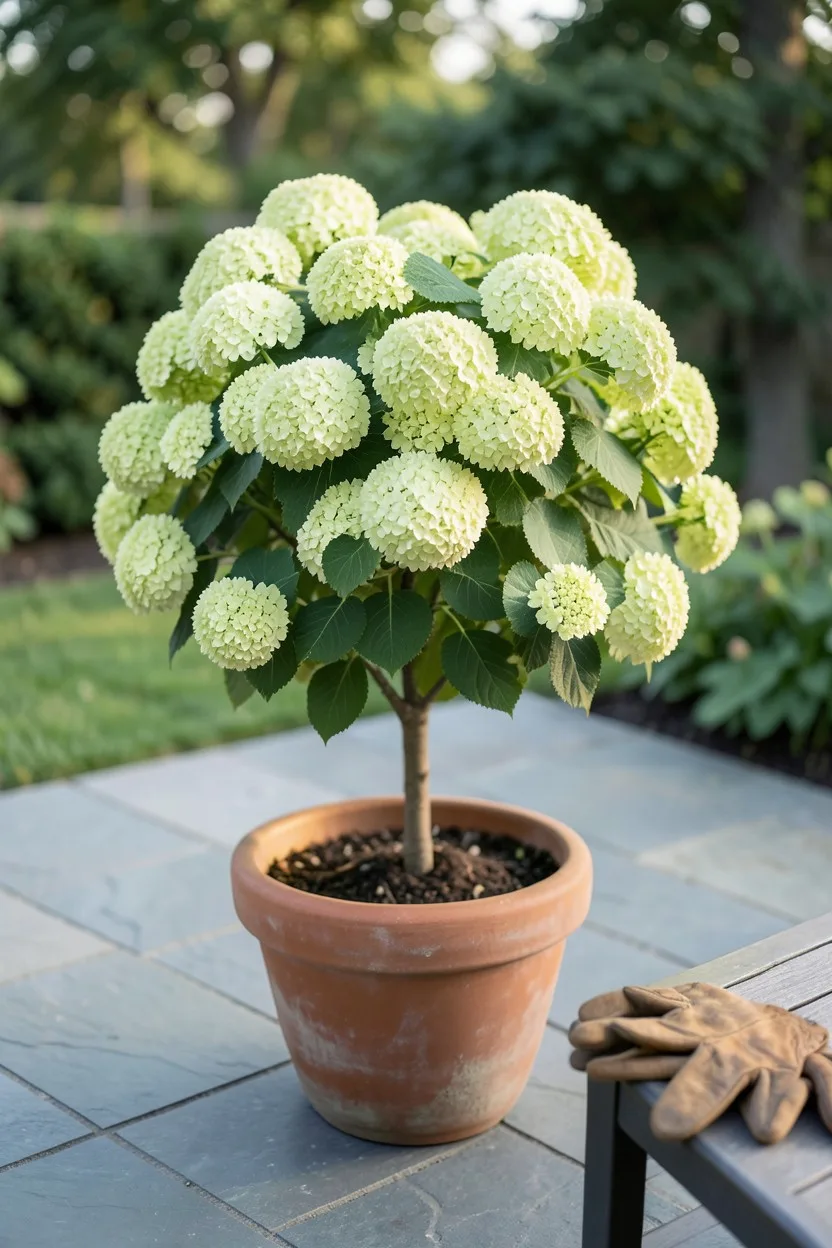
You do not need a massive yard to enjoy this plant if you buy the trained tree form, often called a Limelight standard. This is a hydrangea grafted onto a single, sturdy central trunk. It gives you all the massive flower power of the shrub but keeps its footprint restricted to a tight 3-foot circle on the ground.
Plant a trained standard standard directly into a structural cutout in your flagstone patio, or sink it into a large 24-inch unglazed terracotta pot. If you choose a pot, mix two parts high-quality potting soil with one part coarse perlite to keep the drainage perfect. Wrap the interior of the pot with bubble wrap before adding soil if you live north of Zone 6 to protect the roots from freezing solid.
Prune the canopy of the tree form down to a tight ball every March, cutting back each branch to leave just two growth buds on each stem. This heavy maintenance trick keeps the top head compact, dense, and packed with oversized blooms right at eye level.
Best For Tree Form
5. Woodland Edge Transition Border Design
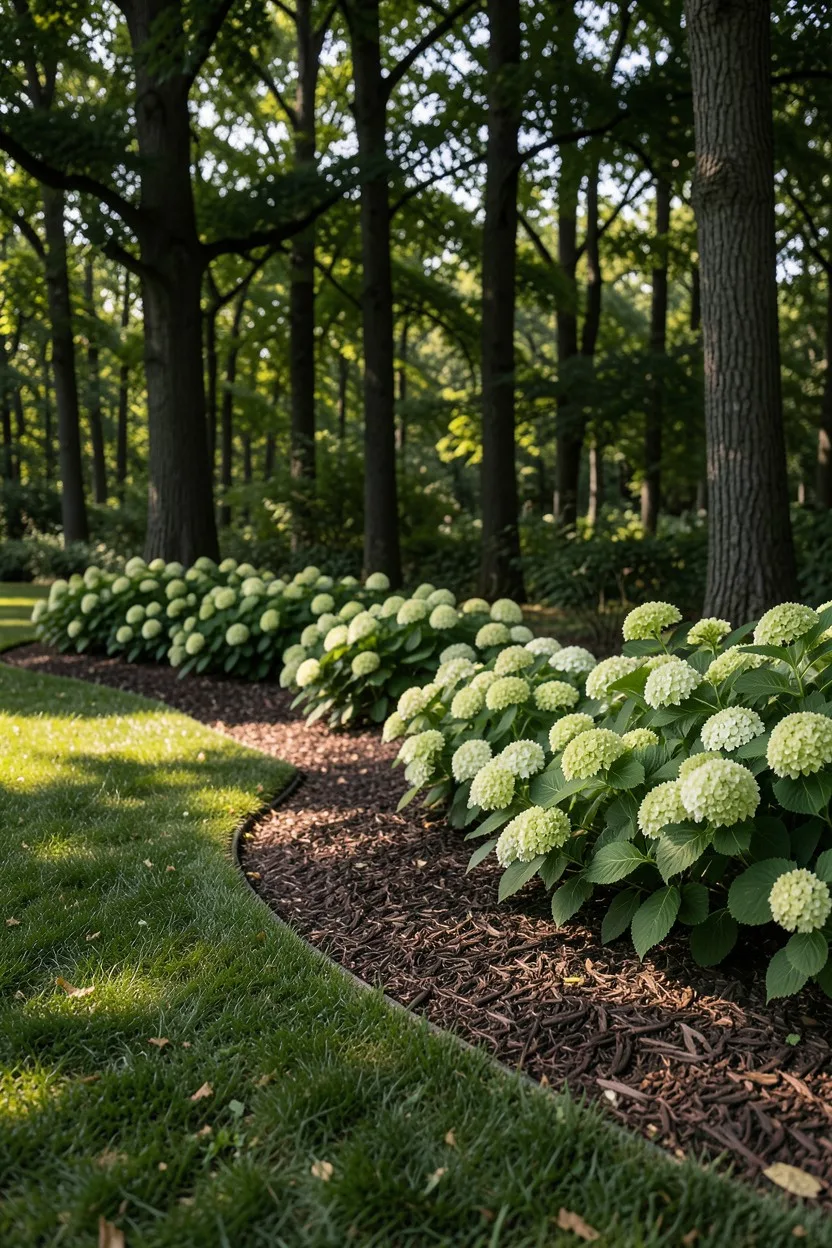
If your property backs up to a natural wooded lot or a line of mature native trees, the transition line can often look messy and weed-choked. Plant Limelights along this perimeter to bridge the gap between manicured lawn and wild woods. The bright chartreuse summer blooms act as a visual spotlight against the dark, moody green background of forest trees.
Space the shrubs 6 feet apart in a loose, meandering zigzag pattern rather than a stiff straight line. This mimics the natural flow of a forest floor. Mix in groupings of native Oakleaf hydrangeas and highbush blueberries nearby to enrich the native ecosystem.
Mulch the entire transition bed with a thick 4-inch layer of shredded hardwood mulch or clean leaf mold. This mimics the forest floor, retains critical summer moisture, and keeps aggressive woodland weeds like wild ivy and brambles from choking out your young hydrangea root systems.
6. The Mixed Shrub Perennial Backdrop
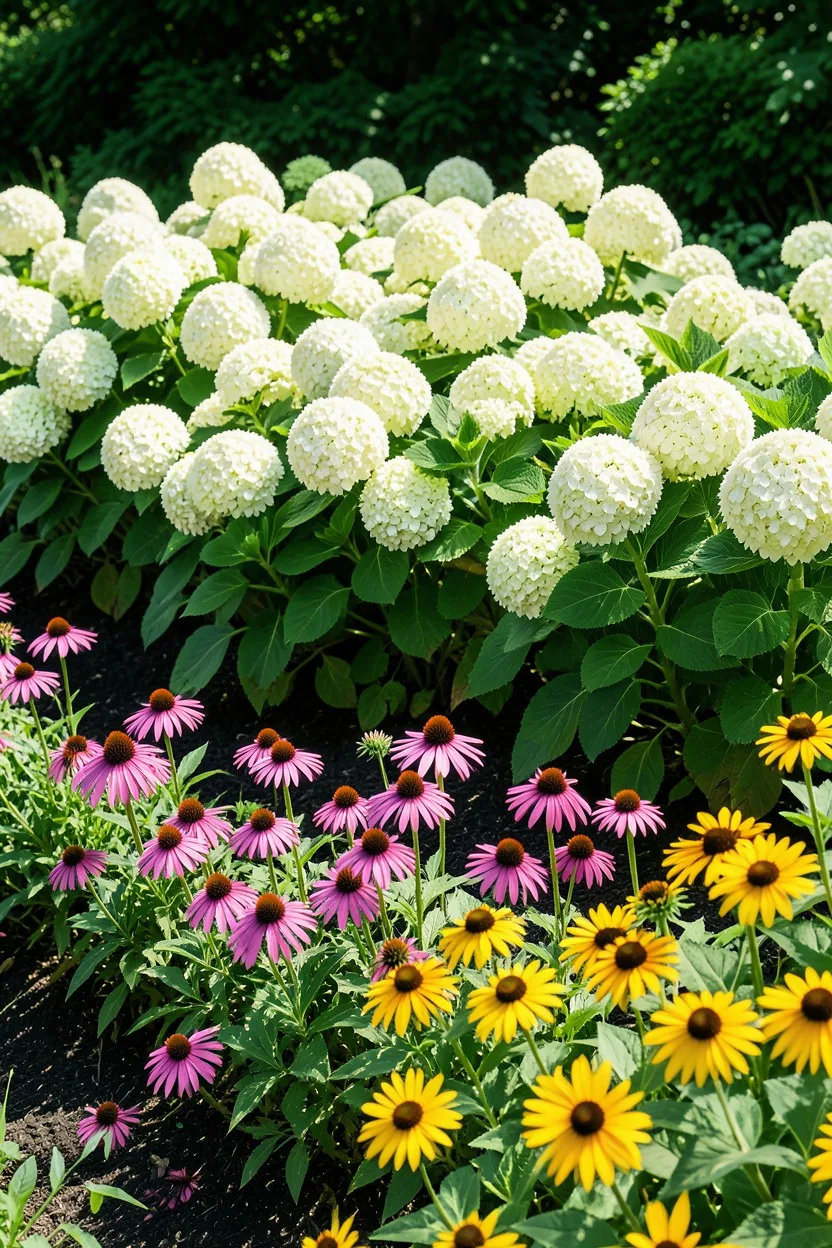
Nobody tells you that using Limelight as a standalone specimen in the middle of a formal garden bed looks awkward in May. It is a slow starter that looks like a bundle of bare sticks while spring perennials are already roaring. Use it as a deep background anchor instead.
Position your hydrangeas at the very back of a 6-foot-deep perennial border. Plant mid-sized sun-lovers like autumn joy sedum, purple coneflower, and black-eyed Susans directly in front of them. By July, the perennials will cover the bare legs of the hydrangea, and the rising white flower cones will create a clean backdrop for the hot pinks and yellows in front.
When planting this matrix, leave 3 feet of open ground between the back of the perennials and the front of the hydrangea base. If you crowd them, the aggressive root system of the Limelight will hog all the soil nutrients, stunting your coneflowers within two seasons.
🌱 GROWING TIP
Feed Once with Holly-Tone
Apply two cups of Espoma Holly-Tone organic fertilizer around the drip line of each shrub in early April. This boosts soil acidity slightly and supplies the slow-release nitrogen needed for massive leaf production.
7. Driveway Property Line Softening Strip

Concrete or asphalt driveways radiating heat all summer create an brutal microclimate for most sensitive garden plants. Limelights possess a heavy tolerance for urban heat, making them an excellent choice to line long parking strips. Plant them along your driveway border to disguise hard blacktop lines.
Install a root barrier fabric along the edge of the driveway if the asphalt is old or cracking. Dig your planting holes 3 feet away from the hard surface edge. This physical buffer protects the roots from absorbing toxic petrochemical runoff from cars while preventing the expanding roots from lifting your paving over time.
Underplant the driveway row with a durable groundcover like creeping phlox or Rozanne geranium. These low-growing plants thrive in the hot sun, cover the bare dirt instantly, and will not mind the occasional tire tracking or car door swing that happens in a tight driveway layout.
8. The White Garden Monochromatic Border
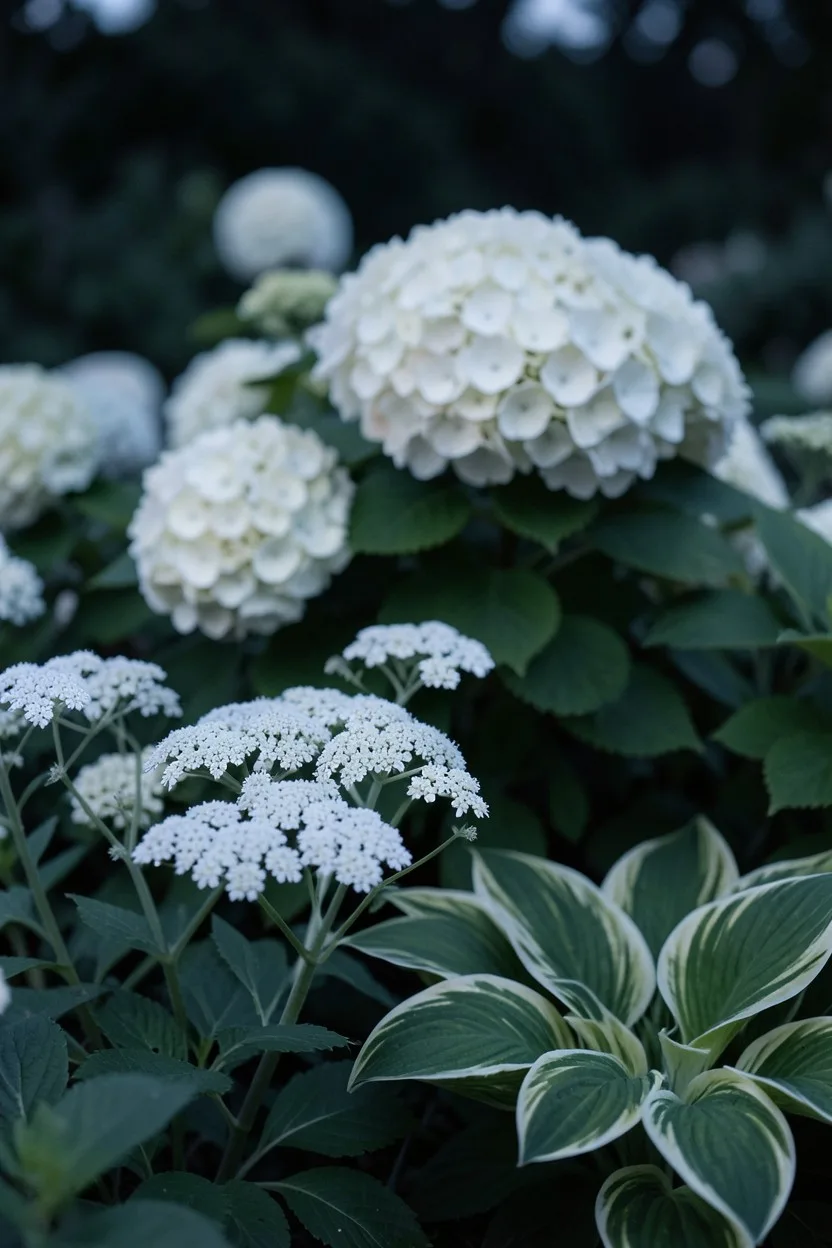
Designing a dedicated moon garden or monochromatic white border requires careful attention to leaf textures, since you cannot rely on varying colors for contrast. Limelight serves as the perfect mid-summer anchor for this style because its massive textured cones break up the monotony of flat blossoms.
Pair the hydrangeas with white-flowering perennials that feature radically different flower structures. Plant spiky white veronica, flat-topped white yarrow, and delicate, airy baby's breath around the base. The contrast between the giant conical hydrangea heads and the delicate surrounding textures keeps the monochrome design from looking flat.
Incorporate a few variegated foliage plants like Patriot hostas or variegated Solomon's seal into the shadow side of the hydrangeas. The bright white-and-green striped leaves catch the evening light, continuing the monochromatic theme even when the hydrangea blossoms pass their peak blooming window.
Monochrome Border — At a Glance
🎨 Color Palette
White, Cream, Silver
🌿 Foliage Contrast
Variegated Hostas
⏱️ Peak Visual Interest
August Evening / Dusk
🌾 Texture Companion
Spiky White Veronica
Insider Secret
The huge flower heads reflect moonlight, making this specific border glow in the dark after the sun sets.
9. The Poolside Tropical Illusion Block
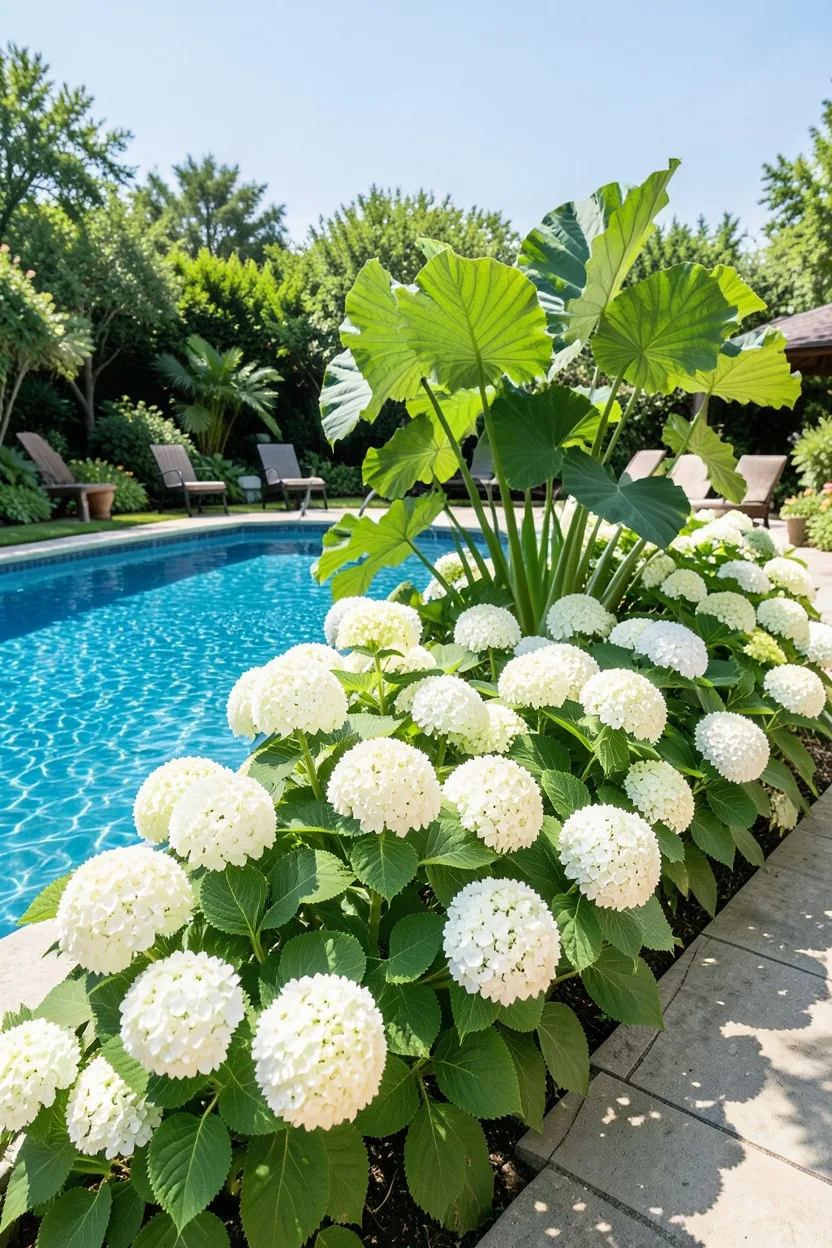
Most northern gardeners want a lush, tropical oasis look around their swimming pools but cannot grow real palms or hibiscus through cold winters. Limelight hydrangeas provide that large-scale leaf density and massive floral display that easily mimics a warm-climate resort vibe.
Set the shrubs 6 feet back from the pool copings to prevent falling leaves or drying flower petals from clogging your skimmer baskets. The sturdy wood structure of panicle hydrangeas handles occasional splashes of chlorinated pool water without dropping leaves or scorching, unlike sensitive annuals.
Surround the poolside hydrangeas with bold-leaf companions like dark green canna lilies and giant elephant ears (Alocasia). The contrast between the massive, smooth, plate-like tropical leaves and the heavily textured, delicate hydrangea blossoms creates a high-summer look that thrives even in northern states.
10. Slope Stabilization and Erosion Planting
Backyard hills and steep slopes are a nightmare to mow and frequently lose their topsoil during heavy spring downpours. Back in my early gardening years, I tried covering a steep bank with turf and it washed away. Mass-planting Limelights completely solves this stabilization problem.
Panicle hydrangeas develop a massive, fibrous web of shallow roots that binds loose soil together effectively. Plant them in a dense grid pattern across the slope, spacing them 5 feet apart in all directions. Use a thick layer of shredded cedar mulch to hold the bare dirt in place while the young plants establish.
Cut the shrubs back hard to 2 feet from the ground every single spring. Keeping the top growth shorter prevents the shrubs from becoming top-heavy on a steep angle, which can cause them to uproot or lean awkwardly after a heavy, saturating rain storm.
💡 PRO TIP
Leave the Dried Winter Blooms
Do not cut off the faded brown flower heads in November. Leave them on the plant all winter long; they catch snow beautifully and provide structure when the rest of the garden is bare.
11. The Formal English Knot Garden Centerpiece
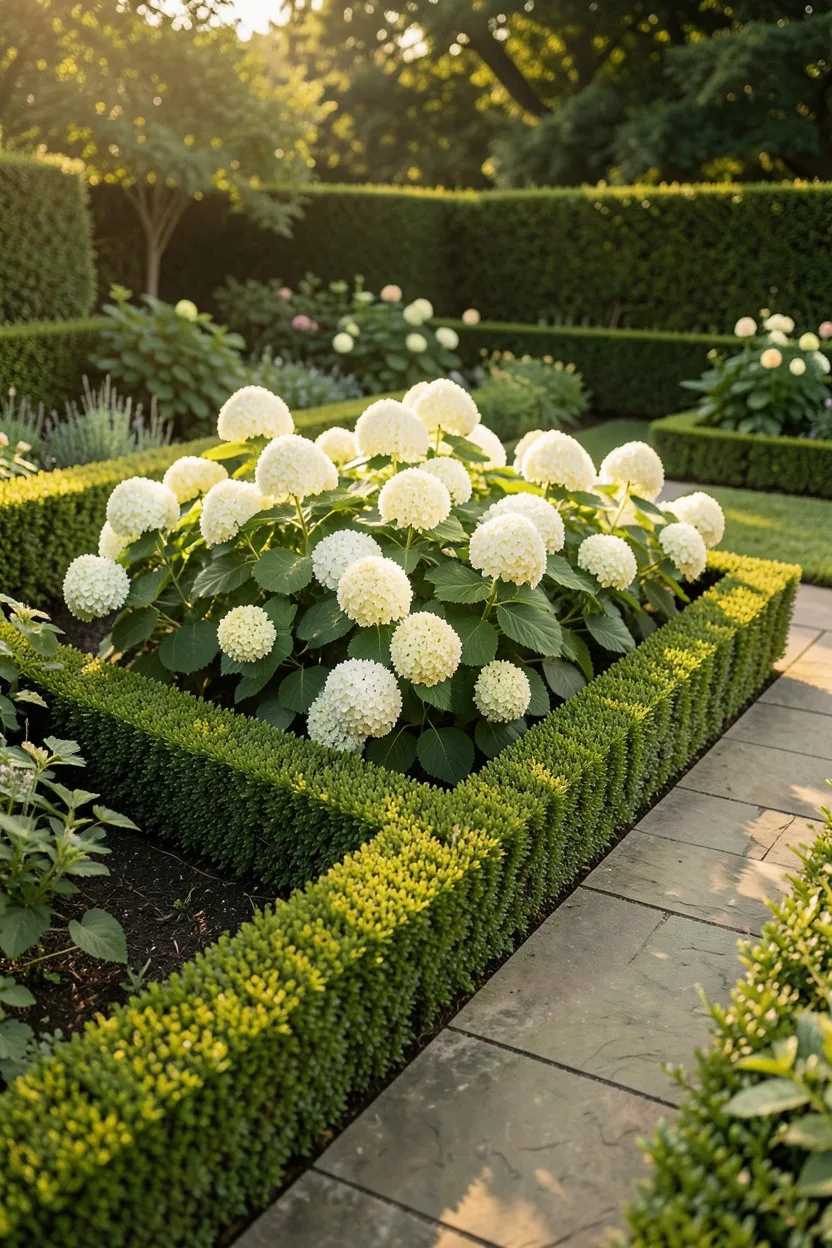
I used to think Limelights only belonged in casual cottage gardens, but I changed my mind after seeing them integrated into a rigid geometric layout. You can use their wild, blooming fullness to soften the stiff lines of a formal landscape design.
Plant a row of Limelights directly inside a low, clipped boxwood hedge framework. The boxwood hedge should be maintained at a strict 18-inch height to create a crisp green frame around the bottom of the hydrangeas. This setup conceals the woody base legs while letting the massive white flower plumes erupt over the top.
Keep the color palette strictly controlled to preserve the formal aesthetic. Mulch with black dyed wood chips or uniform dark slate chips, and banish any chaotic, self-seeding colorful weeds or perennials from the bed to maintain the clean, architectural look.
12. The Rain Garden Low-Spot Moisture Solution

Many homeowners struggle with soggy backyard low spots where water puddles for 24 hours after a heavy rain storm. While French hydrangeas (Macrophylla) rot and die in waterlogged conditions, Limelights are incredibly resilient and can handle temporary wet feet once established.
Position your hydrangeas along the upper inner basin slope of a constructed rain garden bed. Do not plant them in the dead center where water sits deepest; plant them along the shallow side banks where their roots can drink deeply from the pooling moisture without suffocating in mud.
Surround them with moisture-loving native plants like blue flag iris, swamp milkweed, and switchgrass. This specific community of plants absorbs standing water quickly, filtering lawn runoff and turning an ugly mud hole into a functional pollinator haven within a single season.
13. The Deck Screen Under-Lattice Disguise
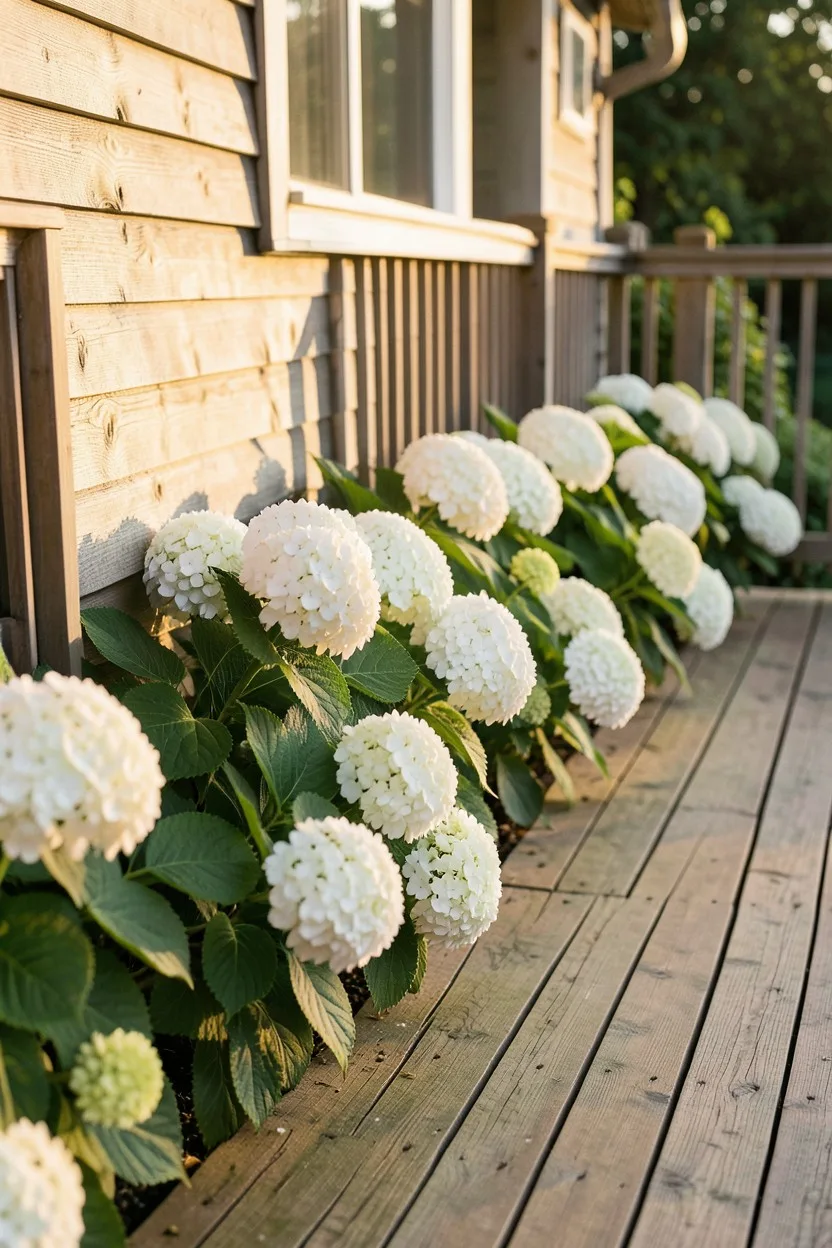
The open space beneath an elevated backyard deck or porch is often an eyesore covered in cheap plastic lattice panels or weeds. Hide that dead space completely by planting a row of Limelights right along the deck perimeter beam.
Ensure the roof line or deck boards do not completely block rainfall from reaching the root zone. Plant the shrubs 3 feet outward from the edge of the deck joists so they catch natural rainfall and direct morning sun, allowing their upper branches to brush against the deck railings.
This placement creates a beautiful view when you are sitting up on the deck, as the giant 12-inch flower heads will peek right through the railing slats at your feet. It transforms an ugly structural foundation into a lush floral platform.
🌱 How to Plant Your Limelight Step-by-Step
Dig the Hole
Excavate a hole twice as wide as the nursery container but exactly the same depth.
Amend the Soil
Mix a shovel of composted pine bark with native soil to improve drainage.
Loosen the Roots
Score the sides of the root ball with a soil knife to break up circling roots.
Set the Plant
Place the shrub so the top of the root ball sits half an inch above ground level.
Water and Mulch
Soak the root zone with 5 gallons of water and apply 3 inches of shredded mulch.
14. The Cutting Garden Cut-Flower Production Row
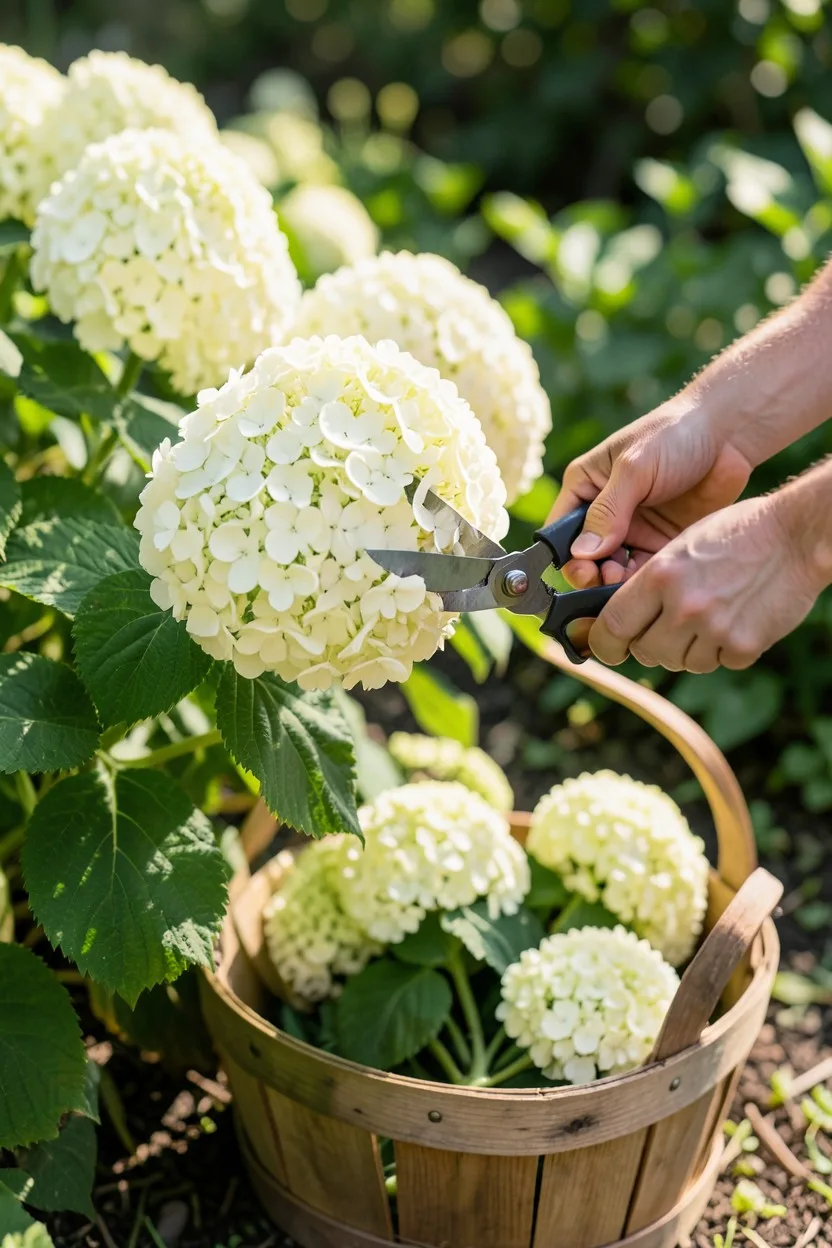
If you love bringing massive floral arrangements into your house, do not sacrifice the look of your display beds. Plant a dedicated production row of Limelights along the edge of your vegetable garden or cutting patch specifically for harvesting stems.
Strip the lower leaves off every stem you cut for an indoor vase. Cut the blooms in late August when they have transitioned from bright green to a sturdy, papery cream-white color. Stems cut too early when they are soft and bright green will wilt within 12 hours of cutting.
Dip the cut stem ends into an inch of boiling water for 30 seconds, or rub a small amount of alum powder onto the cut before placing them into cold vase water. This prevents the sticky sap from clogging the stems, keeping your indoor arrangements fresh for up to two full weeks.
15. Urban Courtyard Compact Space Softener
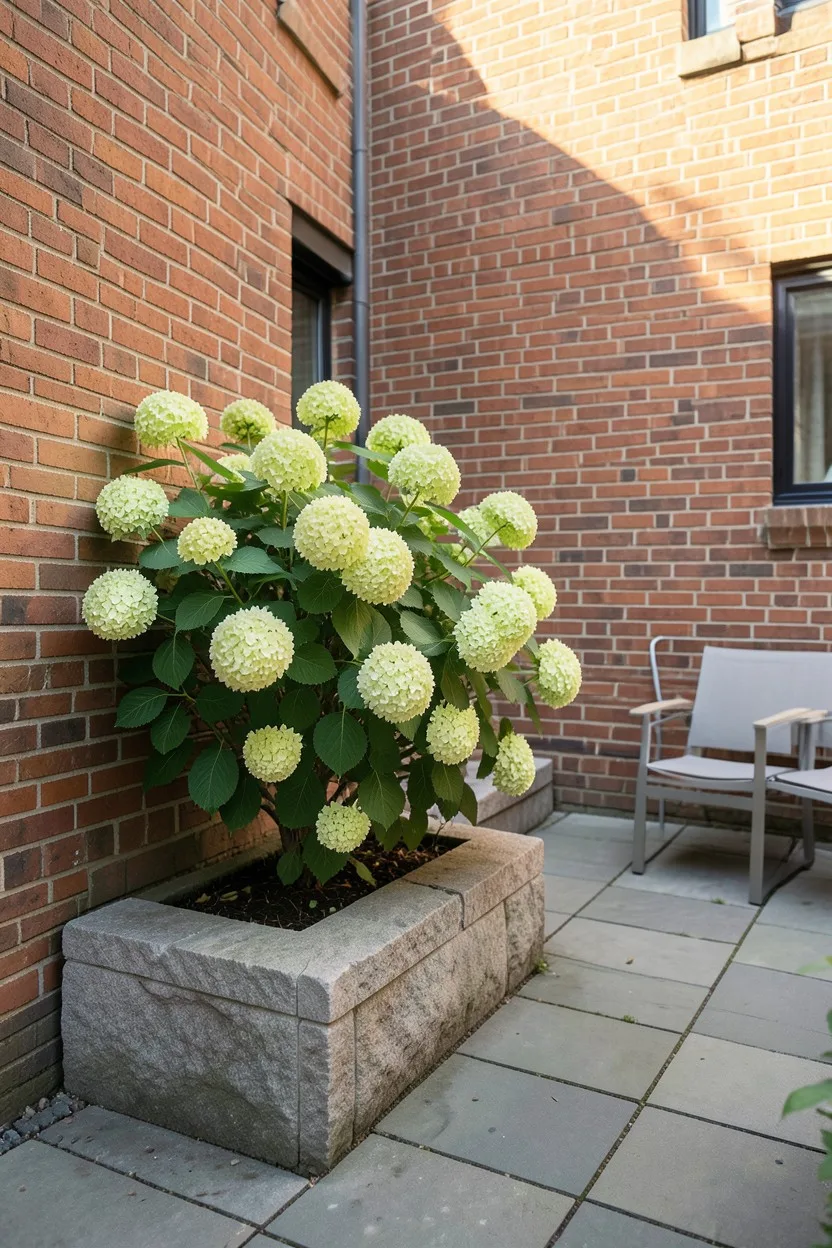
Do not think you cannot grow this plant just because you have a tiny townhome courtyard or urban lot. You can manage a standard Limelight in small spaces if you commit to aggressive, disciplined pruning constraints.
Install a single specimen in a raised brick or stone planter bed that measures at least 3 feet square. The raised masonry protects the root system from foot traffic compaction while elevating the bloom canopy to soften harsh brick walls or privacy fences.
Prune the shrub down to a skeletal frame of just 5 main structural branches every single winter, cutting all side shoots back to a single bud. This annual structural reset keeps the plant locked at a maximum size of 4 feet tall and wide, delivering huge floral impact without overcrowding your limited living space.
Avoid These Hydrangea Mistakes
Final Thoughts
If you only add one type of hydrangea to your landscape this year, make it the Limelight standard tree form rather than the standard bush. The tree form lifts those heavy, color-shifting green-to-pink blossoms up to eye level, saves precious ground space for underplanting colorful perennials, and prevents the common problem of heavy summer rains bending your prize blooms directly into the mud.

John Smith is the founder and CEO of Karaoke Machines Guru. He is a karaoke tutor and karaoke enthusiast and has been passionate about karaoke since he was a child. He also writes about karaoke-related tips, guides, and product reviews on this website.
He overlooks the whole website and makes sure that everything is running smoothly. Learn more!