Let us be honest about garden edging. Those pristine, store-bought interlocking stone pavers look sharp in the store display, but by the time you load enough of them into your truck to edge a single vegetable bed, you are looking at a triple-digit bill. I spent years draining my wallet on plastic rolls that cracked during the first hard winter freeze and concrete blocks that sank unevenly into the dirt. Out of sheer frustration, I started scavenging free, sturdy materials from my own property and local construction sites. Your garden beds need a clean, defining line to keep grass from invading your soil, but you do not need to drop a paycheck to get it.
This is not a collection of generic Pinterest pipe dreams that fall apart during a heavy rainstorm. We are focusing on heavy, durable, or readily available materials that cost next to nothing but look completely intentional if you install them with the right technique. From fallen tree limbs to half-buried glass bottles, these borders bring raw texture and clear boundaries to your gardening space. Dig out your spade, sharpen your garden shears, and let us build edges that last.
Quick Tips Before You Start
Slice a Clean Trench
Always slice a straight, three-inch-deep vertical trench with a half-moon edger before installing any material.
Strip the Bark
If you use raw logs or thick branches, scrape off the bark with a drawknife to keep wood-boring bugs away.
Pack Soil Tight
Backfill both sides of your border with heavy clay or native soil, packing it down firmly with a hand tamper.
1. Pound-in Woven Willow or Hazel Branches
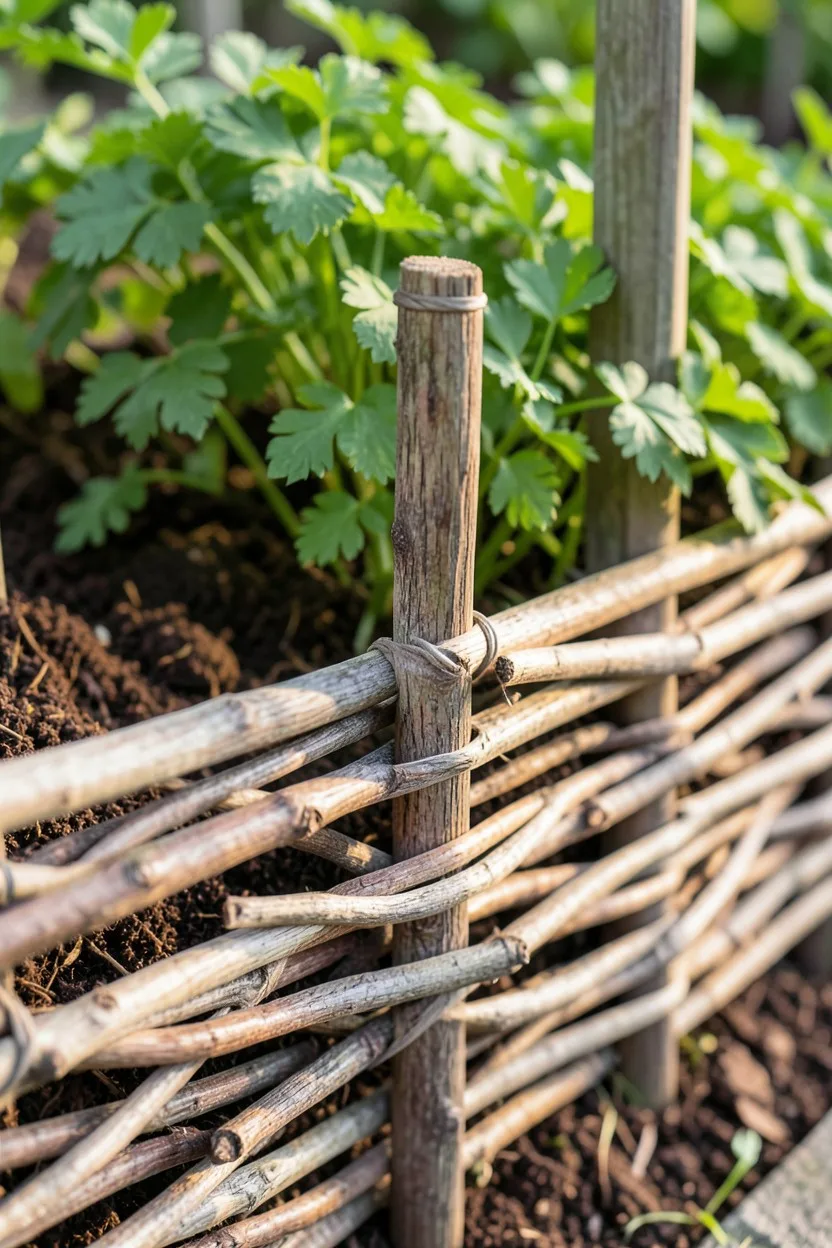
Wattle edging is an old-school English cottage technique that turns yard waste into a gorgeous, textured boundary. You do not buy this; you forage it. Look for flexible, slender branches that are roughly the thickness of your thumb, ideally from willow, hazel, or even dogwood trees after a spring pruning.
Drive sturdy, thick wooden stakes into the ground every 18 inches along your trench line. Use a heavy rubber mallet to sink them at least six inches deep so they do not budge. Weave your long, flexible whips in and out of these stakes in an alternating pattern, pushing the layers down tight as you go to eliminate gaps.
This boundary naturally decomposes over three to four years, slowly feeding the organic matter in your gardening beds. When a section sags, you simply slide new branches into the weave without tearing up the whole layout.
💡 Tip: Cut your vertical stakes from rot-resistant wood like cedar or black locust to double the lifespan of your woven border.
2. Sunk Upright Wine Bottles in Trenches
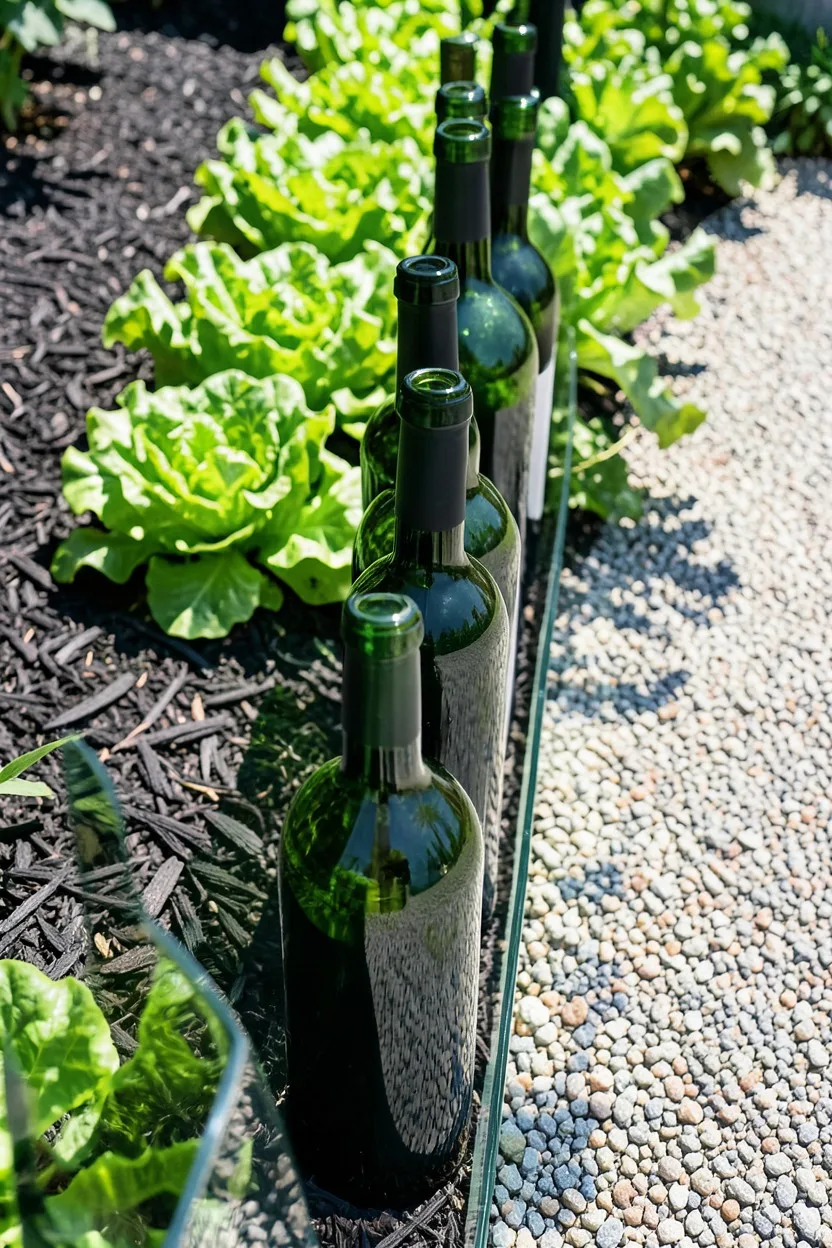
Everyone tells you to use stones, but finding forty matching rocks is a chore. Wine bottles are uniform, completely impervious to rot, and you can source them for free from local restaurants or your own recycling bin. The trick to making this look classy rather than cluttered is strict uniformity.
Dig a trench that is exactly six inches deep. If your trench is too shallow, the bottles will wobble and tip over when you step near the bed. Insert the bottles neck-down, side-by-side, pressing them tightly against each other like a row of glass soldiers.
Pack the native soil back into the trench around the necks, stepping on the dirt to solidify it. The flat bottoms of the bottles create a level, smooth three-inch glass curb that catches the light beautifully without interfering with your lawnmower blades.
Glass Bottle Border — At a Glance
📏 Trench Depth
6 Inches Deep
🍷 Material Need
4 Bottles per Foot
⏳ Lifespan
Decades (Rot-Proof)
🧼 Maintenance
Occasional Hose Rinse
Gardener Takeaway
Use only one color of glass per bed—all green or all clear—to keep the aesthetic clean and modern.
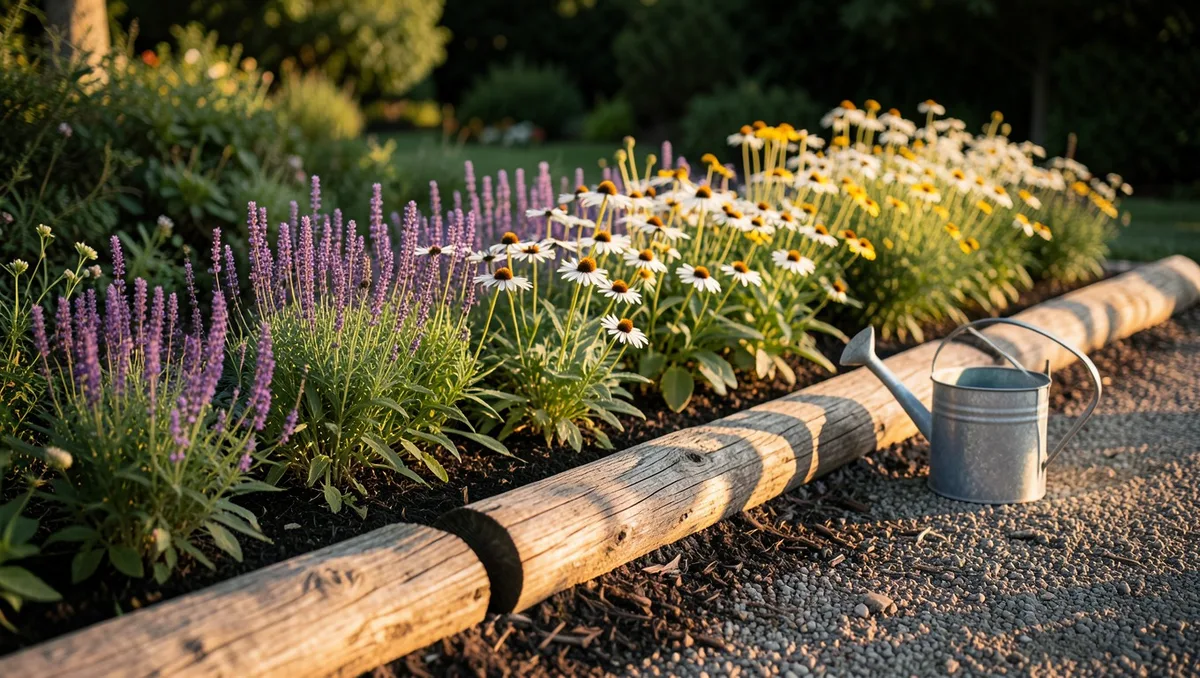
3. Stacked Cordwood and Split Tree Limbs
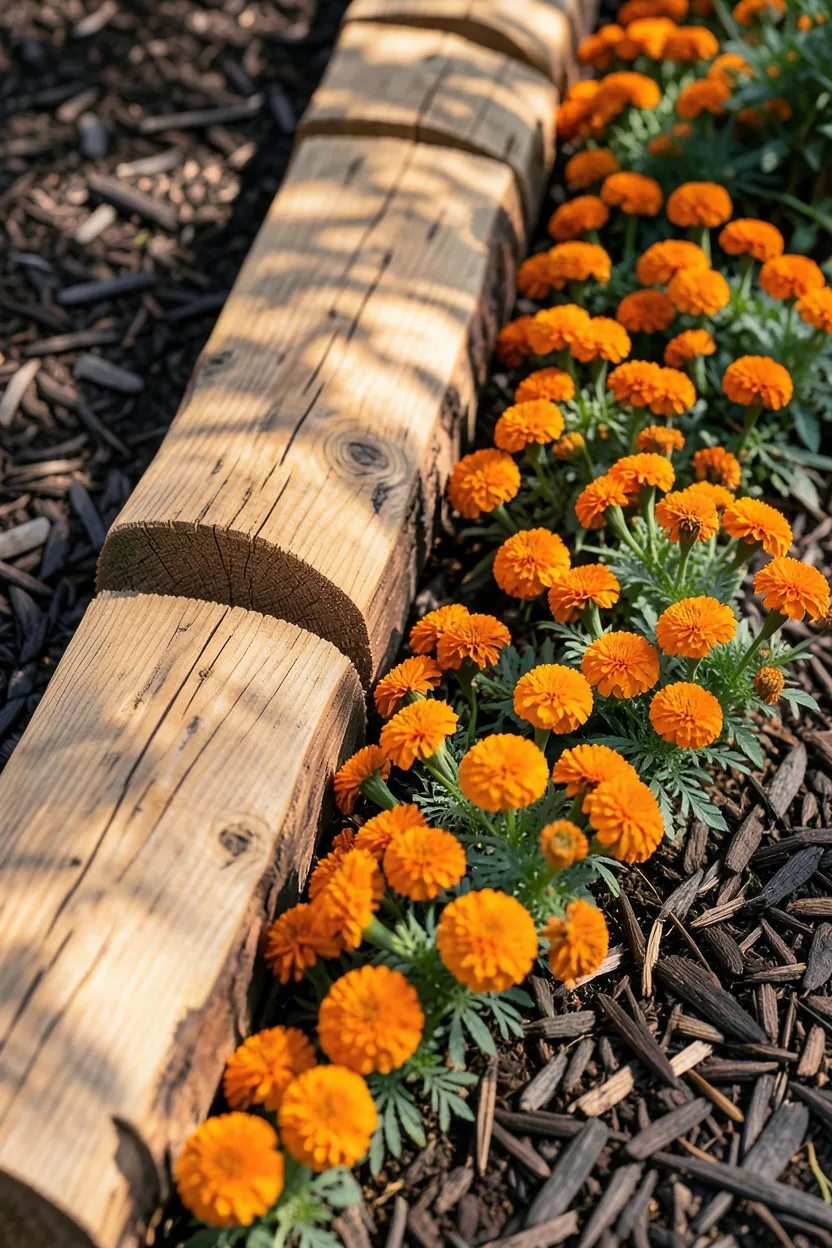
Storms happen, and tree trimming companies are always looking for places to dump heavy logs without paying landfill fees. Flag down a local arbor crew or check online marketplaces for free logs. You want hardwood like oak, maple, or cherry that is cut into uniform 12-inch logs.
Lay the logs flat, side-by-side, perpendicular to your garden bed line. This creates a thick, heavy cordwood boundary that doubles as a sturdy step when you need to reach into the back of your gardening beds to harvest tomatoes or prune weeds.
Because these logs are thick, they take a long time to decay. The small crevices between the logs also provide excellent winter shelter for beneficial predatory insects like ground beetles, which eat slugs and cutworms.
4. Scavenged Flat Fieldstone and Limestone Layers
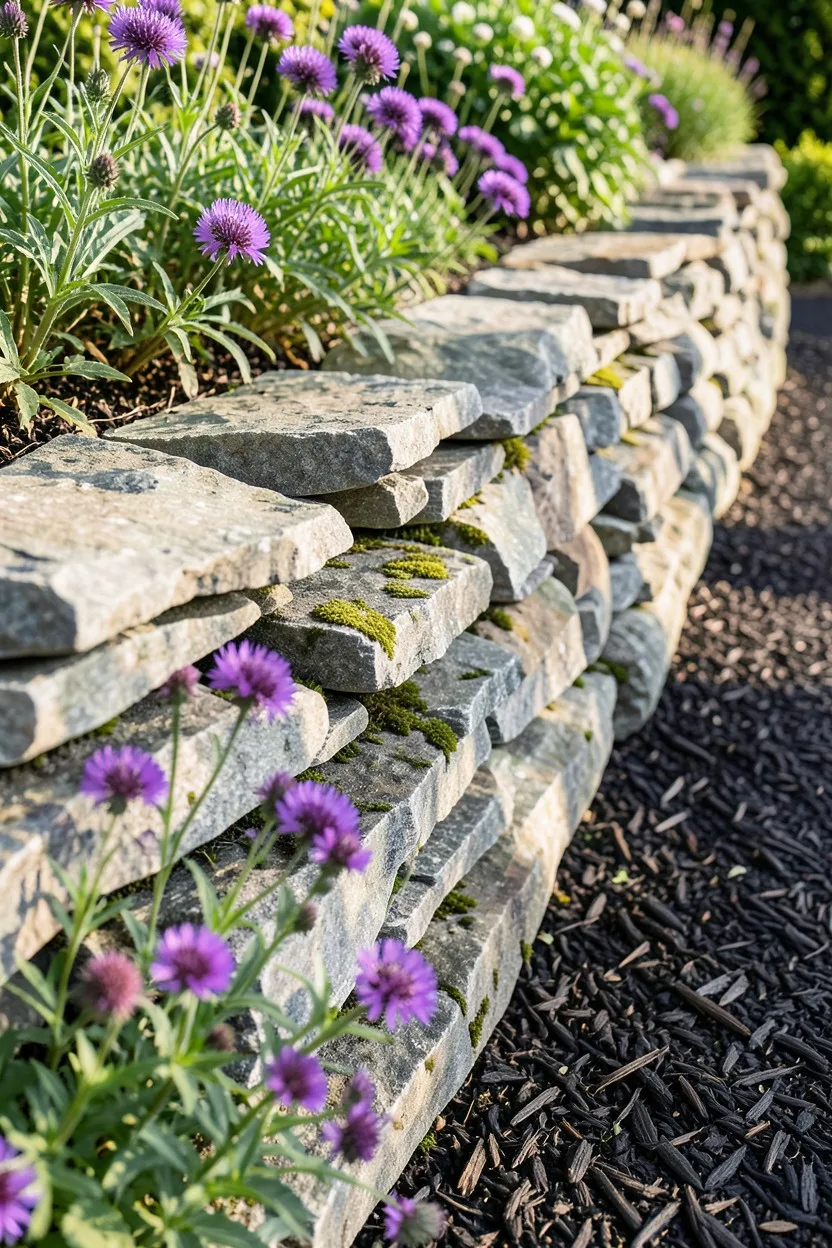
If you live in a rocky area like New England or the Texas Hill Country, farmers spend their whole lives pulling stones out of fields. Look for construction sites where topsoil is being cleared, or ask local landowners if you can clear stones from their creek beds.
Select stones that are relatively flat on the top and bottom. Dig a shallow two-inch trench along your gardening bed line, fill it with an inch of coarse sand, and lay your heaviest, largest stones down first as the foundation.
Stack the next layers in a running bond pattern, just like bricks, ensuring the joints are offset. Do not go higher than three layers without mortar. Keep it low, tight, and leaning slightly back toward the garden soil to prevent tipping.
⚠️ COMMON MISTAKE
Never Skip the Foundation Leveling
Placing heavy fieldstones directly onto loose, un-leveled topsoil guarantees they will tilt, sink, and separate during the first heavy rain. Spend the extra twenty minutes digging down to firm subsoil.
5. Upside-Down Terracotta Pots Embedded Deep

Every seasoned gardener has a stack of cracked, chipped, or stained terracotta pots sitting in the back of the shed. Instead of throwing them away, turn them into a scalloped, architectural boundary that feels incredibly charming.
Dig a trench that matches the height of your smallest pot. You want only the bottom two inches of the pot base to stick out above the ground level. Turn the pots upside down and line them up rim-to-rim inside your trench.
Thread a long piece of rebar or a thick wooden dowel horizontally through the drain holes of the pots before you bury them. This anchors them together into a rigid line so an accidental kick from a lawnmower won't displace them.
6. Bury Scrap Corrugated Metal Roof Panels
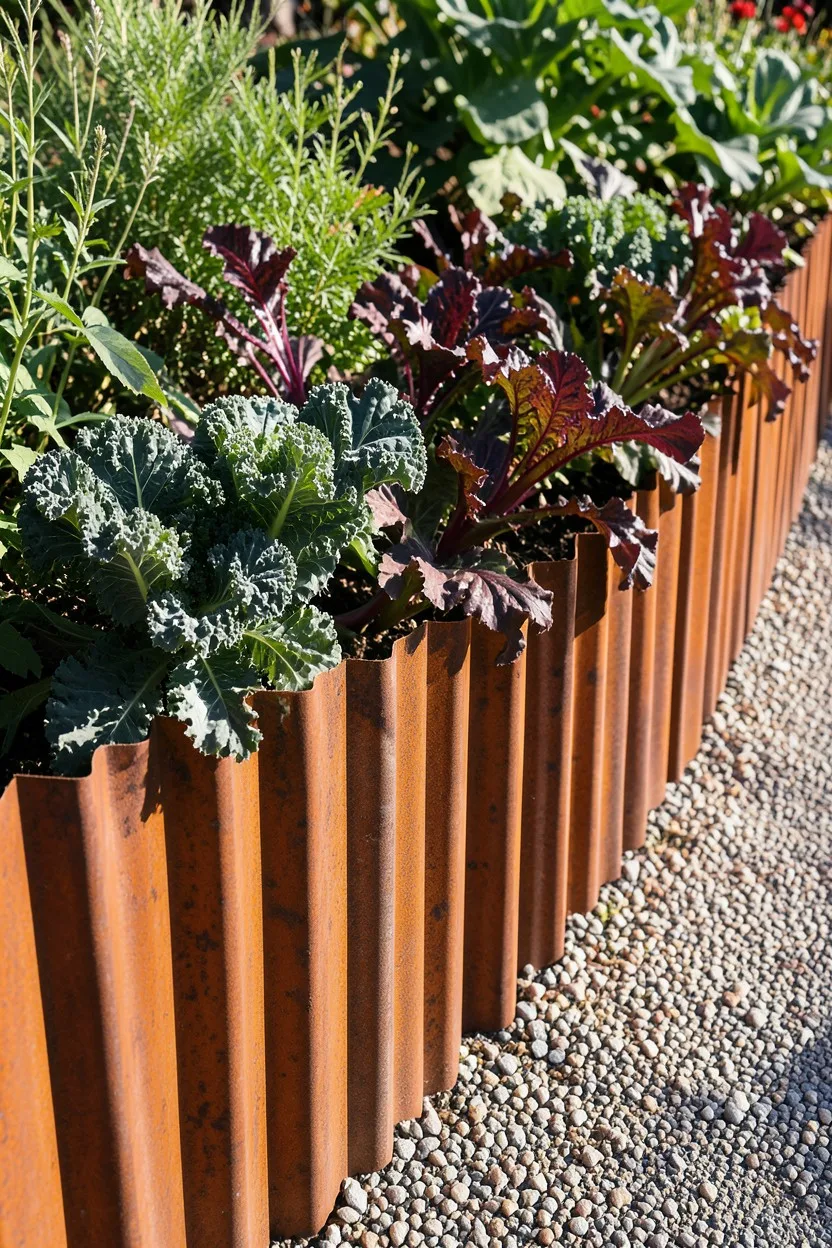
For a modern, industrial, or farmhouse gardening look, corrugated steel is an unbeatable freebie if you scan old barns or demolition sites. You can slice these panels down into long, eight-inch-wide strips using an angle grinder fitted with a metal cutoff wheel.
Dig a narrow four-inch trench along your bed edge. Slip the metal panels into the slot, overlapping the ends by at least two ridges to prevent soil from leaking out between the joints. Backfill the trench with gravel or packed earth.
The zinc coating on galvanized steel prevents rust for decades, and the slim profile takes up zero footprint, making this absolutely brilliant for tight urban gardening plots or small raised beds next to paths.
💡 Tip: Put a bead of outdoor silicone or a slit piece of old garden hose along the top raw metal edge to protect your bare hands when weeding.
7. Line with Thick Heavy Tree Bark Plates
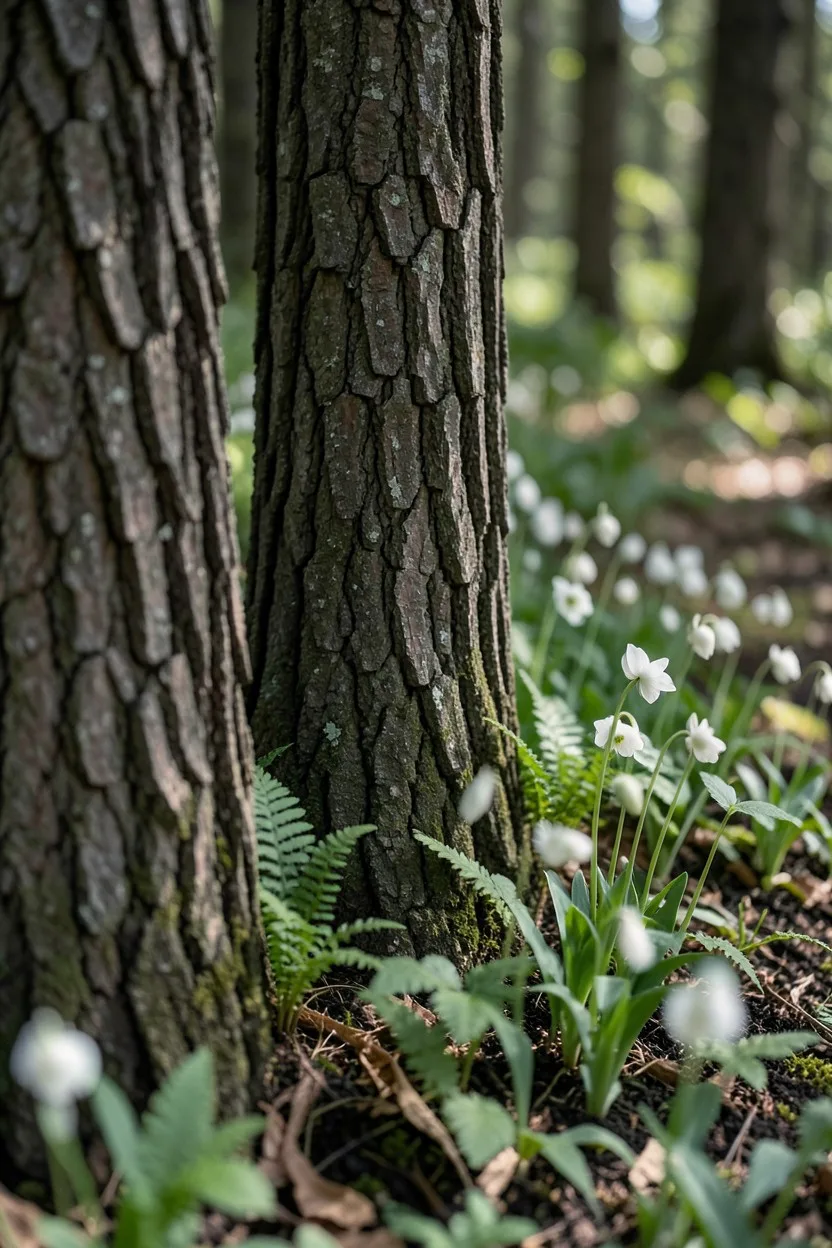
When large pine or oak logs sit at a sawmill or wood yard, giant slabs of thick, corky bark naturally peel away. These bark plates are often thrown into the chipper, but they make an incredibly natural, seamless edge for woodland gardening beds.
Collect plates that are at least two inches thick and a foot long. Stand them vertically in a shallow trench, leaning them against the inside edge of your garden soil. Pack the front side with mulch or pine needles to hold them upright.
This boundary looks like it grew out of the forest floor. It works perfectly around shady zones planted with native ferns, wild bleeding hearts, and trilliums where harsh concrete or bricks would look jarringly out of place.
Bark Borders Work Best For
8. Drive Recycled Pallet Wood Mini-Pickets
Wooden pallets are everywhere, and businesses give them away to anyone willing to haul them off. Look for pallets stamped with an 'HT' mark, which means they were heat-treated rather than chemically preserved with toxic pesticides.
Deconstruct the pallets using a pry bar, then slice the slats into uniform pieces that are ten inches long. Cut a sharp 45-degree angle on one end of each piece to create a simple spike that slides easily into your lawn.
Paint them with a homemade exterior stain or leave them raw to weather into a beautiful silvery-grey tone. Tap them into the soil side-by-side using a wood scrap block placed over the tops to protect the pickets from splitting under your hammer.
9. Interlock Reclaimed Red Clay Bricks Angles
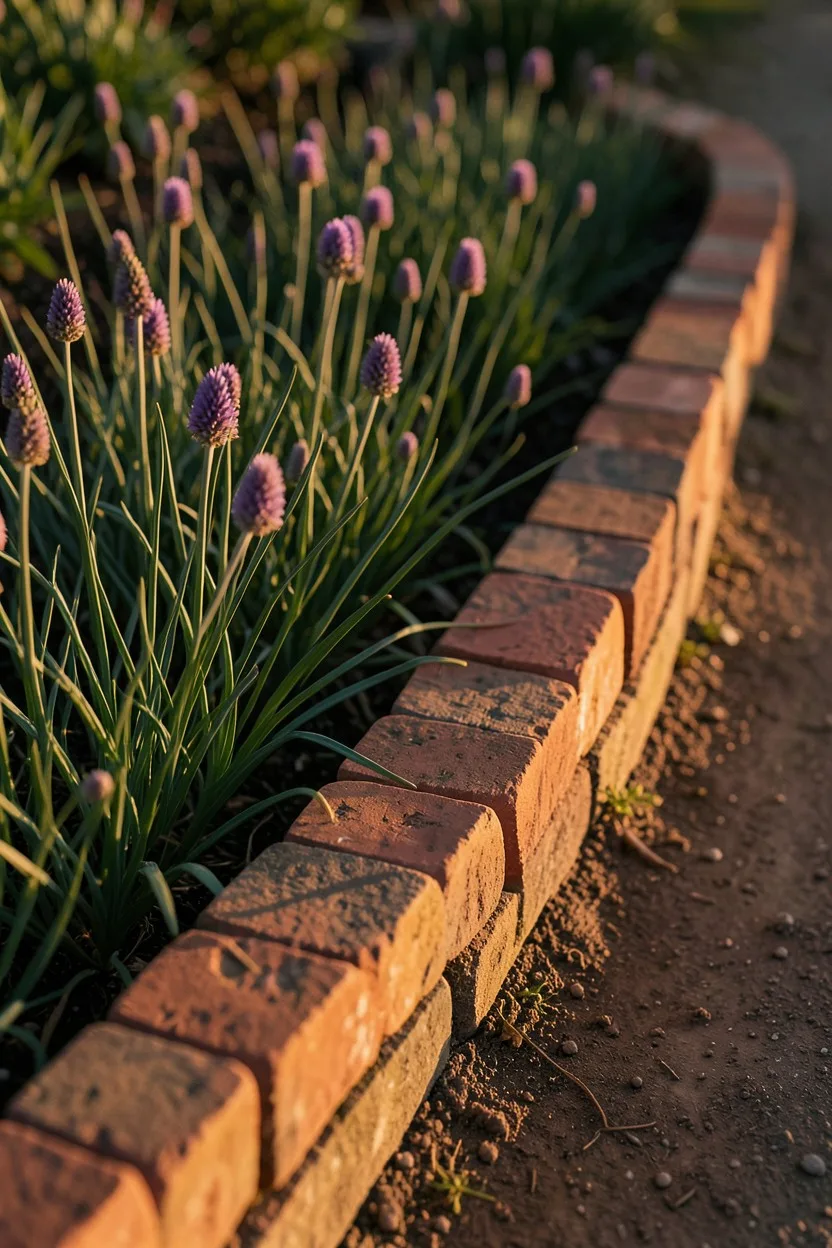
Old chimneys, patio renovations, and historic site cleanups are goldmines for antique red clay bricks. Unlike modern concrete bricks, old clay bricks have rich color variations and soft, worn edges that give your gardening layout instant maturity.
Instead of laying them flat, dig a V-shaped trench that is four inches deep. Stand the bricks up at a sharp 45-degree angle, resting each brick halfway across the face of the previous one. This creates a serrated, sawtooth border.
The angled sawtooth design is excellent because it naturally locks the bricks together without any mortar or stakes. It provides a raised barrier that easily stops creeping grass stolons from entering your rich garden topsoil.
🧱 How to Install an Angled Brick Border
Dig the V-Trench
Excavate a four-inch-deep trench with one sloped wall along your designated bed line.
Set the Angle
Place the first red clay brick down at a precise 45-degree angle against the sloped trench wall.
Interlock the Row
Lean each consecutive brick halfway against the back of the previous brick to form a tight sawtooth line.
Backfill and Pack
Shovel native clay or heavy soil into both sides of the trench and tamp it down using your boots.
10. Weave Inverted Flexible Rubber Tires Liners
Used tires are a major headache for recycling centers, and mechanics will often give them away for free. To avoid looking like a junkyard, you must modify them. Cut away the sidewalls using a sharp utility knife, leaving only the flat, flexible tread cylinder.
Slice the tread loop open to create a long, heavy-duty rubber strap. Dig a narrow slot along your vegetable bed edge, drop the rubber strip in vertically, and leave just one inch poking above the grass line.
This completely invisible barrier stops aggressive lawn grasses like Bermuda or Kentucky Bluegrass dead in their tracks. It will not crack when you hit it with a string trimmer, and it lasts indefinitely below the surface.
11. Arrange Large Upright River Cobbles Smoothly

If you have access to a gravel bar or a natural riverbed on a piece of private property, you can find smooth, water-worn river cobbles. Look for stones that are roughly the size of a loaf of bread, choosing oblong shapes over round ones.
Lay them horizontally, end-to-end, bedded deep into a shallow trench. Do not just sit them on top of the grass, or weeds will grow between them within a month. Bury the bottom third of each stone into the dirt.
The smooth, rounded surfaces are incredibly satisfying to look at and provide a clean transition between formal lawns and loose, sprawling perennial beds filled with lavender, creeping phlox, or culinary herbs.
💡 PRO TIP
Block Weeds with Newspaper Liners
Before you lay down your river cobbles, tuck a three-layer strip of damp, plain black-and-white newspaper into the trench bottom. This simple barrier suffocates underlying weed seeds for months while decomposing safely.
12. Collect Broken Concrete Slabs as Urbanite
Urbanite is simply broken concrete from old sidewalks, driveways, or patio demolitions. People pay thousands of dollars to haul this heavy waste to landfills, so they are thrilled if you offer to take it off their hands for free.
When stacked properly, broken concrete looks almost identical to premium natural flagstone. The raw, fractured edges offer an incredibly rugged, chiseled texture that instantly anchors a gardening space.
Select pieces that are roughly three to four inches thick. Lay them flat and tight, stepping on each piece to check for wobble. You can fill the small joints between slabs with stone dust, fine gravel, or creeping sedum plants.
13. Stand Old Slate Roof Shingles Overlapping
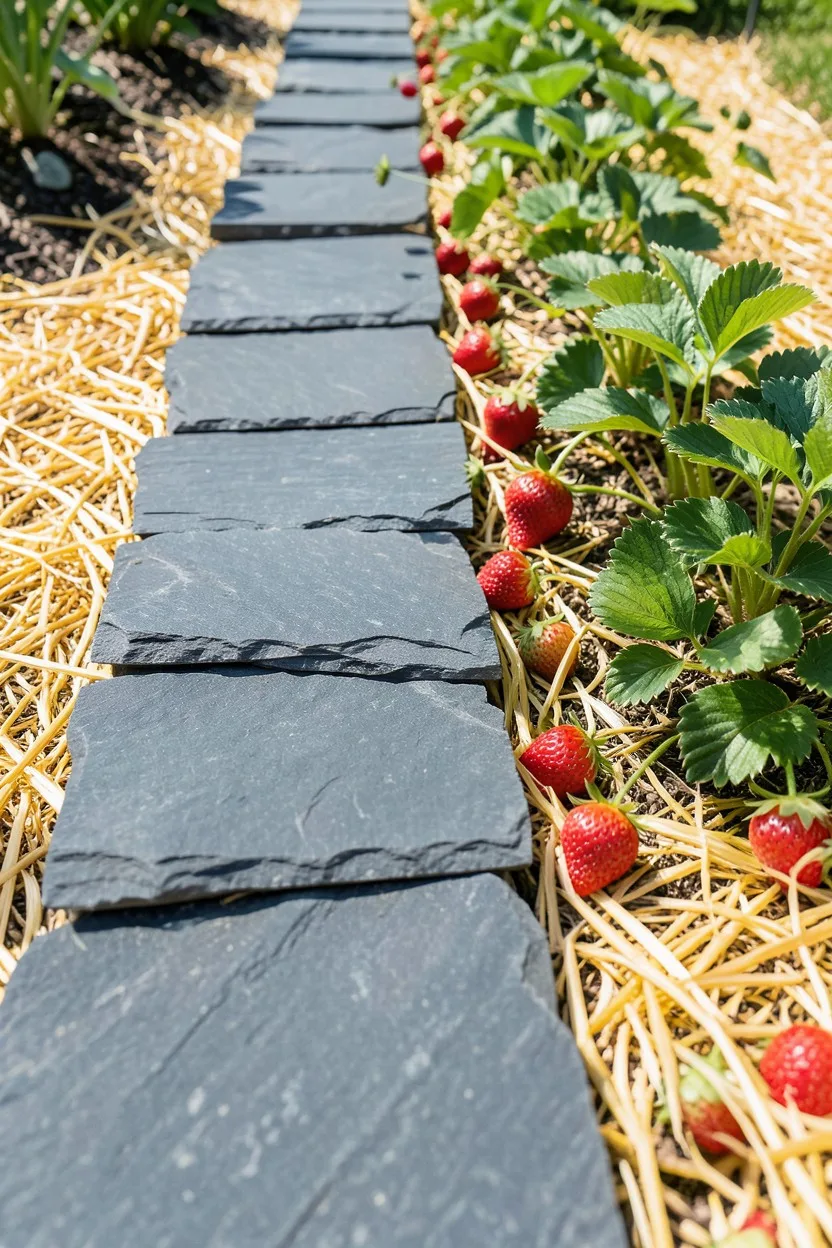
When century-old houses get new roofs, contractors strip away thousands of heavy slate shingles. These slates are incredibly tough, totally waterproof, and have a beautiful dark grey, purple, or green hue that adds instant heritage style.
Dig a deep, narrow slit trench. Slide the slates into the trench vertically, overlapping each shingle by roughly two inches, like fish scales. Leave about three inches of the slate standing above the surface of your gardening bed.
Because slate is thin, it creates an incredibly sharp, clean line that mimics expensive custom steel edging at zero cost. It is completely unaffected by damp soil and will not warp or fade under intense summer sun.
14. Stitch Thick Manila Rope along Stakes
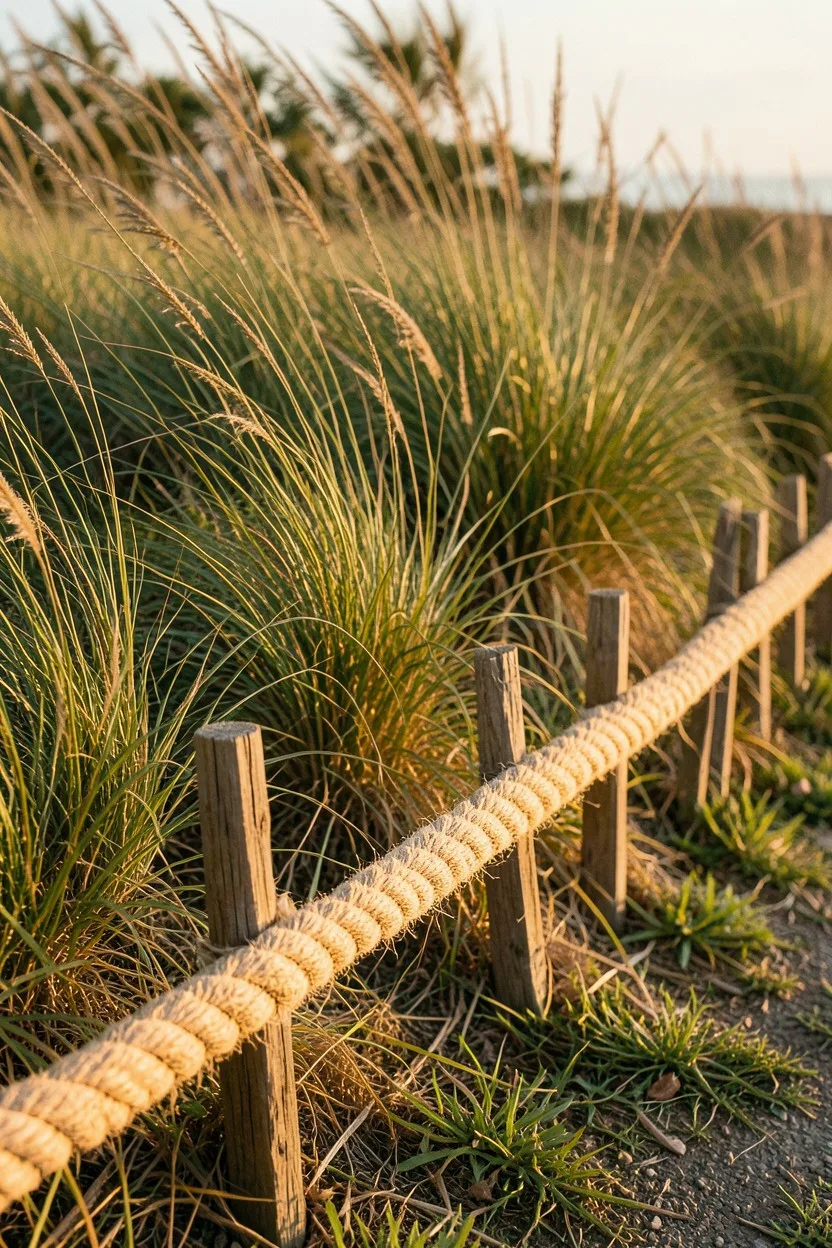
If you want a soft, nautical, or coastal look for a beach garden or casual backyard space, look for old manila rope. Shipping docks, tree workers, and fitness gyms discard thick rope when it no longer meets safety certifications.
Drive short, stout wooden posts or thick cedar branches into the ground every three feet along your bed path. Keep them low, around four inches tall. Use heavy-duty galvanized U-nails or heavy twine to anchor the thick rope along the inside tops of the stakes.
This boundary does not stop grass roots below the surface, so pair it with a deeply cut mechanical trench. It serves as a beautiful visual frame that looks excellent alongside ornamental grasses, sea oats, and wild yarrow.
15. Lay Horizontal Bamboo Stems with Wire Ties
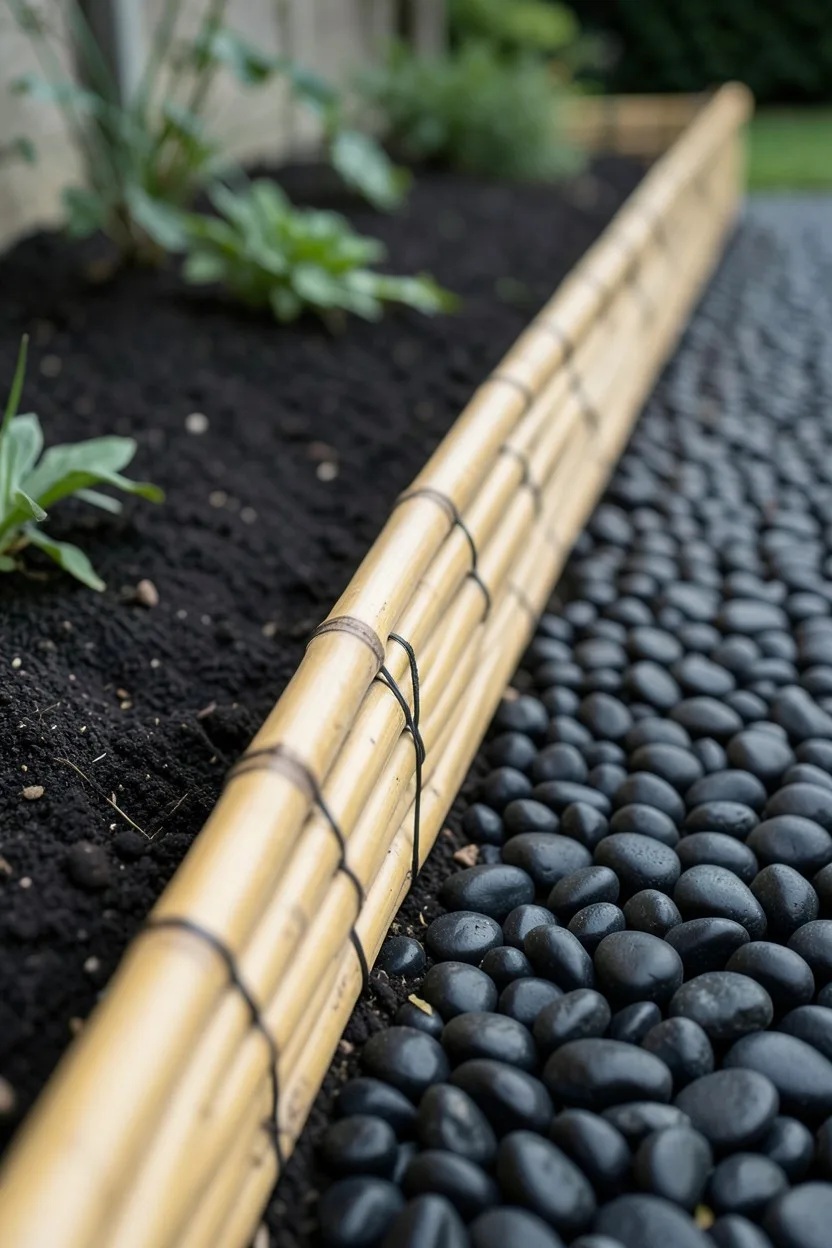
Bamboo spreads like wildfire, and many homeowners will happily let you harvest as much as you want from their yards just to get rid of it. Cut thick, green canes that are at least two inches in diameter using a fine-tooth handsaw.
Lay the long canes horizontally along your gardening boundary line. Secure them in place by driving short bamboo stakes into the dirt on both sides of the main cane, then tie them together tightly with strong, dark-coated steel wire.
The bright green color slowly cures into a beautiful, clean straw-gold tone over a single season. This clean line looks brilliant in minimalist yards, Japanese-inspired gardening designs, or around neat raised beds filled with Asian greens and ginger.
Choosing Your Border Strategy
What to Do
- Bury materials at least 4 inches deep to block grass roots completely.
- Use uniform material types along a single continuous bed line.
- Scavenge locally via online boards and construction crews for free pieces.
What to Avoid
- Do not leave raw wood bark on logs to rot and attract termites.
- Do not just rest rocks on top of un-dug weeds or live lawn turf.
- Avoid chemically treated wood pallets that contaminate food soil.
Frequently Asked Questions
Will using raw logs or wood branches attract termites to my garden?
Raw wood will eventually attract decomposers, but you can minimize termite risk by removing the bark entirely before installation and keeping the border at least fifteen feet away from your home's foundation. Hardwoods like oak or cedar resist bugs far longer than soft pine.
How do I keep lawn grass from growing right through a stone or brick border?
You must dig a vertical trench before laying your stones and insert a cheap layer of cardboard or thick newspaper behind the stones. This physically blocks the grass stolons from sliding through the gaps between the rocks.
Can I use plastic bottles instead of glass wine bottles?
Avoid plastic bottles. They degrade quickly under intense solar rays, leak microplastics into your rich gardening soil, and are too light to stay anchored when the ground shifts during heavy spring rains.
How long will a woven branch wattle border last before rotting?
A woven wattle border typically lasts between three and five years depending on your local rainfall and the wood species used. Willow and hazel hold up well, and you can easily patch sagging spots by weaving in fresh green whips.
Final Thoughts
If you only add one from this list, make it the reclaimed red clay bricks in a sawtooth pattern. Old bricks are incredibly heavy, completely immune to rotting out, and their self-locking angled structure means you do not have to mess around with expensive mortars or fasteners to get a perfectly straight line. They stay exactly where you put them, block stubborn lawn grass from invading your beds, and bring a historic, established feel to even the newest backyard setups. Stop spending your hard-earned cash on plastic junk at the big-box store and start scouting your neighborhood for real materials with character.

John Smith is the founder and CEO of Karaoke Machines Guru. He is a karaoke tutor and karaoke enthusiast and has been passionate about karaoke since he was a child. He also writes about karaoke-related tips, guides, and product reviews on this website.
He overlooks the whole website and makes sure that everything is running smoothly. Learn more!