Let us be completely honest: most high-end landscaping magazine spreads are essentially just photos of massive bank accounts. When I bought my first fixer-upper home, the yard was a terrifying moonscape of compacted red clay and wiregrass, and my remaining budget after closing was exactly three hundred dollars. Everyone tells you to just call a local landscape designer, but that advice is useless when you are staring at a bare dirt lot with empty pockets.
You do not need a crew of six men and a Bobcat to get a gorgeous, structured yard. Over fifteen years of gardening, trial, and massive error, I have learned that looking expensive is not about spending thousands of dollars; it is about choosing the right materials, controlling your edges, and planting with a specific strategy. This guide gives you the exact blueprint to trick the neighbors into thinking you hired an elite crew, using real materials, specific dimensions, and the dirt-under-your-nails tactics that actually work.
Quick Tips Before You Start
Define the Lines
Always map out your beds with a garden hose before digging to create smooth, sweeping curves.
Buy Mulch in Bulk
Skip the plastic bags from big-box stores and order a cubic yard from a local landscape yard to save up to 70%.
Divide Your Plants
Buy mature perennial grasses and hostas, then immediately slice the root balls in half to double your plant count.
Source Free Stones
Check online community marketplaces early on weekend mornings for homeowners giving away free pavers and border rocks.
1. Deep Victorian Trench Edges Instead of Plastic Borders
The absolute fastest way to make a backyard look cheap is to install that wavy, flimsy black plastic edging from the home improvement center. It heaves out of the ground during the first winter freeze, collects chopped-up grass from your mower, and looks terrible within two months. Do this instead: grab a sharp, straight-edged spade and slice a clean, four-inch-deep vertical trench between your lawn and your garden beds.
This is called a Victorian edge, or a English lawn trench, and it is what professional botanical gardens use to get those razor-sharp lines. Angle your spade at 45 degrees on the garden side, throwing the excess soil back into the bed, and leave a sheer vertical drop on the grass side. Every time you mow, simply run your weed eater vertically along this trench to keep the line incredibly crisp.
It costs nothing but an hour of muscle, and it immediately gives your entire yard a structured, intentional aesthetic. Fill the garden bed right up to that sharp edge with dark mulch to create a massive visual contrast that screams high-end craftsmanship.
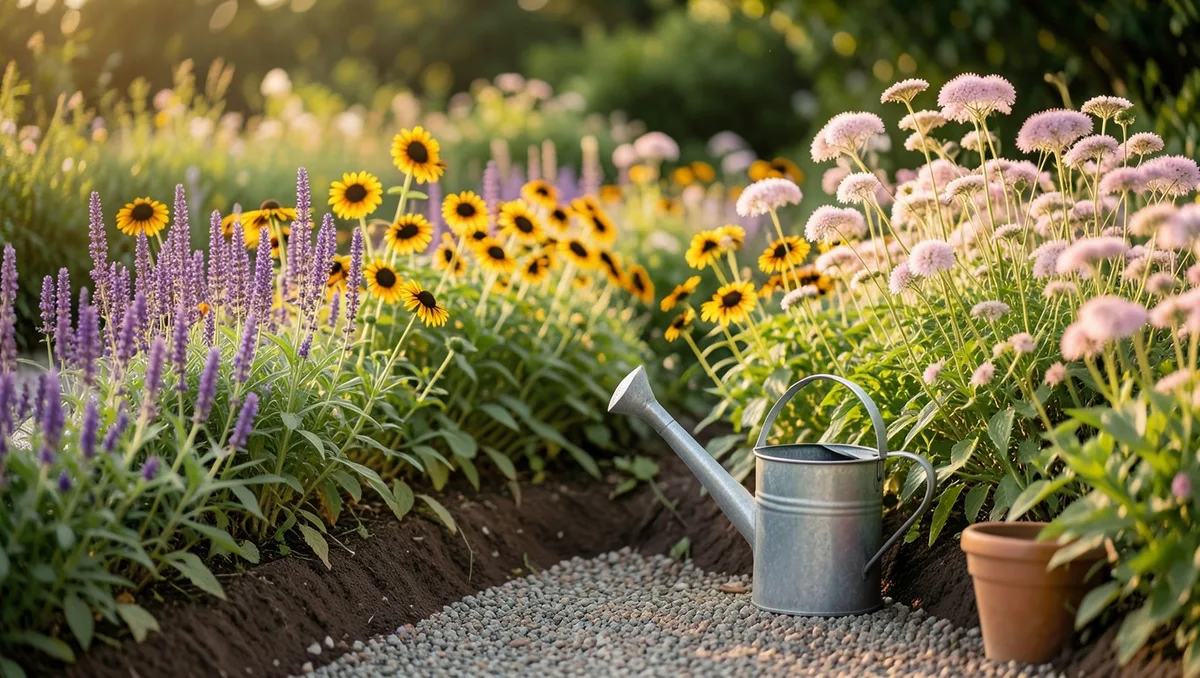
2. Mass Plantings of a Single Perennial Variety
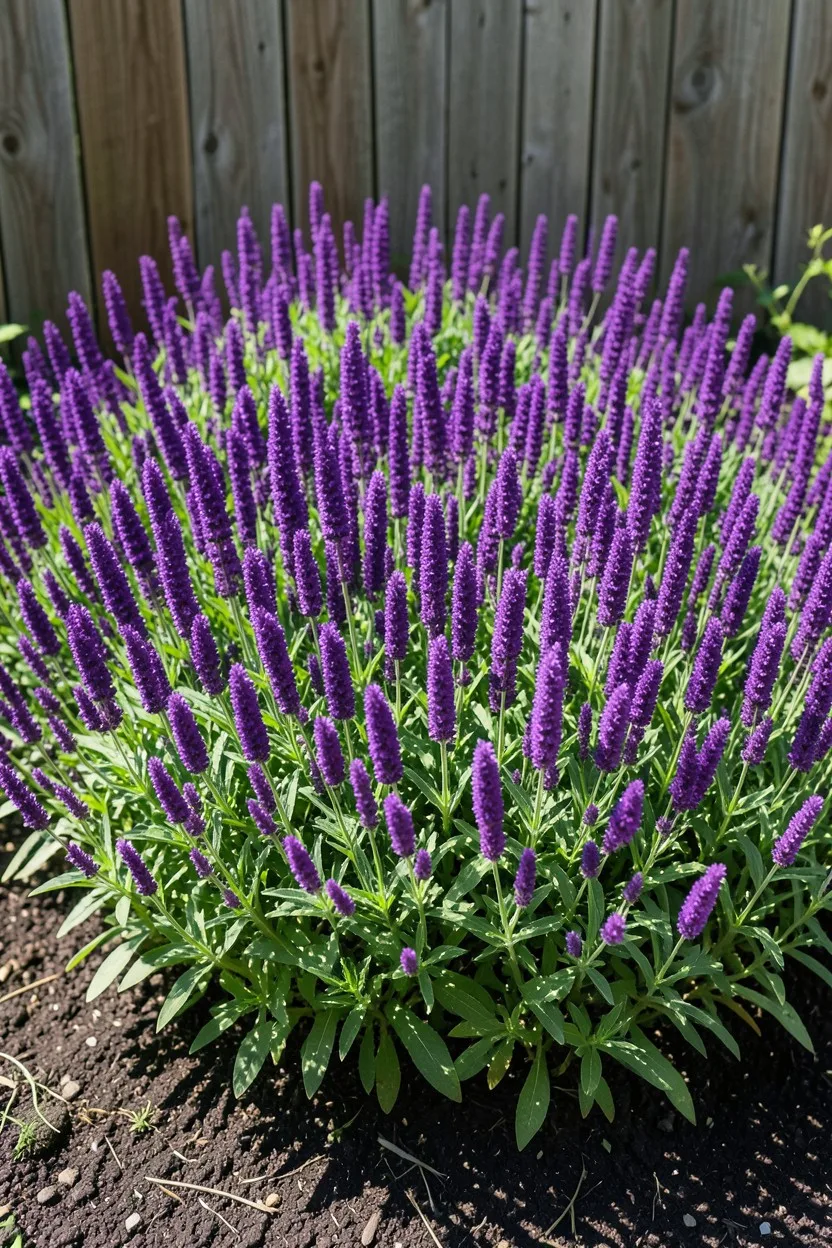
When budget-conscious gardeners go to the nursery, they usually buy one of this, one of that, and one of something else because everything looks pretty. This creates a cluttered, chaotic, polka-dot yard that looks like a discount bin experiment. High-end landscaping relies on repetition and scale. Pick one tough, high-impact perennial and buy seven to nine specimens of that exact same variety.
Plant them in a dense, staggered zigzag pattern rather than a straight line. For hot, sunny spots, use Walker's Low catmint or May Night salvia; their deep purple spikes bloom for months and cover massive ground. If you have shade, buy a single variety of hosta, like Patriot or Sum and Substance, and fill the entire border.
By repeating the same foliage pattern and color for six to ten feet, you create a visual anchor. It looks like a deliberate design choice made by an architect, even if you only spent fifty dollars on the starter plugs.
May Night Salvia — At a Glance
☀️ Light Requirement
Full Sun (6+ hours)
Design Superpower
Mass planting this variety creates a high-contrast purple blur that anchors the eye and masks uneven soil.
3. Crushed Limestone Paths Over Filter Fabric
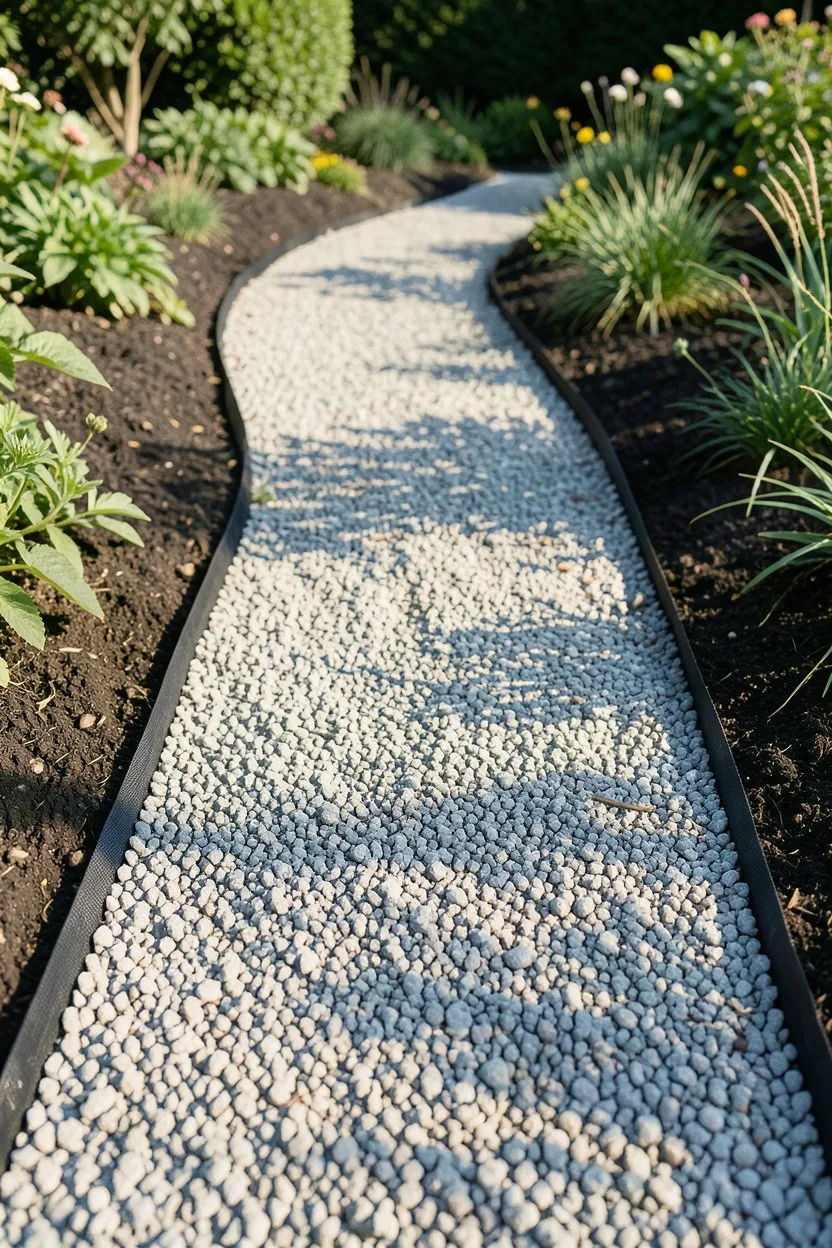
Stepping stones can be beautiful, but cheap, uneven concrete pavers spaced out over patchy grass just look messy. If you want a walking path that mimics a European estate, use crushed limestone or decomposed granite. Start by excavating the path to a depth of two inches, making sure the floor of the pathway is completely flat.
Lay down a heavy-duty, woven geotextile filter fabric like Dewitt Pro 5 — do not use the cheap, thin plastic landscape film that rips when you step on it. Secure the fabric with metal landscape staples every twelve inches. This fabric keeps weeds from pushing up while allowing water to drain straight through.
Fill the path with crushed limestone gravel, specifically size 'quarter-inch minus', which includes tiny stone dust that packs down like concrete when wet. Rent a hand tamper or just walk over it repeatedly to lock the stones together. The stark, clean white or grey line winding through your green garden beds gives an instant, upscale structure to the space.
🌱 GROWING TIP
Choose the Right Gravel Size
Never buy smooth, round pea gravel for pathways. It rolls around underfoot like marbles and will spill into your lawn constantly. Always buy angular, crushed gravel that locks together under pressure.
4. Upcycled Tree Trunks for Natural Terrace Retaining Walls
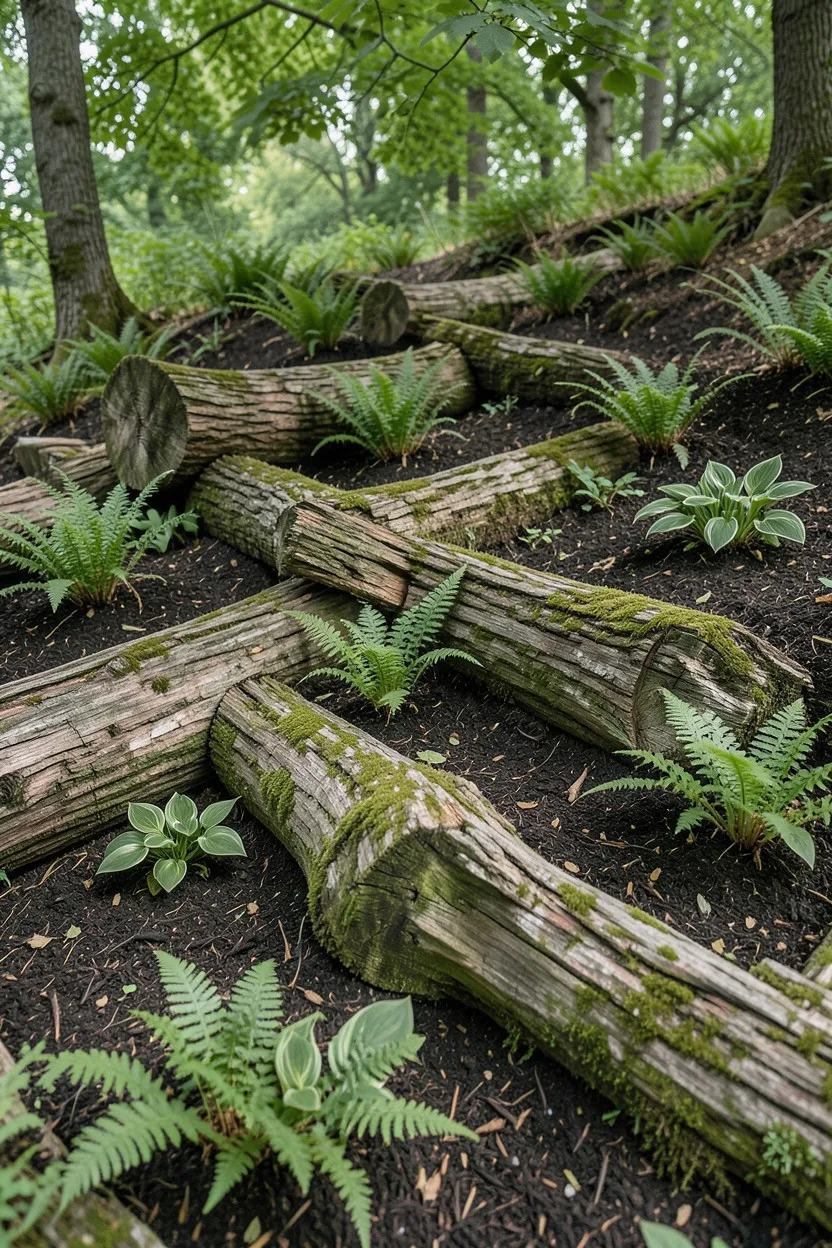
Pre-cast concrete retaining wall blocks from big-box stores look suburban, commercial, and distinctly budget-tier unless you spend a fortune on interlocking stone systems. If your yard has a slope, embrace a rustic, estate-style look by using thick log segments as natural terracing.
Keep an eye out for tree service crews working in your neighborhood. Walk up, offer them twenty bucks, and ask them to drop off clean, straight trunk segments from hardwood trees like oak or maple, cut to four-foot or six-foot lengths. They are often thrilled to avoid paying commercial dump fees at the landfill.
Dig a shallow trench along the contour of your slope, drop the logs in, and drive heavy rebar stakes through drilled holes directly into the ground behind them to anchor them firmly. Backfill the uphill side with rich compost and topsoil. Over a season, moss will colonize the bark, turning a cheap structural fix into a gorgeous, permanent woodland feature.
5. Oversized Terracotta Pots as Architectural Focal Points
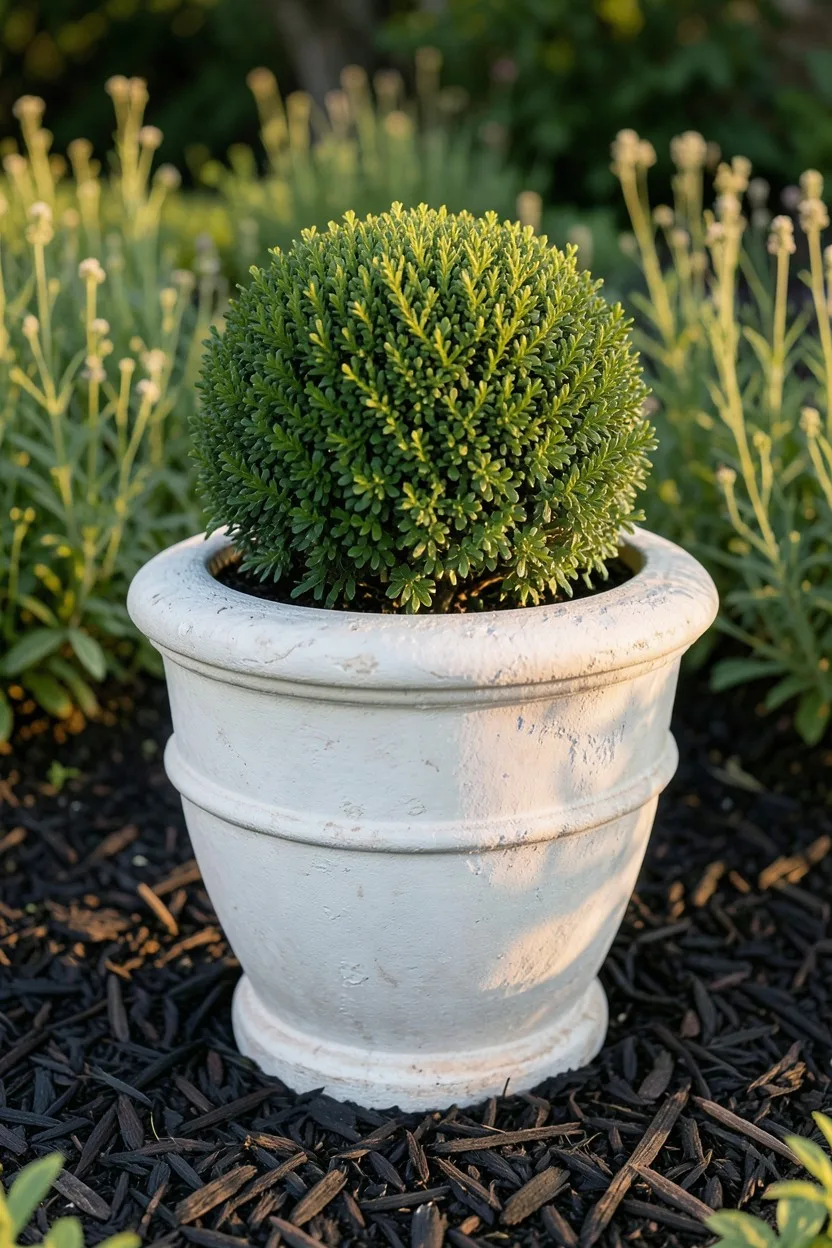
A collection of tiny, mismatched plastic planters scattered on a porch looks messy and cluttered. If you want luxury, you need scale. One massive, genuine Italian terracotta pot or a heavy concrete urn placed directly inside a garden bed does more design work than twenty small plants ever could.
Look for a pot that is at least 18 to 24 inches in diameter at the rim. If authentic clay is out of your budget, buy a thick, heavy-duty structural foam planter with an unglazed finish — just ensure it has zero shiny plastic sheen. Place this focal point at the exact end of a gravel pathway or right in the center of a deep curve in your garden beds.
Plant a single, striking specimen inside it, like a structural ornamental grass or a dense boxwood ball. Elevate the pot slightly by placing it on a flat stepping stone hidden under the mulch so it does not sink into the mud over time. It anchors the entire view and makes your yard feel like a grand estate.
Best Materials for Focal Planters
6. Feathery Feather Reed Grass for Year-Round Privacy
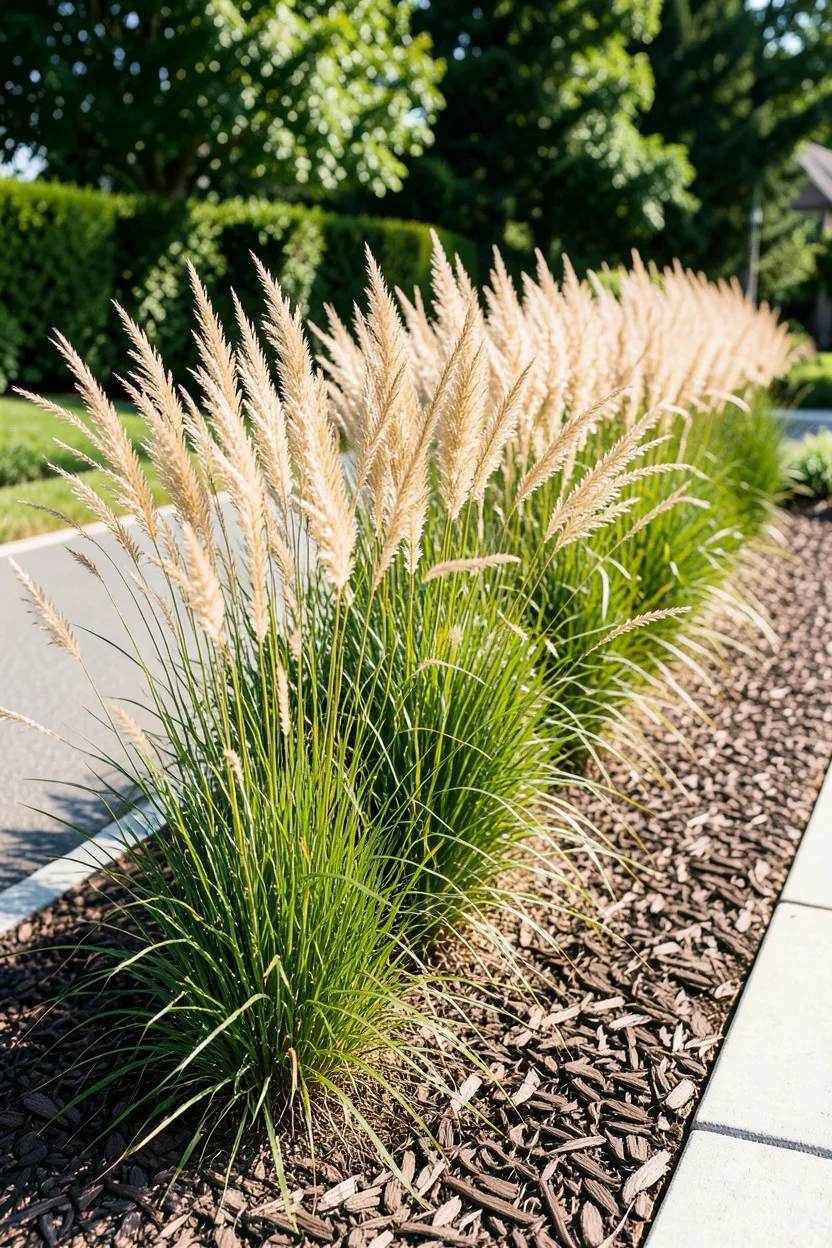
Building a cedar privacy fence can easily cost thousands of dollars in lumber and hardware. If you need a fast, affordable screen that looks incredibly intentional and modern, plant a row of Karl Foerster feather reed grass. This specific ornamental grass grows strictly vertical, reaching five feet tall by mid-summer without ever flopping over.
Buy three-gallon pots in early spring, space them exactly two feet apart on center, and plant them in a perfectly straight line along your property boundary. By June, they create a dense, rustling wall of rich green blades topped with striking, wheat-like golden plumes that catch the wind beautifully.
The real magic happens in winter: do not cut them down in autumn. Leave the dried, tan stalks standing all winter long to maintain your privacy screen through the snow and frost. Cut them back to three inches above the ground with hedge shears in late February, and they will rocket right back up by May.
7. Symmetrical Boxwood Borders Formed From Starter Plugs
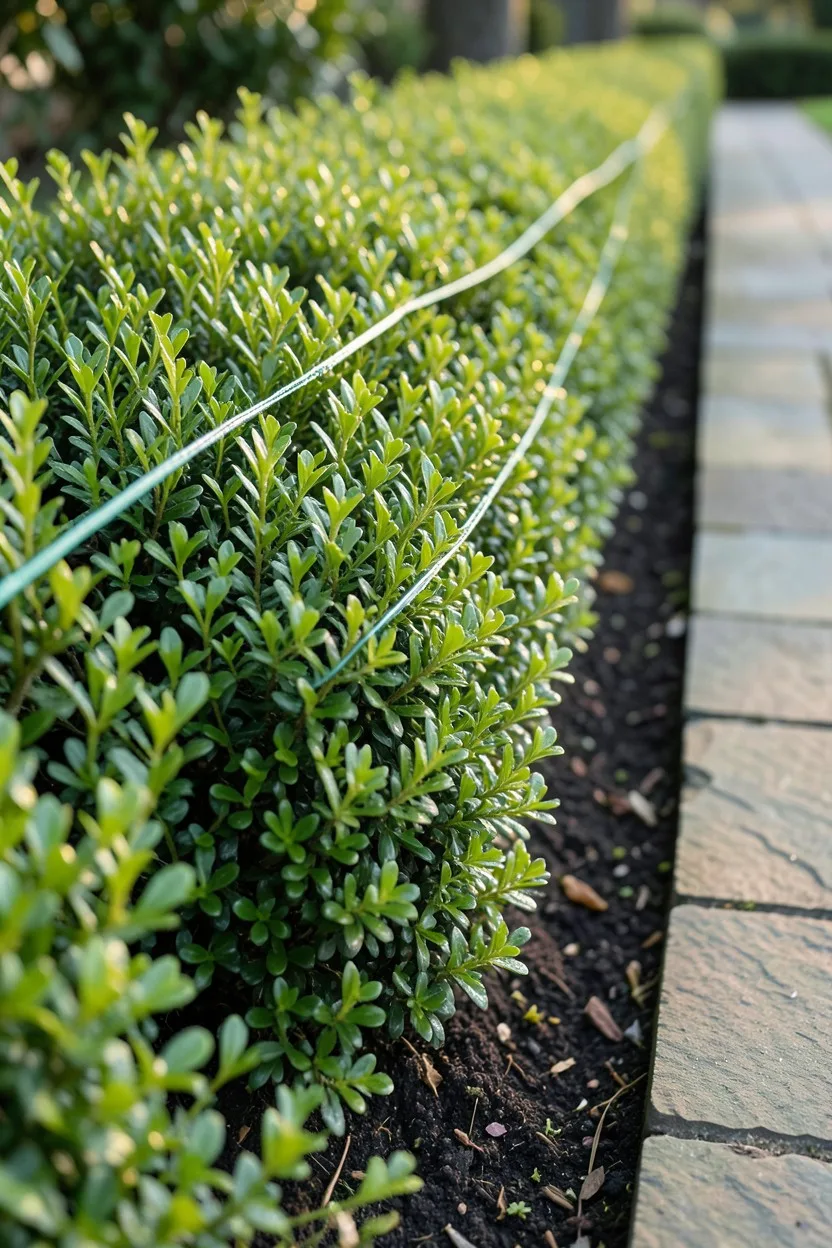
Go to any estate garden in England or France, and you will see low, formal boxwood hedges framing the walkways. If you buy mature, two-gallon boxwood shrubs at the nursery, you will easily spend thirty to forty dollars per plant. For a twenty-foot path, that adds up to hundreds of dollars instantly. Do not do that.
Search online specialty nurseries for 'starter plugs' or bare-root boxwoods, specifically varieties like Wintergreen or Green Velvet. These are tiny, root-bound plants that arrive in trays and cost about three to five dollars each. Plant them twelve inches apart in a perfectly straight line, using a string line tied between two stakes to keep your row flawlessly plumb.
Yes, they will look small the first year. Feed them with a balanced organic fertilizer every spring and clip the top tips twice a summer to encourage dense branching. By year three, they will knit together into a dense, expensive-looking estate hedge that you built for the price of a takeout dinner.
✂️ From Starter Plug to Formal Estate Hedge
Plant Starter Plugs
Space bare-root plugs exactly 12 inches apart along a tight string line in early spring.
Pinch the Tips
Clip the top half-inch of new growth in June to force the roots to send out dense side branches.
Spring Feeding
Apply a thick two-inch layer of organic compost around the base of the hedge every April.
Formal Shaping
By year three, shear the top and sides into a crisp square shape, keeping the base slightly wider than the top.
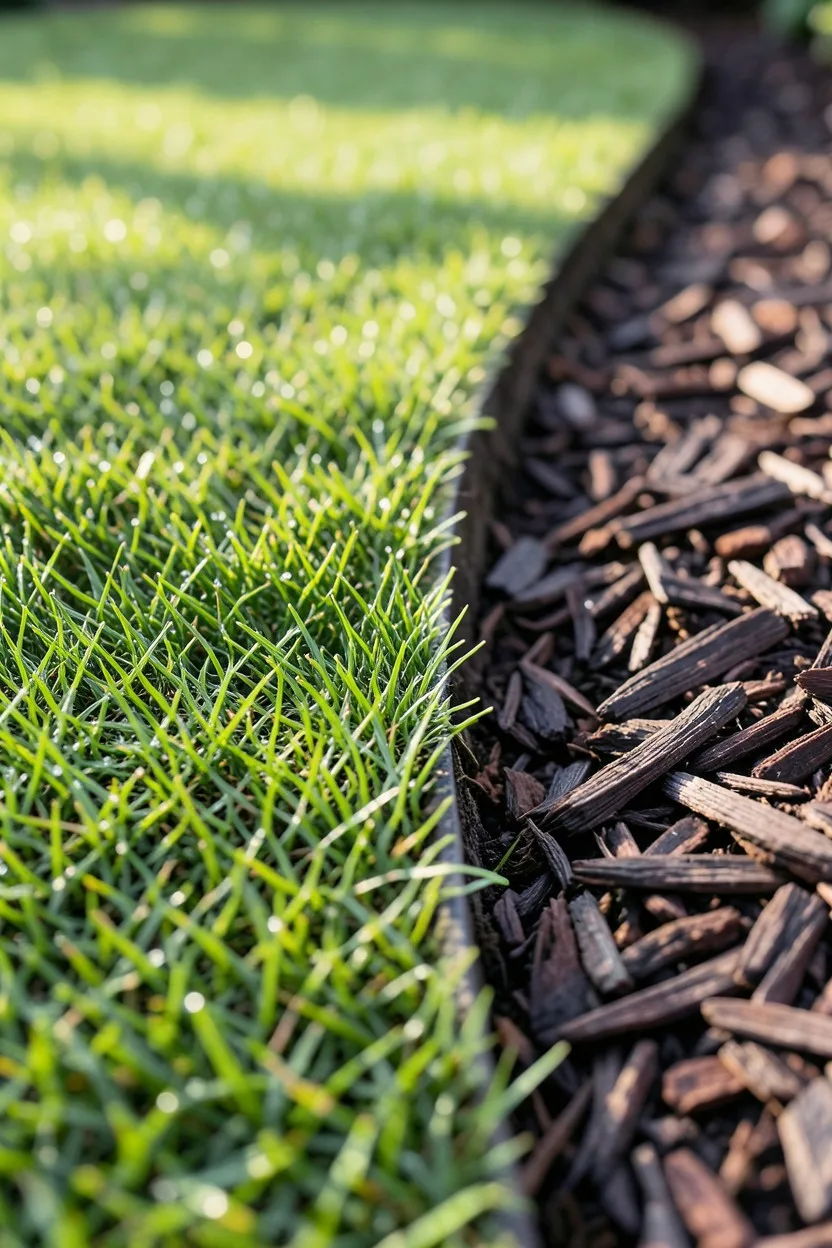
8. Double-Layered Natural Wood Chip Mulch Layering
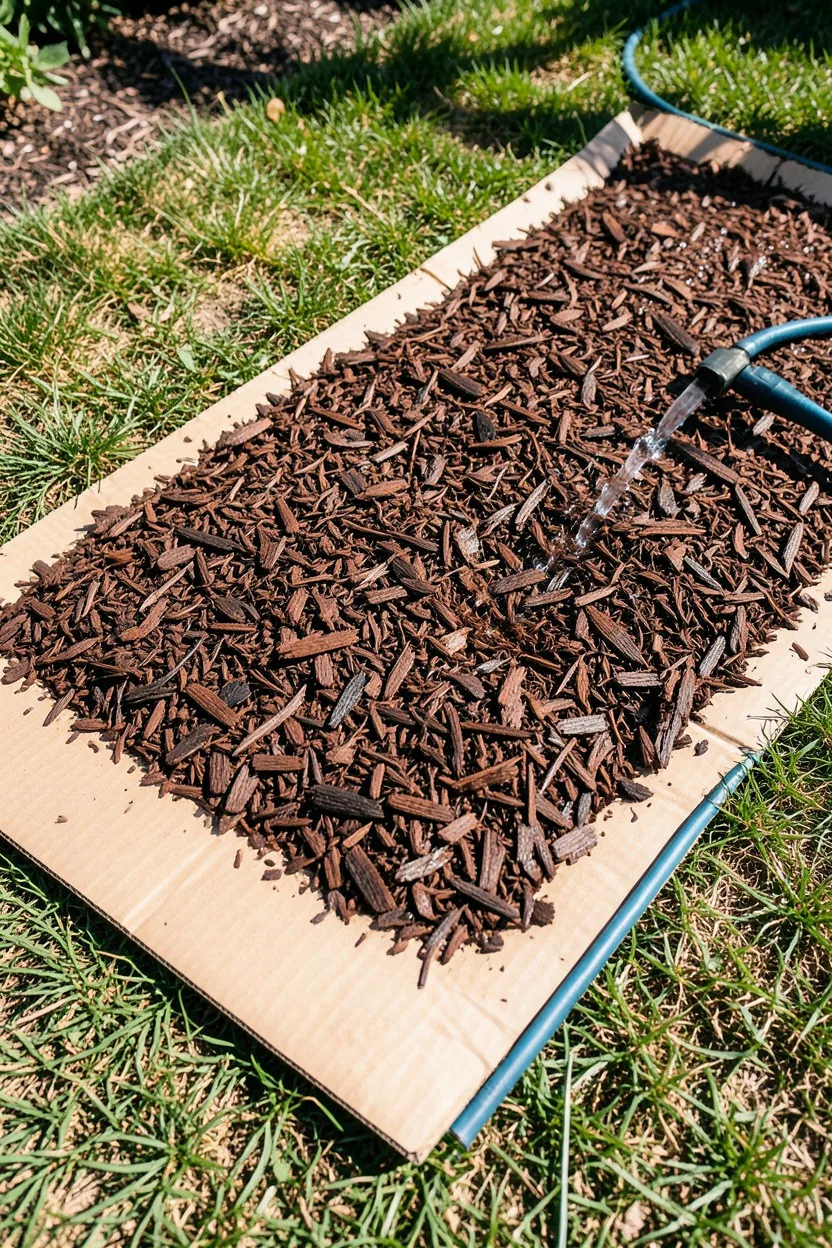
Cheap, dyed red or bright orange mulch looks unnatural, smells strongly of chemicals, and bleaches out to an ugly grey within three months. To get that rich, forest-floor look found on professional estates, use a two-layer natural mulching system that enriches your soil while looking spectacular.
First, lay down three layers of plain, unprinted corrugated cardboard directly over any existing weeds or grass. Soak the cardboard thoroughly with a garden hose until it is completely saturated. This chokes out light and kills weeds without toxic sprays.
Top the cardboard with a three-inch layer of shredded hardwood bark or clean arborist wood chips. Call local tree trimming companies or use an online service like ChipDrop to get a truckload of fresh wood chips dumped in your driveway completely free. As it breaks down, it creates dark, spongy, high-nutrient soil while keeping your garden beds looking dark, unified, and pristine.
9. Bury Plastic Pots to Create Swappable Seasonal Displays
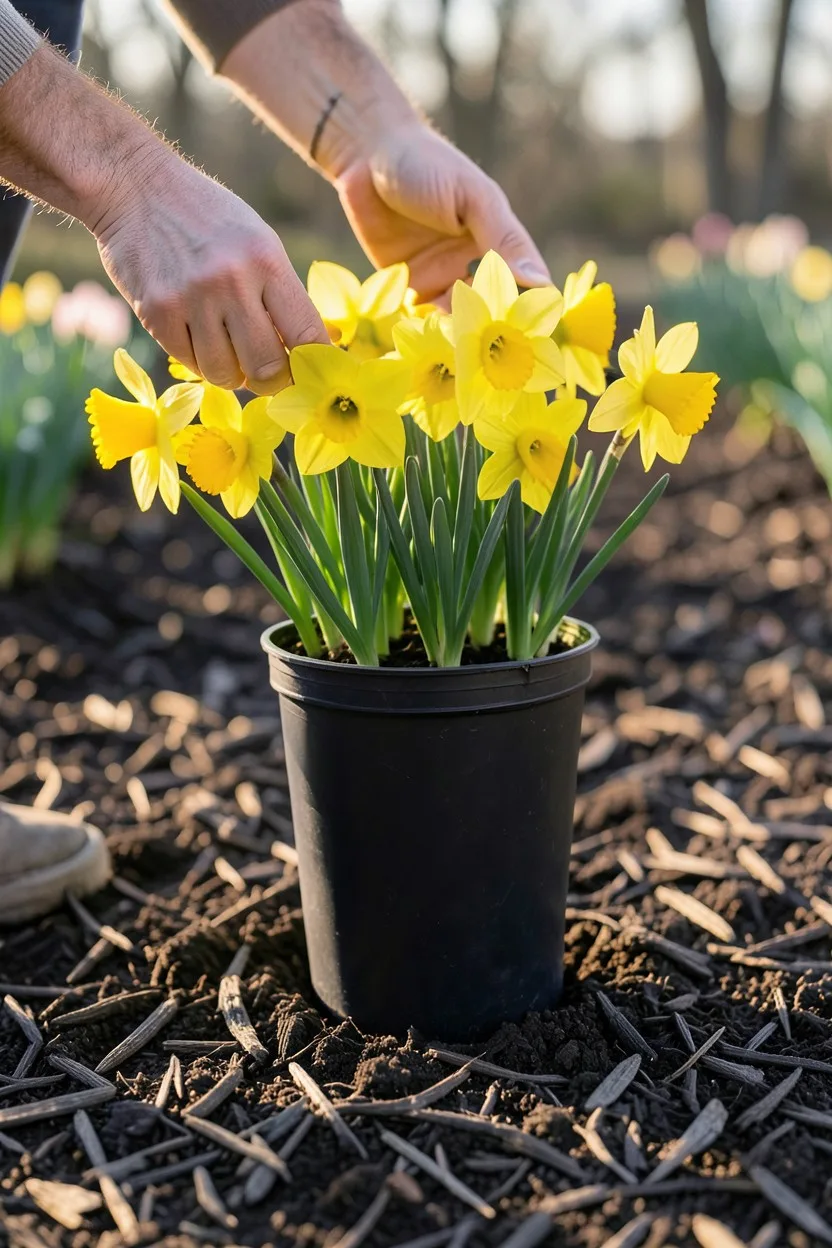
Buying fresh annual flowers for your front beds every spring, summer, and autumn gets incredibly expensive, and digging them up constantly destroys your soil structure. Here is a brilliant designer trick: dig a permanent hole in your garden bed and drop an empty, heavy-duty five-gallon plastic nursery pot directly into the dirt, burying it right up to the rim.
Now, you have a permanent, hidden sleeve in the ground. When spring arrives, buy cheap, pre-grown containers of tulips or daffodils from the grocery store, drop their plastic pots directly into the buried sleeve, and cover the rims with a handful of loose mulch. It instantly looks like they grew there naturally.
When those flowers fade, lift the plastic pot out, drop it into your compost pile, and slide a fresh pot of summer geraniums or autumn chrysanthemums into the exact same hole. Your front walkway will feature rotating, estate-quality seasonal color all year long with zero digging and minimal expense.
⚠️ COMMON MISTAKE
Don't Trap Excess Standing Water
Always drill four to six extra half-inch drainage holes in the bottom of your buried plastic sleeves. If heavy rain hits and the sleeve has poor drainage, the roots of your display pot will sit in stagnant water and rot within days.
10. Free Division of Existing Perennial Hosta and Daylily Clumps
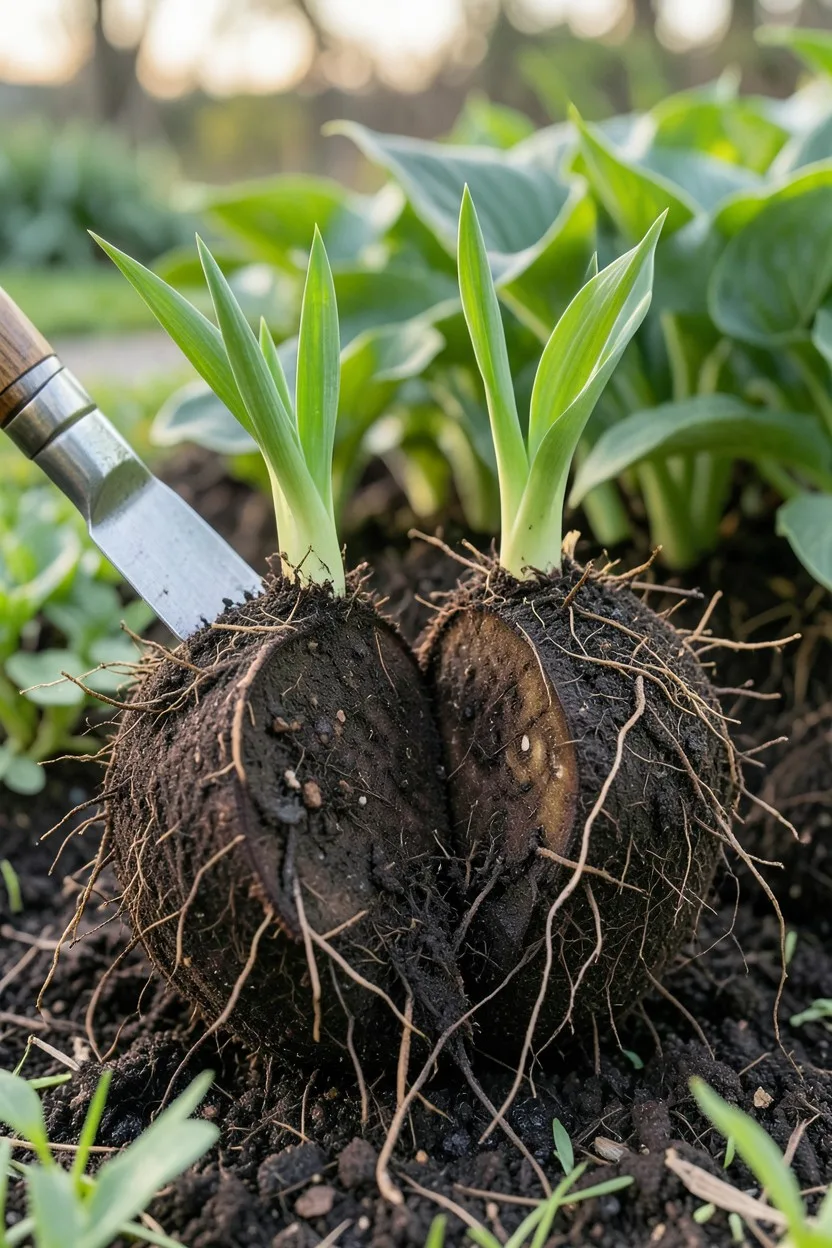
Never buy forty separate plants when you can buy ten and turn them into forty for free. Tough, fibrous-rooted perennials like hostas, daylilies, and ornamental iris grow in expanding clumps. Every three years, these clumps get crowded in the center and begin to lose their vigor.
In early spring, just as the new green shoots start poking through the soil, drive a sharp spade straight down through the center of the plant, cutting the root ball completely in half. Dig up one half, leaving the other half undisturbed in its original spot.
Take the dug-up root mass, slice it into smaller segments using a sharp garden knife, ensuring each piece has at least three healthy green eyes or shoots, and replant them immediately. Water them thoroughly with a liquid seaweed solution to reduce transplant shock. By dividing your own stock, you can fill an entire fence line with lush foliage without spending a single dollar.
Perennial Division — At a Glance
📅 Best Timing
Early Spring / Early Autumn
🛠️ Required Tool
Sharp spade or hori-hori knife
🌱 Yield Multiplier
Turns 1 mature plant into 3–4
💧 Aftercare
Deep watering for 2 weeks
Financial Value
Dividing three mature hosta clumps can yield up to a dozen free plants, saving you over $150 in nursery costs.
11. Uniform Low-Voltage LED Lighting Along Hardscape Paths
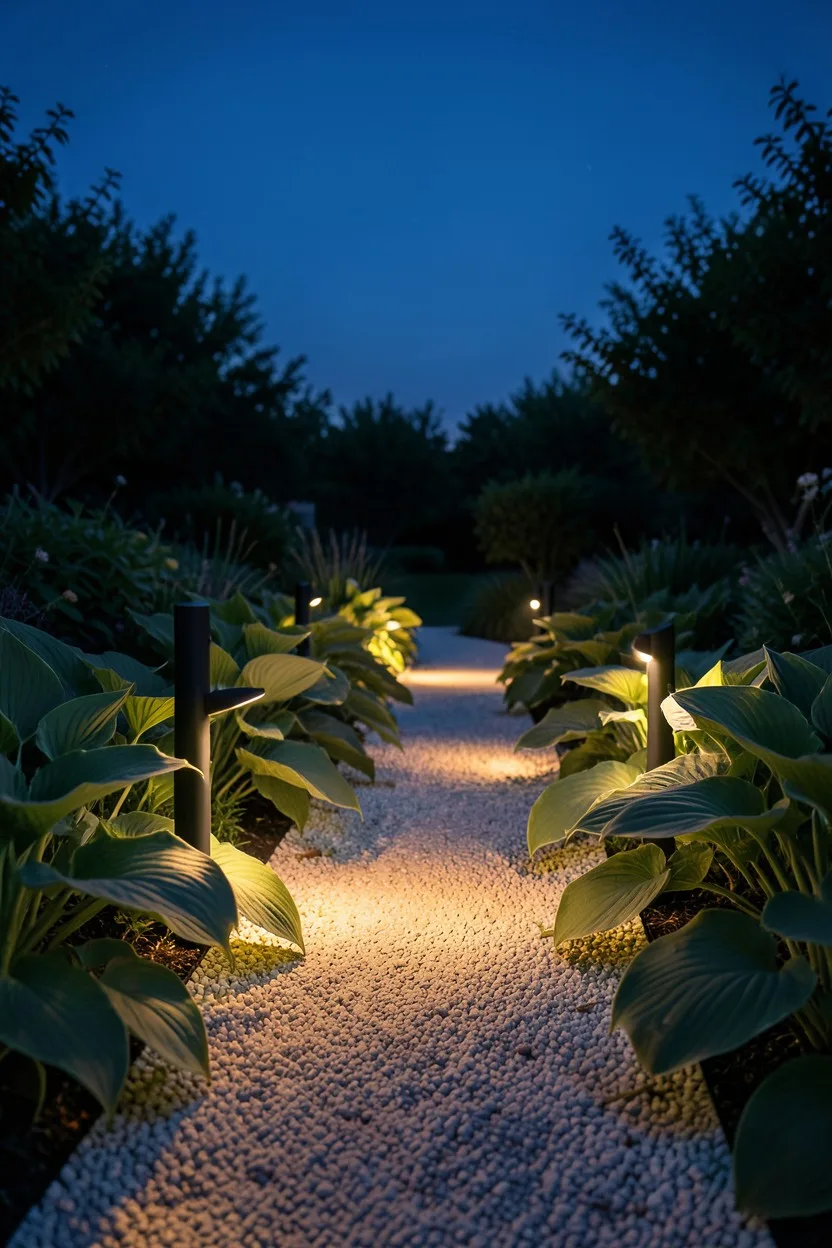
Cheap, plastic solar stake lights from the dollar aisle are a design disaster. They cast a weak, bluish, flickering light, sit crookedly in the soil, and fail completely on cloudy days. To get that warm, resort-style nighttime glow, install a wired low-voltage LED landscape system.
You do not need an electrician. Buy a basic 12-volt outdoor transformer and a spool of 14-gauge low-voltage landscape wire. Choose heavy, die-cast aluminum light fixtures with an oil-rubbed bronze or matte black finish that screw directly into heavy plastic ground stakes.
Run the wire along your flower beds, bury it just three inches deep under your mulch, and use clip-on waterproof connectors to attach the lights. Space them eight feet apart, alternating sides of the path to avoid a runway look. The warm 2700K light washing over your plants and walkway completely transforms the yard after dark, adding instant luxury.
12. Monolithic Vertical Stone Pillars Placed in Perennial Beds
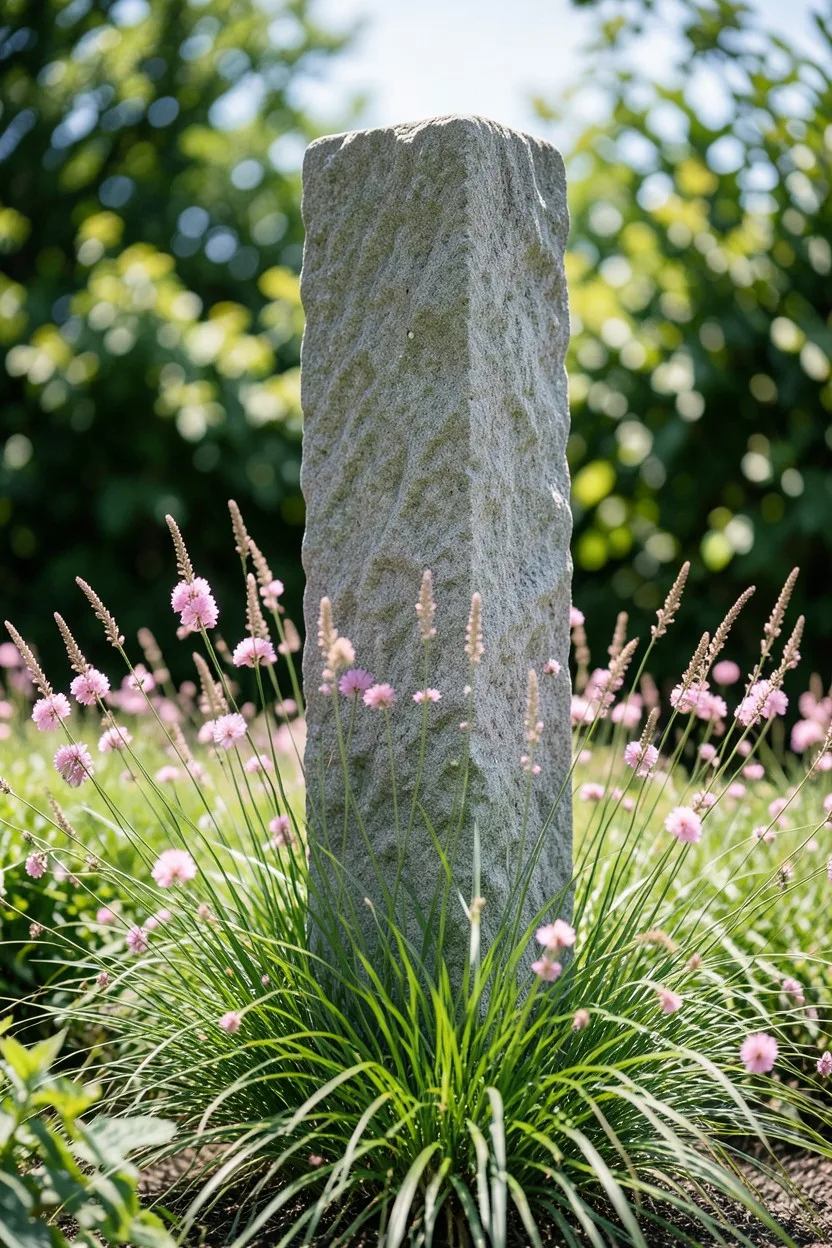
High-end landscape designs always include heavy structural elements to balance out soft, airy plant foliage. You do not need to build an expensive brick wall or a stone fireplace to achieve this balance. Go to a local commercial quarry or stone yard and look for individual quarry scrap pillars or long, rough-cut flagstones.
Look for pieces that are four to five feet long, with rough, unfinished, natural edges. Dig a deep hole, stand the stone vertically up on its end like a miniature monolith, and fill the base of the hole with packed crushed gravel and dirt to anchor it securely. At least one-third of the stone should be underground for safety.
Surround the base of the stone pillar with airy, movement-heavy plants like fine-textured ornamental switchgrass or delicate purple gaura. The contrast between the rigid, heavy, ancient-looking grey stone and the soft, dancing green foliage creates an incredible artistic balance that looks like a custom museum installation.
13. Inexpensive Galvanized Stock Tanks for Industrial Raised Beds
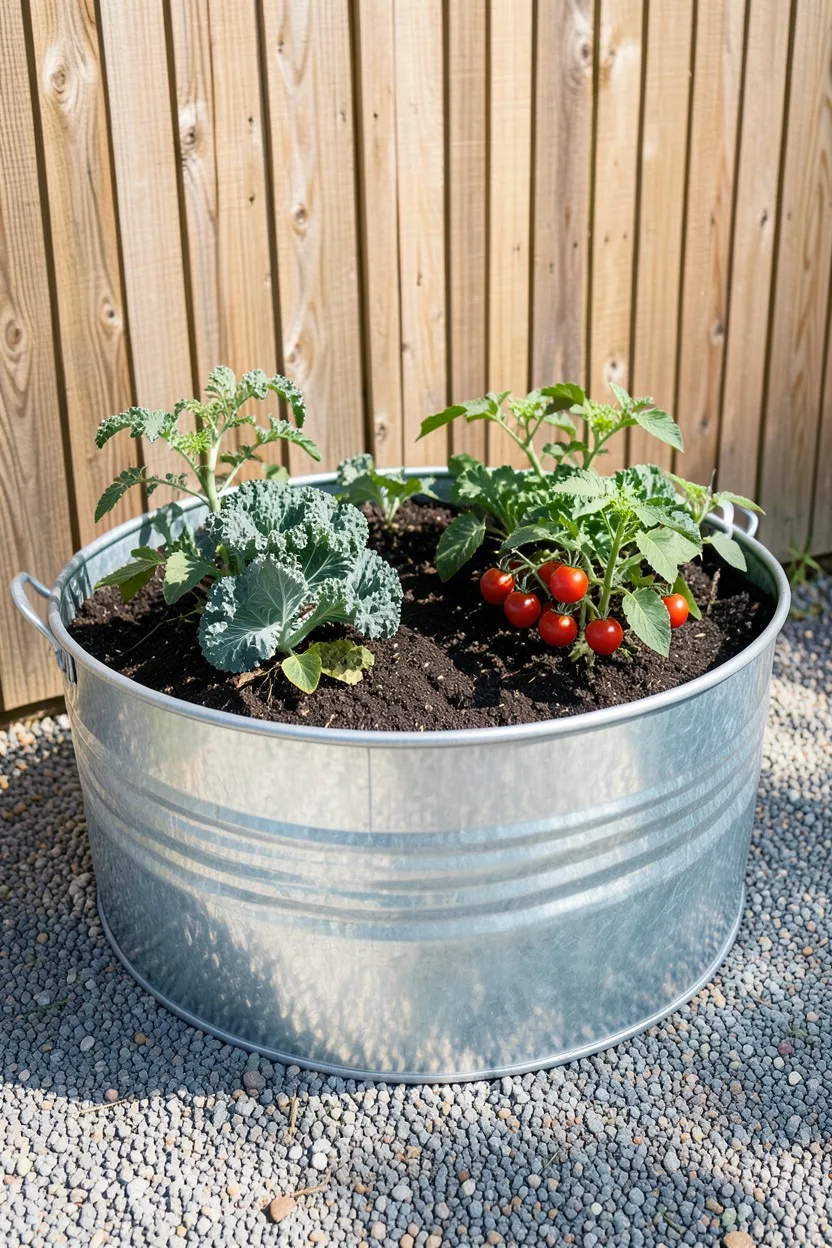
Building custom masonry or premium cedar raised beds can cost a small fortune in material and fasteners, and cheap pine boards will rot out within three seasons. For a clean, modern, architectural look that lasts for decades, buy galvanized steel stock tanks from a local agricultural feed store.
A six-foot-long oval stock tank costs a fraction of the price of high-end raised bed kits. Before filling it, flip the tank upside down and use a step-drill bit to create a dozen one-inch drainage holes across the entire bottom. Set the tank on a level pad of crushed gravel or coarse leveling sand.
To save money on soil, do not fill the entire tank with expensive potting mix. Use the Hügelkultur method: fill the bottom half with old rotting logs, fallen branches, and packed autumn leaves. Top that with a layer of cheap topsoil, and use premium organic potting mix only for the top eight inches where plant roots actually live.
Raised Bed Materials: Value vs Cost
Galvanized Stock Tanks
- Lasts 20+ years without rotting or cracking.
- Installs in minutes with zero assembly required.
- Provides a clean, modern industrial look.
- Easy to move or reposition if your layout changes.
Standard Treated Lumber
- Rots out or warps within 5 to 7 years.
- Requires hours of cutting, drilling, and screwing.
- Chemical treatments can leach into food crops.
- Lumber prices vary wildly and stay expensive.
14. Direct-Sowed Carpet of Jewel-Toned Moss Phlox on Slopes

If you have a steep, sunny bank or an ugly clay slope where grass refuses to grow, do not spend money on sod or expensive retaining walls. Plant creeping moss phlox, specifically varieties like Emerald Blue or Fort Hill. This evergreen groundcover forms a thick, dense mat that locks soil roots in place to stop erosion completely.
Buy small starter flats in early autumn and space them eighteen inches apart across the slope. Mulch heavily between the young plants with shredded bark to keep weeds down while they expand. By the following spring, the entire bank will transform into a solid, vibrant carpet of pink, purple, or white blooms.
When the flowers fade, the foliage stays a tight, vibrant moss-green all summer and winter long. It smothers weeds completely, requires zero mowing, and makes a difficult, ugly slope look like a carefully planned alpine rock garden.
15. Symmetrical Espalier Fruit Trees Against Plain Fences
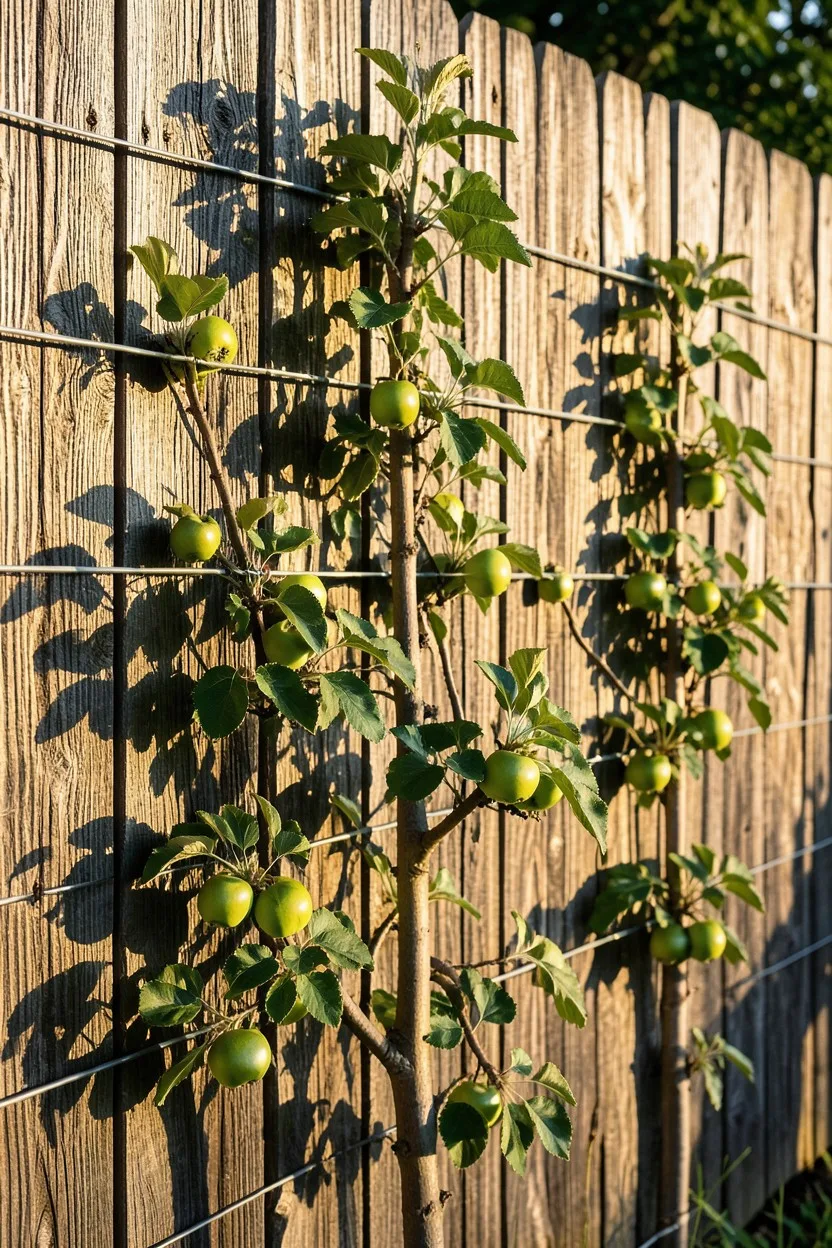
A blank, weather-beaten wooden fence or an empty brick garage wall can look incredibly stark and depressing. Instead of buying expensive outdoor wall art, train a fruit tree to grow flat against the surface in a formal, classical technique called espalier.
Buy a young, single-stem bare-root apple or pear tree for a fraction of the cost of a mature container tree. Mount heavy-duty eye hooks into your fence posts or brick wall, and stretch thick 12-gauge galvanized wire horizontally between them, spacing the wires eighteen inches apart vertically.
As the tree grows, tie the flexible side branches horizontally along the wires using soft rubber garden ties, and snip away any branches that try to grow outward toward you. Within two seasons, you will have a stunning, symmetrical living sculpture that produces fresh fruit while taking up less than a foot of bed depth.
💡 PRO TIP
Prune for Form, Not Just Fruit
When maintaining an espalier tree, check it every two weeks in summer. Pinch off any aggressive vertical shoots that sprout from the horizontal arms to keep the clean, graphic lines of the wooden frame perfectly sharp.
16. Uniform Dark Hardwood Mulch on Regular Soil Islands
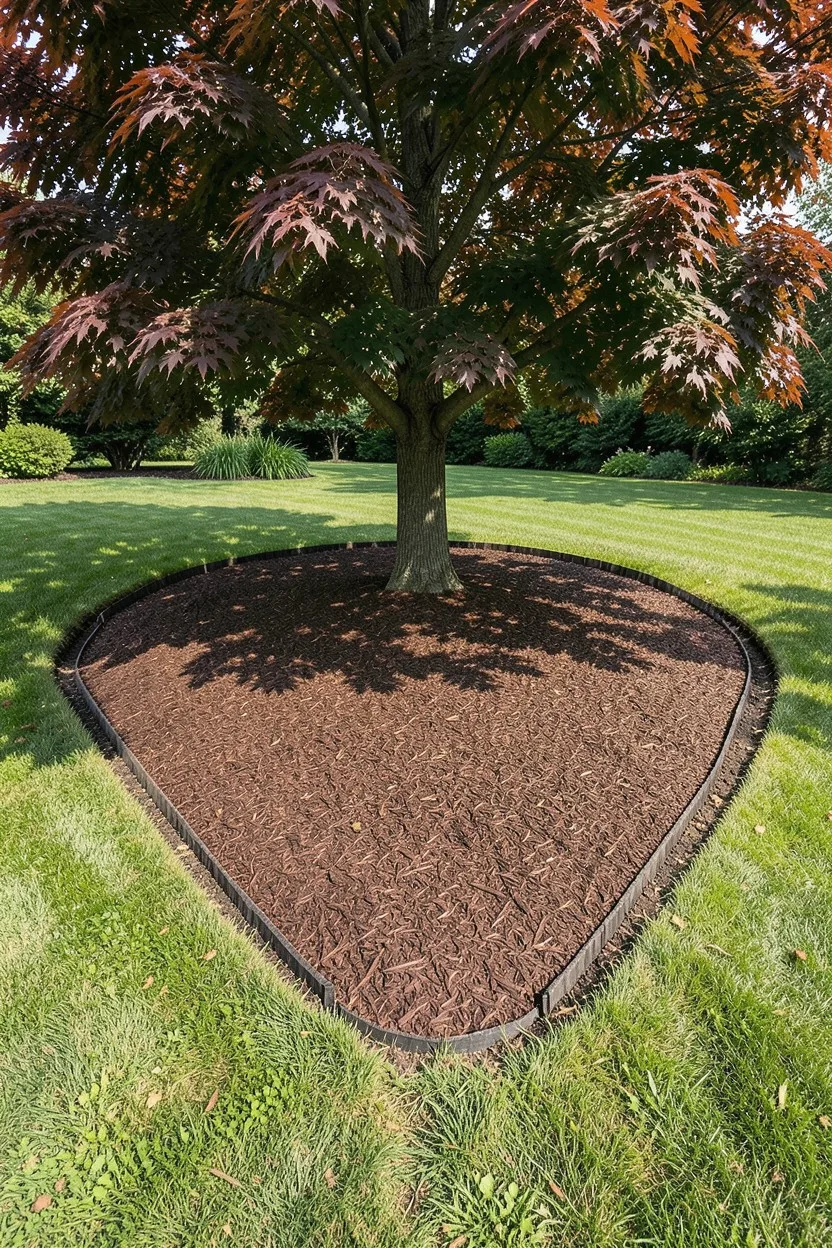
If your yard is a giant expanse of patchy grass, do not spend thousands of dollars tilling the whole lawn and laying new sod. Instead, create large, intentional 'islands' of deep garden beds around your existing mature trees or along the corners of your property lines.
Use your garden hose to map out smooth, wide, teardrop-shaped lines around the trees, ensuring the curves are gentle enough for a lawnmower to follow easily. Smother the grass inside the line with cardboard, and dump a thick four-inch layer of uniform, dark brown double-shredded hardwood mulch directly over it.
Even if you do not have the budget to fill these beds with expensive plants yet, the sheer presence of large, clean, dark islands completely breaks up the monotony of a bad lawn. It gives the eye a structured place to rest and makes the entire yard look heavily designed and curated.
17. Heavy-Duty Rebar and Twine obelisk Trellises
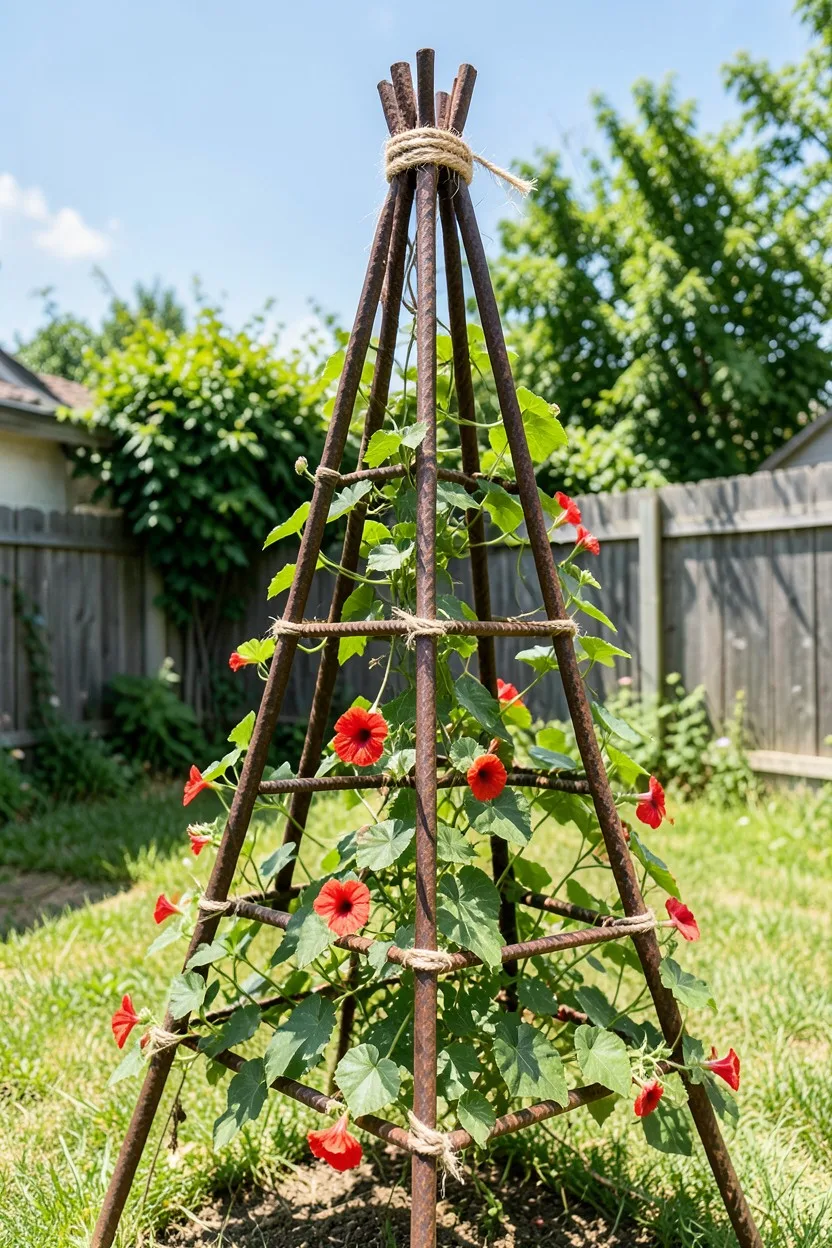
Cheap plastic or thin wooden diamond-lattice trellises from the garden center look flimsy, break during high winds, and rot out within two years. If you want a striking vertical element that looks industrial and custom-built, make your own obelisk trellises using steel rebar.
Buy four ten-foot pieces of half-inch steel rebar from the construction aisle of your local hardware store. Drive the bottom twelve inches of each piece firmly into the ground in a four-foot square pattern, then gather the top ends together in the center to form a tall pyramid shape.
Secure the tops tightly using heavy-duty copper wire or thick jute twine. Wrap more jute twine horizontally around the structure every twelve inches to create a climbing grid. Plant fast-growing, heavy-blooming vining plants like purple clematis or climbing nasturtiums at the base. The steel will naturally rust to a gorgeous, deep amber patina that looks incredibly artistic.
18. Grouped Honorable Mentions for Fast Ground Coverage
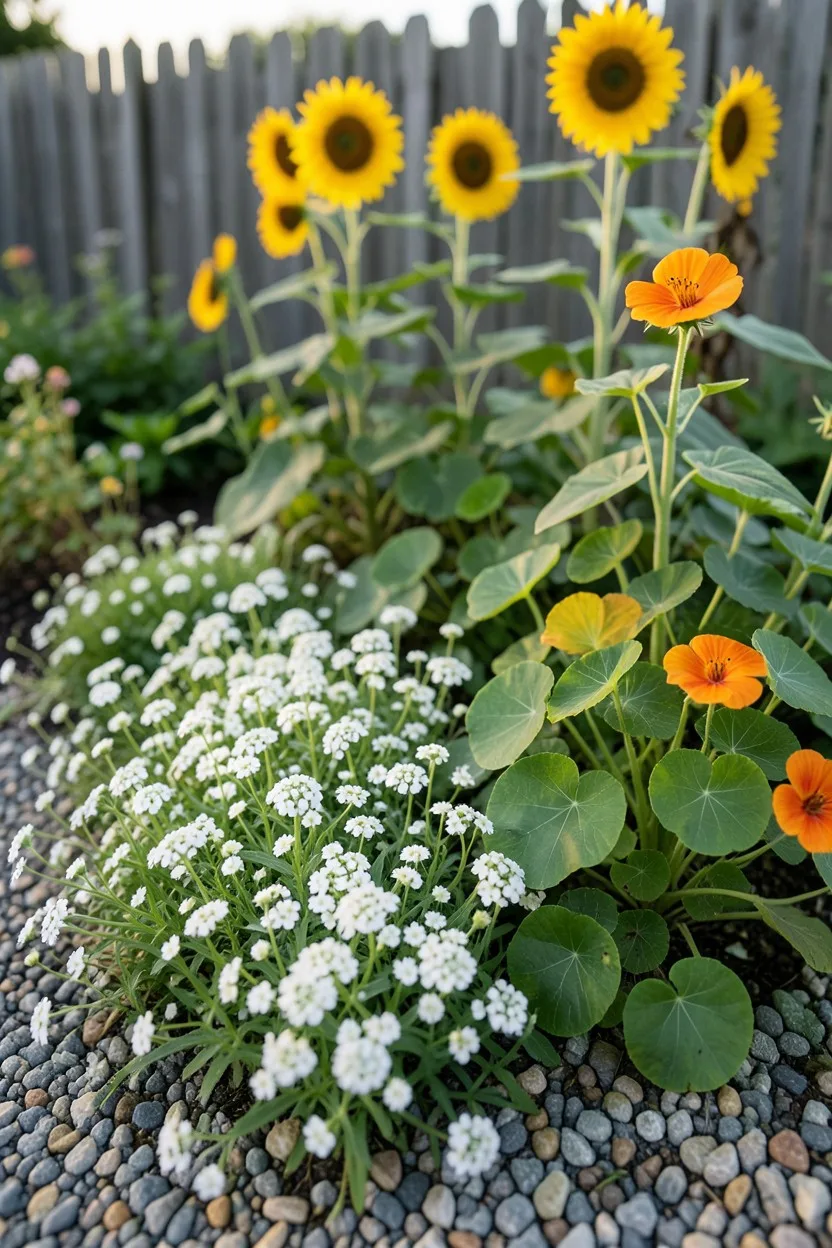
If you still have bare patches of dirt that need immediate coverage before weeds take over, here are three budget-friendly workhorses you can direct-sow from cheap seed packets right now. Nasturtiums: Sow Jewel Mix seeds directly into poor soil; they produce massive mounds of round, lily-pad leaves and bright edible flowers within six weeks while choking out weeds.
Sweet Alyssum: Sow these tiny seeds along the absolute front edge of your gravel pathways; they germinate in days and form a dense, low-growing white carpet that smells strongly of honey all summer. Sunflowers: Drop Autumn Beauty or Velvet Queen seeds along the back of your beds against the fence line; they rocket up eight feet tall in ten weeks, providing massive vertical scale for pennies.
Choose nasturtiums if you need to cover raw clay banks, alyssum to softening your hardscape borders, and sunflowers for instant height. Combining these fast seeds ensures no bare dirt remains to ruin your high-end look.
Frequently Asked Questions
How can I find cheap landscaping materials near me?
Look up local commercial quarries, arborist companies, and municipal recycling centers rather than retail nurseries. Many cities offer free shredded mulch or compost to residents who bring their own trucks, and tree crews will gladly dump wood chips for free to avoid landfill fees.
Will a dug Victorian trench edge wash away in heavy rain?
No, if you dig it correctly with a sheer vertical drop on the lawn side and a 45-degree slope on the bed side, the shape holds remarkably well. Water flows into the bottom of the trench and drains away, leaving the clean grass line completely intact.
Can I use cardboard with ink or tape for sheet mulching?
You must peel off all plastic packing tape, shipping labels, and heavy plastic staples before laying down the cardboard. Standard black or colored printing ink is perfectly fine, but avoid glossy, highly waxed cardboard boxes as they block water flow.
How do I keep cheap gravel from tracking into my lawn?
Always choose angular, crushed stone sizes like 'quarter-inch minus' or decomposed granite, and pack it down firmly with a heavy hand tamper. The tiny stone dust particles lock the gravel into a solid, stable surface that does not roll under your shoes.
Final Thoughts
If you only add one thing from this list to your yard this weekend, make it the deep Victorian trench edge along your front walkway. It requires absolutely zero dollars, takes about two hours of honest sweat with a sharp spade, and the immediate visual change is so stark it will make your old patchy lawn look like a calculated design choice. High-end landscaping is a game of control and contrast, not a game of who has the biggest bank account—go pick up your shovel and prove it.

John Smith is the founder and CEO of Karaoke Machines Guru. He is a karaoke tutor and karaoke enthusiast and has been passionate about karaoke since he was a child. He also writes about karaoke-related tips, guides, and product reviews on this website.
He overlooks the whole website and makes sure that everything is running smoothly. Learn more!