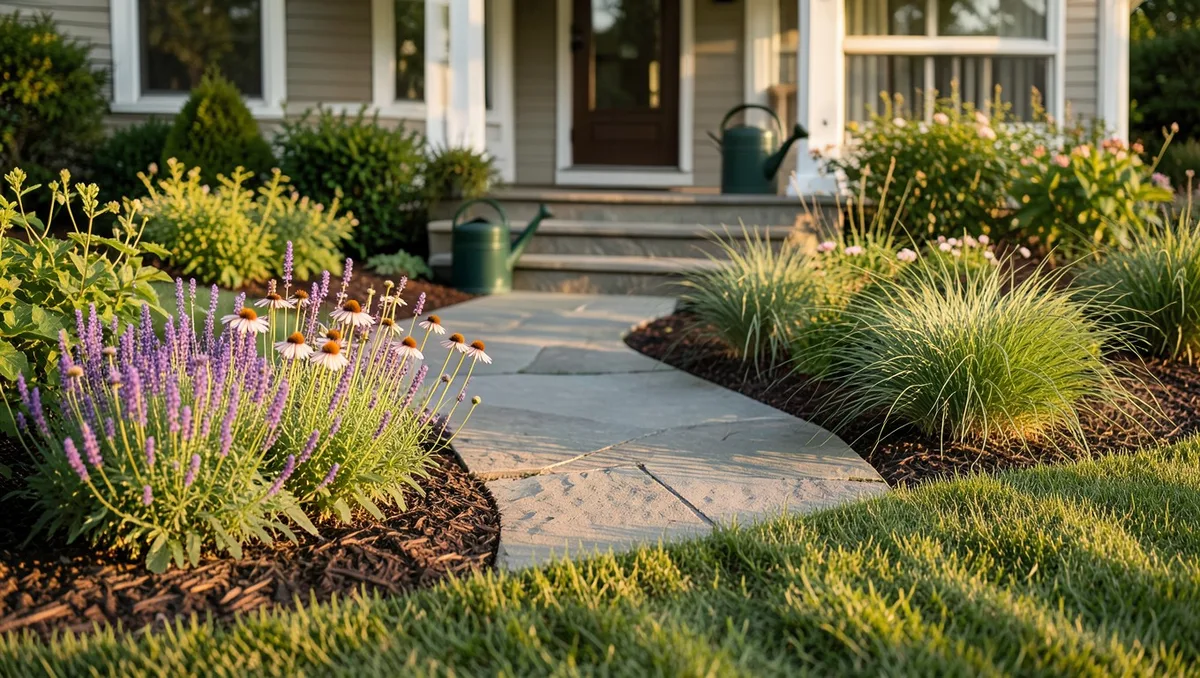
Your front yard is your home's handshake, but professional landscaping quotes are enough to make your stomach drop. Last spring, my neighbor was quoted $4,500 for a basic front border refresh, and honestly? It made me furious. You do not need a crew of five, a Bobcat, and a second mortgage to make your front walk look like a high-end editorial spread. You just need a Saturday, a trunk full of specific materials, and a clear tactical plan.
Over the years, I have wasted hundreds of dollars on cheap plastic edging that shattered during the first frost and impulse plant buys that died within three weeks because I ignored my zone's soil realities. This guide cuts through the generic internet fluff to give you 17 hard-hitting, concrete projects you can pull off this weekend for under $200 each. We are talking real materials, exact dimensions, and the honest design rules that corporate landscaping companies do not want you to figure out on your own.
Quick Tips Before You Start
Measure Twice
Calculate your exact square footage before ordering bulk mulch or stone to avoid overpaying.
Call 811
Always dig safely by having underground utility lines marked before starting any edging or trenching project.
Source Local
Check your city's municipal recycling center for free or deeply discounted hardwood mulch and compost.
1. Deep Spade-Cut Border Edging
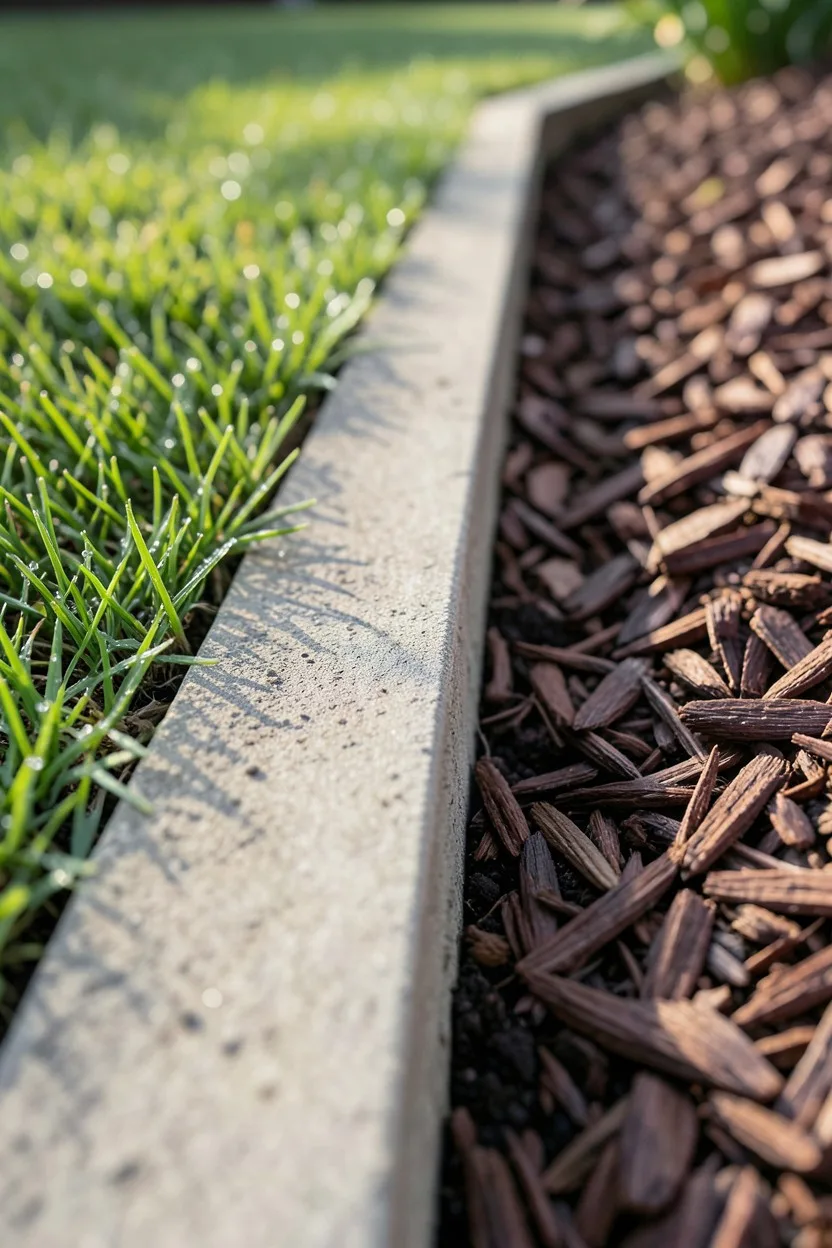
Stop buying flimsy plastic landscape edging from the big-box store. It buckles in the summer heat, pops out of the ground during winter freezes, and looks incredibly cheap within six months. The most elegant, high-end edging option used by professional botanical gardens costs exactly zero dollars in materials: a deep, clean spade-cut trench.
Take a sharpened half-moon edger or a straight-blade spade and cut a vertical 4-to-6-inch deep wall directly into the turf at a sharp 90-degree angle. Then, slope the soil back into the garden bed at a 45-degree angle. This creates a literal moat that catches the eye and physically stops grass roots from invading your flower beds. Fill the bed up to the edge with dark brown shredded hardwood mulch to make the line pop.
💡 Tip: Re-cut this edge twice a year—once in early spring and once in mid-autumn—to keep the line razor-sharp.
2. The Three-Tier Perennial Mass Layering
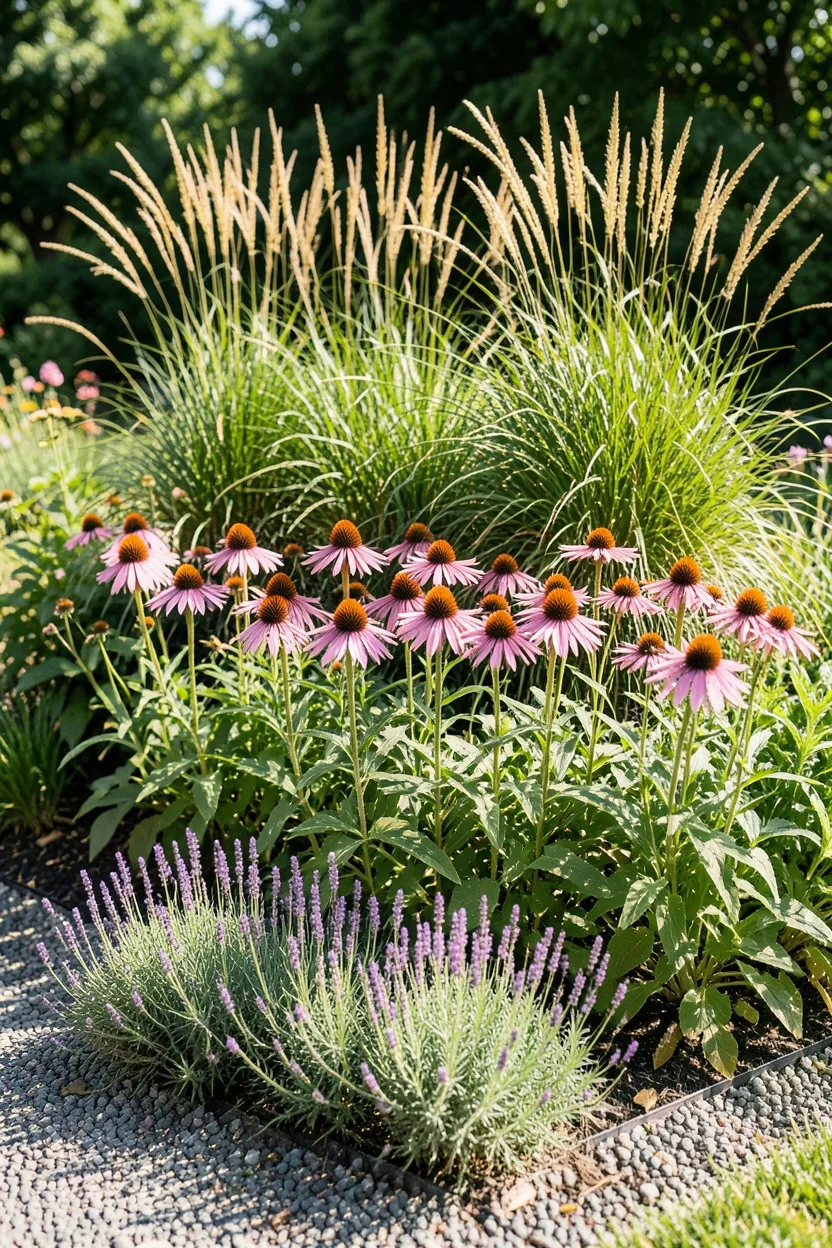
The biggest mistake I see in DIY front yards is the 'one of everything' nursery haul. Planting one hosta, one daisy, and one coral bell looks cluttered and chaotic from the street. Instead, steal the estate design secret: mass planting in structured vertical tiers.
Spend your $200 budget on just three specific plant varieties that thrive in your light conditions. For a sunny front yard, buy three Walker's Low catmint plants for the front border, three Magnus coneflowers for the middle layer, and two Karl Foerster feather reed grasses for the structural back row. Plant them in tight, staggered zig-zag groups rather than straight lines. This creates an immediate visual rhythm that feels deliberate and expensive.
Sunny Tiered Bed — At a Glance
☀️ Light Requirement
6+ Hours Full Sun
🌱 Front Layer
Walker's Low Catmint
🌸 Middle Layer
Magnus Coneflower
🌾 Back Layer
Karl Foerster Grass
💰 Total Plant Cost
Approx. $140–$160
Design Value
Staggering these specific varieties creates year-round texture and structural definition that mimics high-end professional designs.
3. Flagstone Stepping Stone Infill Pathway
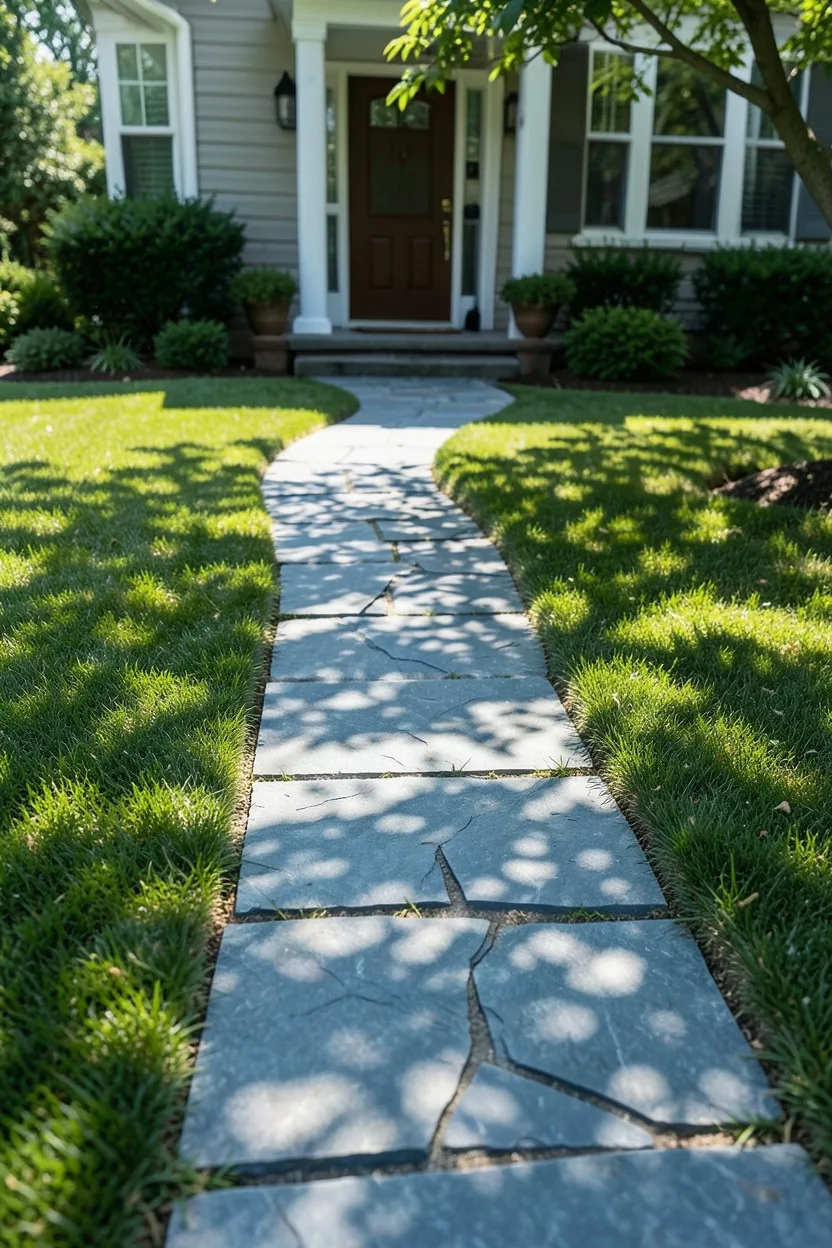
A dirt path worn into your grass from the driveway to the front porch ruins your curb appeal instantly. Pouring a formal concrete walkway will run you thousands, but you can build a stunning, rustic flagstone stepping path for under $180.
Head to a local landscape supply yard—not a retail nursery—and buy individual irregular pieces of Pennsylvania bluestone or local limestone flagstone, targeting pieces roughly 1.5 to 2 inches thick and at least 18 inches wide. Lay them out on your lawn to match a natural human stride, roughly 24 inches from center to center. Trace each stone with a trowel, slice away the sod underneath down to 2 inches, drop in a half-inch layer of leveling sand, and set the stone flush with the grass line so your lawnmower glides right over them.
🌱 GROWING TIP
Keep Stepping Stones Mower-Safe
Always dig your stone beds slightly deeper than the stone thickness. Adding a half-inch of leveling sand allows you to tap the flagstone down with a rubber mallet until it sits roughly a quarter-inch below the surrounding turf line, saving your mower blades from disaster.
4. Symmetrical Heavyweight Terracotta Planters
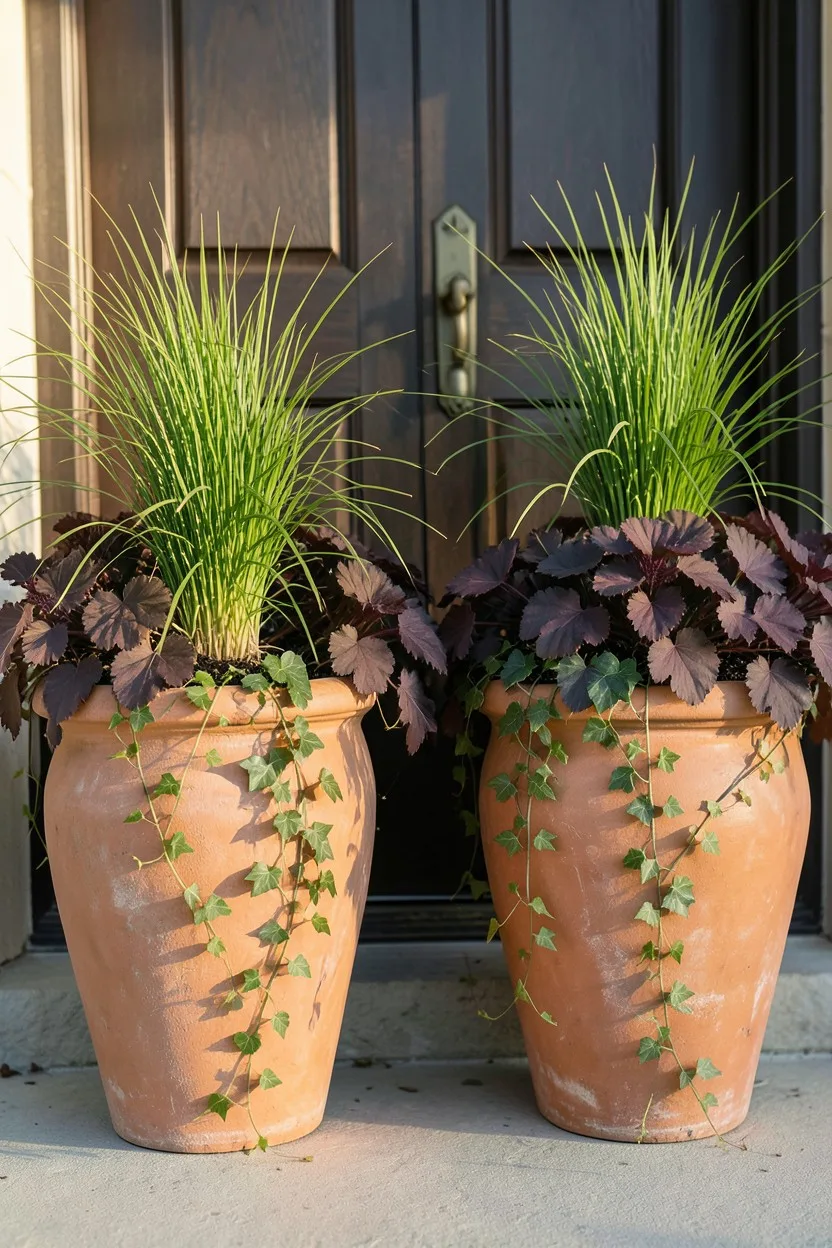
Small, mismatched plastic pots scattered across a front porch look like an accidental garage sale. If you want your entryway to feel grounded and stately, you need scale and symmetry. Two massive, identical planters flanking your front door will do more for your home's exterior than twenty tiny pots.
Buy two large 16-inch or 18-inch Italian terracotta pots, which generally run about $40 to $50 each at regional garden centers. Do not plant generic annual mix-packs. Fill them using the classic 'thriller, filler, spiller' formula. Use a bold structural element like a dwarf Alberta spruce or an upright sweet flag grass as your thriller, vibrant coral bells or silver dichondra as your filler, and English ivy or sweet potato vine to spill over the front edge.
5. High-Contrast Double-Shredded Hardwood Mulch Rings
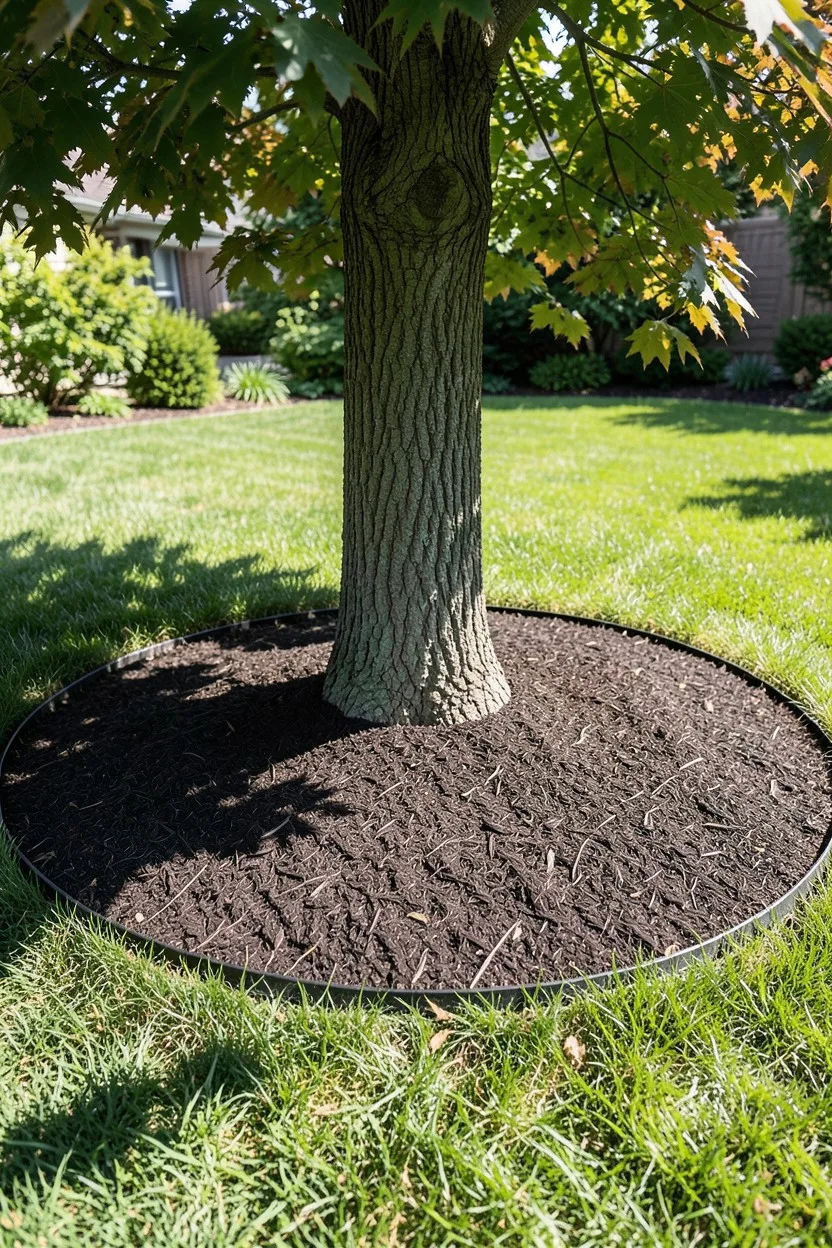
If your front yard tree has grass growing right up to its trunk, it looks unfinished and invites lawnmower damage to the bark. Creating a wide, dramatic mulch ring is one of the fastest ways to inject a crisp, professional park-like aesthetic into your landscape.
Measure a clean, perfect circle out from the trunk, extending at least 3 feet in all directions. Use your spade to slice away the turf within that circle, taking care not to dig deep near the main tree roots. Lay down a breathable woven landscape fabric or three layers of damp newspaper to choke out weeds, then apply exactly 3 inches of black or deep espresso double-shredded hardwood mulch. Never pile the mulch against the bark like a volcano; leave a 2-inch clear gap around the trunk base to prevent rot.
Best Mulch Options
6. Low-Voltage Solar LED Path Uplighting

Great landscaping should not disappear when the sun goes down. Professional architectural lighting systems cost a fortune because they require running low-voltage wiring underground and installing high-output transformers. You can get 80% of that luxury look using premium solar fixtures if you choose the right warm-color temperature.
Avoid the cheap $2 plastic stakes that cast a cold, bluish tint. Spend $120 on a high-quality 6-pack of die-cast aluminum solar uplights featuring warm-white 2700K LED chips and glass lenses. Position them 12 inches away from the foundation wall or the base of your focal-point shrubs, angling the solar panel south and tilting the light fixture upward at a 45-degree angle to wash your home's siding and specimen plants in a soft, dramatic glow.
7. The Direct-Sown Native Wildflower Border
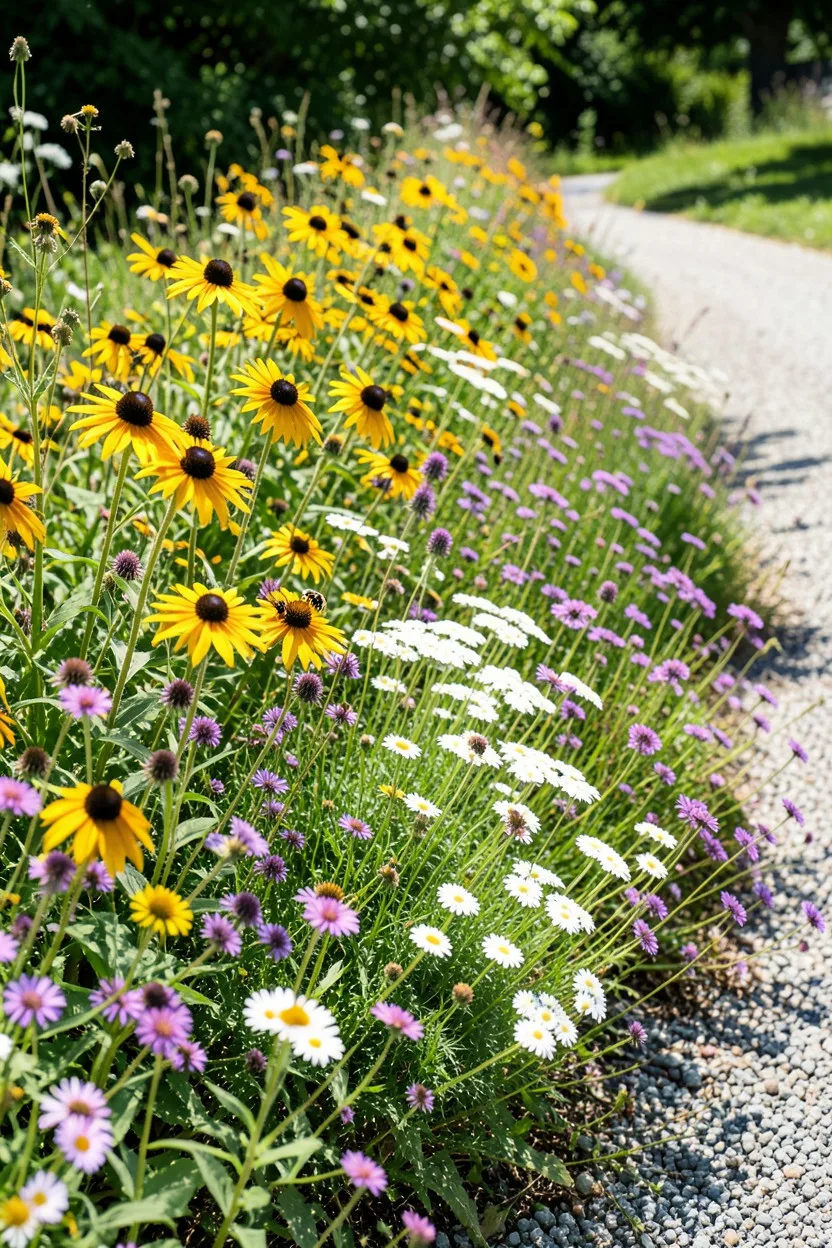
Buying mature native plants in 1-gallon pots gets expensive fast. If you have a long, bare strip along a driveway or fence line that needs a major color injection, skip the nursery pots entirely and direct-sow a dedicated native pollinator seed mix.
For under $50, you can buy a high-quality, regional native wildflower seed blend from a specialized purveyor like Prairie Moon Nursery or American Meadows. Prep is everything here: scalp the grass down to the soil, rake away the debris, and scratch the top half-inch of dirt. Mix your tiny seeds with bucket sand to ensure even distribution, cast them broadly across the zone, and compress the soil using a lawn roller or by walking over it. Water lightly every morning for three weeks, and by mid-summer, you will have a dense, buzzing wall of color that requires zero fertilizer.
⚠️ COMMON MISTAKE
Don't Just Toss Seeds Over Grass
Wildflower seeds cannot compete with established turf roots. If you do not completely remove or smother the existing grass and expose bare mineral soil before sowing, your expensive seed mix will simply rot or get choked out by weeds.
8. River Rock Drainage and Feature Channels
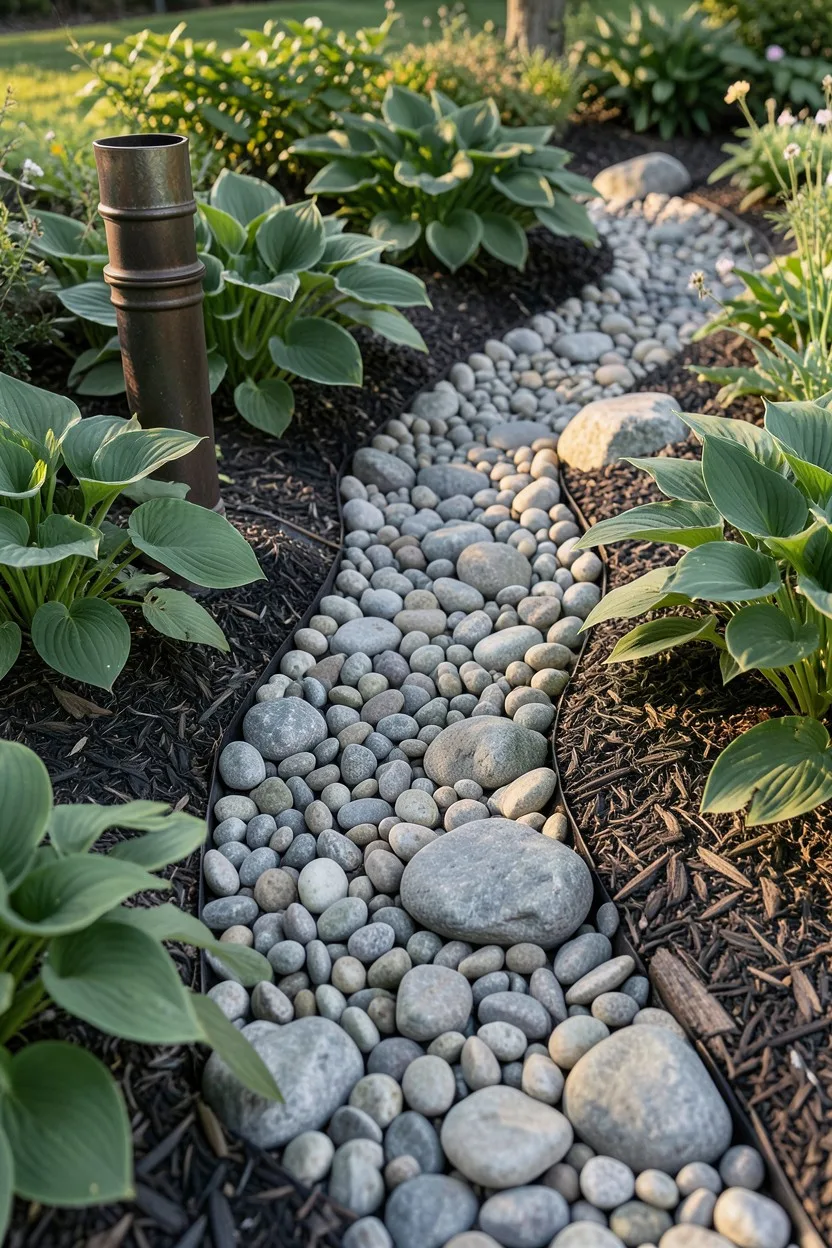
Where your roof downspout pours onto the lawn, it usually creates an ugly, muddy patch that washes away your topsoil. Turn that problem into a gorgeous architectural feature by installing a dry creek bed drainage channel.
Dig out a shallow, winding 6-inch deep trench that carries water away from your foundation toward the lawn. Line the trench with standard heavy-duty weed barrier fabric, then head to your local yard to purchase a quarter-ton of 2-to-5-inch smooth river rock for around $60. Arrange the stones naturally, placing larger rocks along the outer curves of the channel and smaller gravel along the center bed. It solves your erosion problem instantly while introducing a rugged, natural stone texture to your front foundation layout.
9. Cottage-Style Cedar Trellis and Climbing Vines
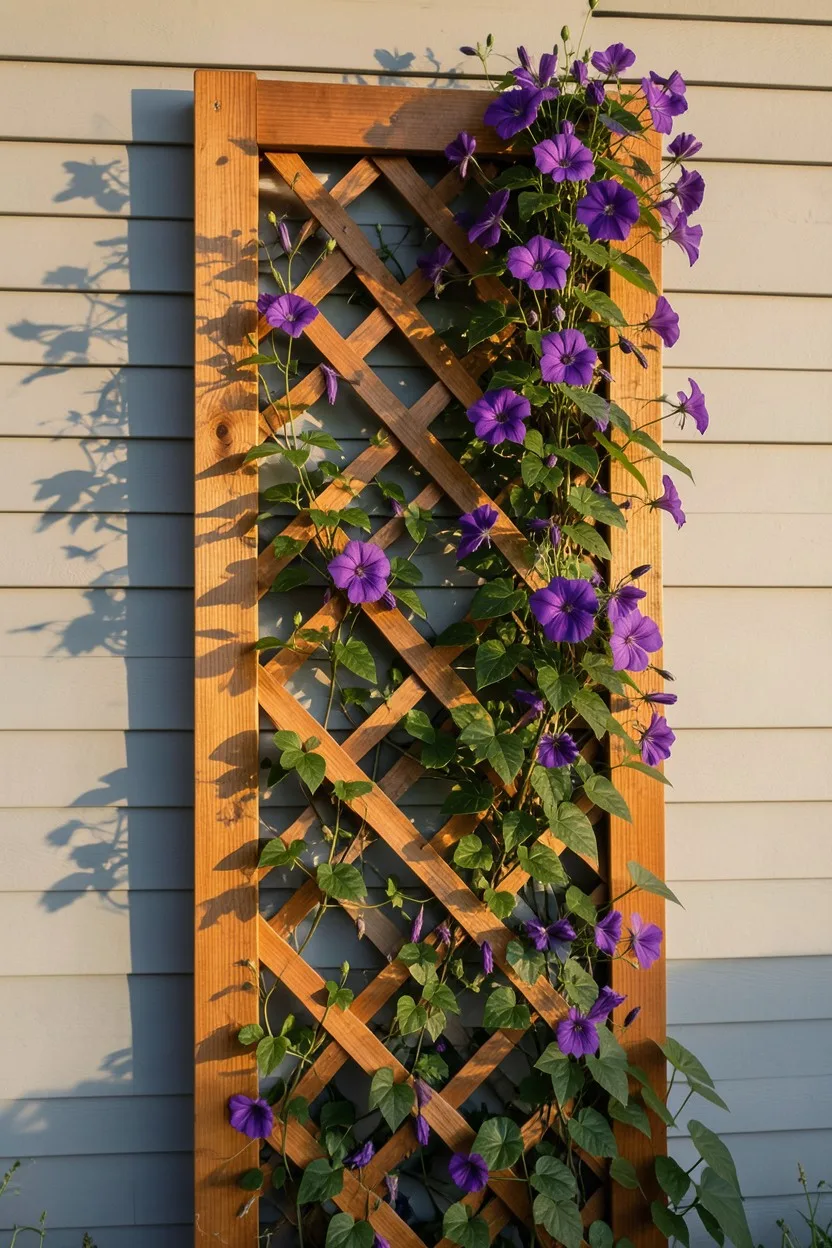
Blank, expansive garage walls or bare brick siding drain the personality out of a home's exterior. You can break up that flat vertical plane by adding height with a simple cedar trellis and a vigorous, flowering climbing vine.
Buy a pre-assembled 6-foot heavy-duty cedar lattice trellis for about $45, or build your own using raw 1×2 cedar furring strips. Anchor it firmly to your siding or brick using spacer blocks so there is a 2-inch gap behind the wood, allowing air to circulate. At the base, plant a single multi-stemmed Clematis variety like 'Jackmanii' or a native honeysuckle. Within two seasons, the plant will scale the framework, turning a boring vertical wall into a lush, blooming feature panel.
Vertical Trellis Plant Specs — At a Glance
🪵 Support Frame
6-Foot Cedar Lattice
🌸 Best Plant Choice
Jackmanii Clematis
📐 Wall Clearance
2-Inch Air Spacer
✂️ Pruning Routine
Cut down in early spring
Pro Tip
Mounting the trellis with a 2-inch gap protects your siding from moisture and gives vine tendrils room to wrap cleanly.
10. Repurposed Brick Walkway Border Accents
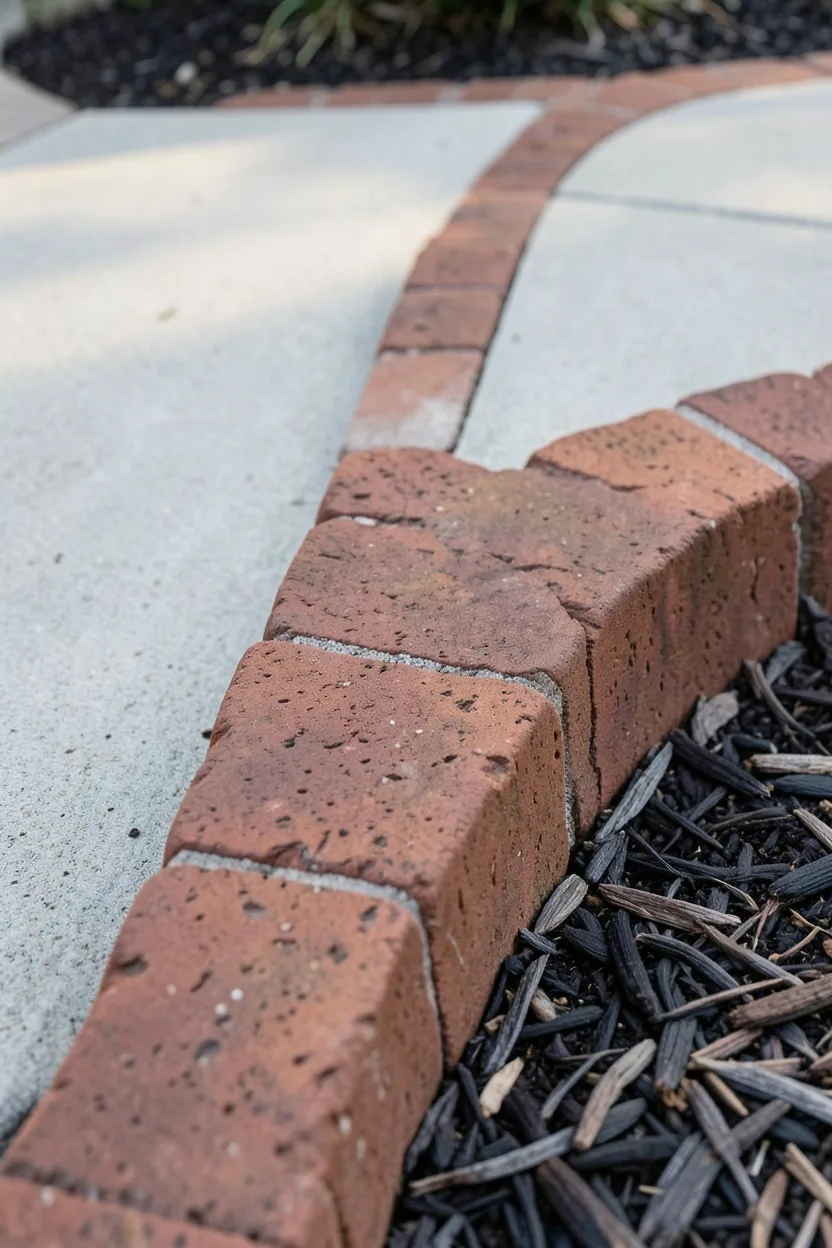
A standard concrete sidewalk can look a bit harsh and cold on its own. You can instantly upgrade its appearance by framing the existing concrete path with a decorative, warm-toned accent border made from real clay bricks.
Search online classifieds or local salvage yards for used historic red clay pavers—you can easily find batches of 100 bricks for under $50. Dig a narrow 4-inch deep trench right along the edge of your concrete path, compact a 1-inch layer of crushed gravel base in the bottom, and lay the bricks tightly end-to-end either flat or at a 45-degree angle for a serrated edge look. Pack coarse polymeric sand into the gaps to lock them firmly in place, keeping weeds from popping through.
11. Foundation Shrub Rejuvenation and Structural Pruning
Sometimes the best budget landscaping move is subtraction, not addition. Overgrown, shapeless foundation bushes that block your front windows make your house look dated and dark. Instead of spending money on new shrubs, spend $30 on a high-quality pair of bypass loppers and a sharp folding pruning saw.
Perform a structural rejuvenation prune in early spring before bud break. Remove all dead, damaged, or crossing branches from the interior of your hollies, boxwoods, or yews to open up air circulation. Cut back the overall height so the foliage sits at least 6 inches below your window sills. Shape them into soft, natural mounds rather than tight, unnatural spheres. It lets light back into your home and instantly cleans up your exterior profile.
✂️ How to Rejuvenate Overgrown Shrubs
Clear the Base
Remove all dead leaves, weeds, and old debris away from the main trunk and lower branches.
Cut the Deadwood
Use a folding pruning saw to cleanly slice out all dead, brittle, or diseased branches from the core.
Open the Center
Prune away crossing or inward-growing limbs to allow sunlight and fresh air to reach the interior structure.
Reduce Height
Trim the upper canopy back until the foliage sits comfortably below your front window sills.
12. The Mailbox Base Flower Bed Conversion
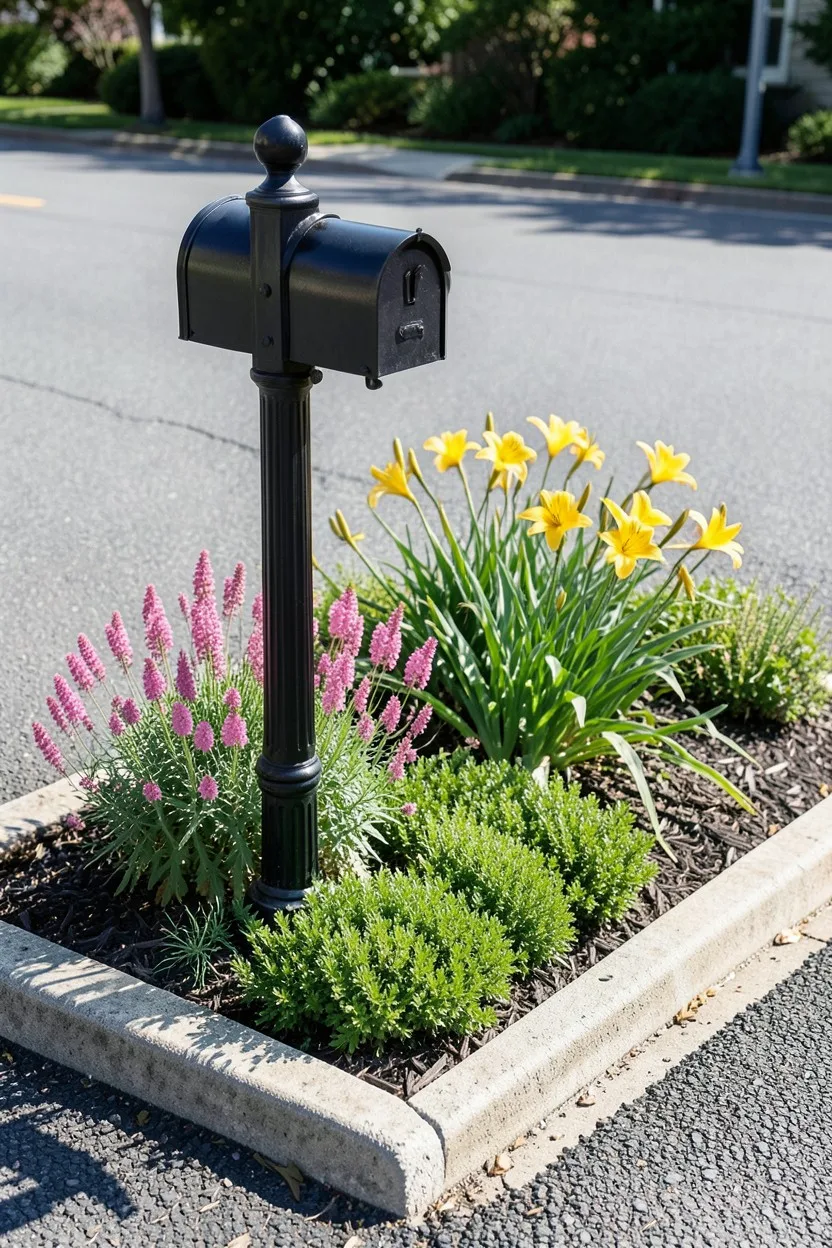
A lonely mailbox post sticking out of a patch of weeds is a massive missed opportunity for curb appeal. You can convert that small patch of ground into a high-impact mini-garden that welcomes visitors right from the street edge.
Dig out a tidy 4×4 foot square bed around your mailbox post. Install a deep spade-cut edge or use leftover stones to frame the perimeter. Plant tough, drought-tolerant species that can handle intense road heat, occasional salt spray, and dry conditions. A combination of low-growing 'Autumn Joy' sedum, daylilies, and a creeping groundcover like creeping thyme will thrive with absolute minimal maintenance, providing reliable color and texture all season long.
💡 PRO TIP
Choose Road-Tough Plants Only
The soil next to the street faces extreme conditions, including heat radiation from the blacktop and winter salt runoff. Skip delicate flowers and opt for ultra-hardy perennials like sedum, daylilies, or ornamental grasses that can take a beating.
13. Pre-Cast Concrete Tree Ring Borders
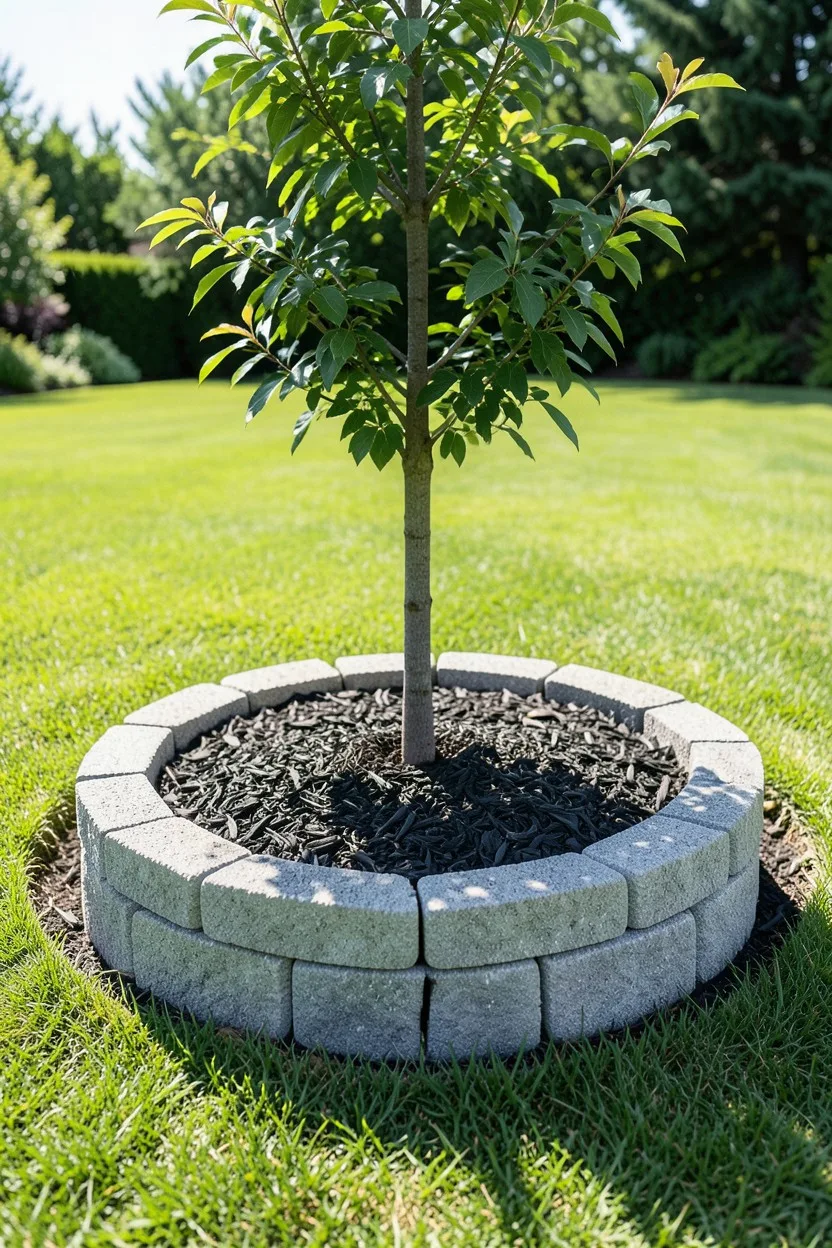
If you want a highly structured, tidy stone border look but do not have the budget for real masonry stone, pre-cast scalloped or textured concrete tree ring blocks are a great solution. They provide a neat finish for under $100 per tree.
Buy 12 to 14 interlocking curved concrete border sections from your local home improvement store, which usually retail for roughly $3 to $5 per section. Dig a shallow, circular 2-inch deep trench around your tree bed, add a thin layer of sand to assist with leveling, and set the blocks end-to-end. Use a rubber mallet to tap each block until the entire ring is perfectly level, then backfill the center with fresh dark mulch for a clean look.
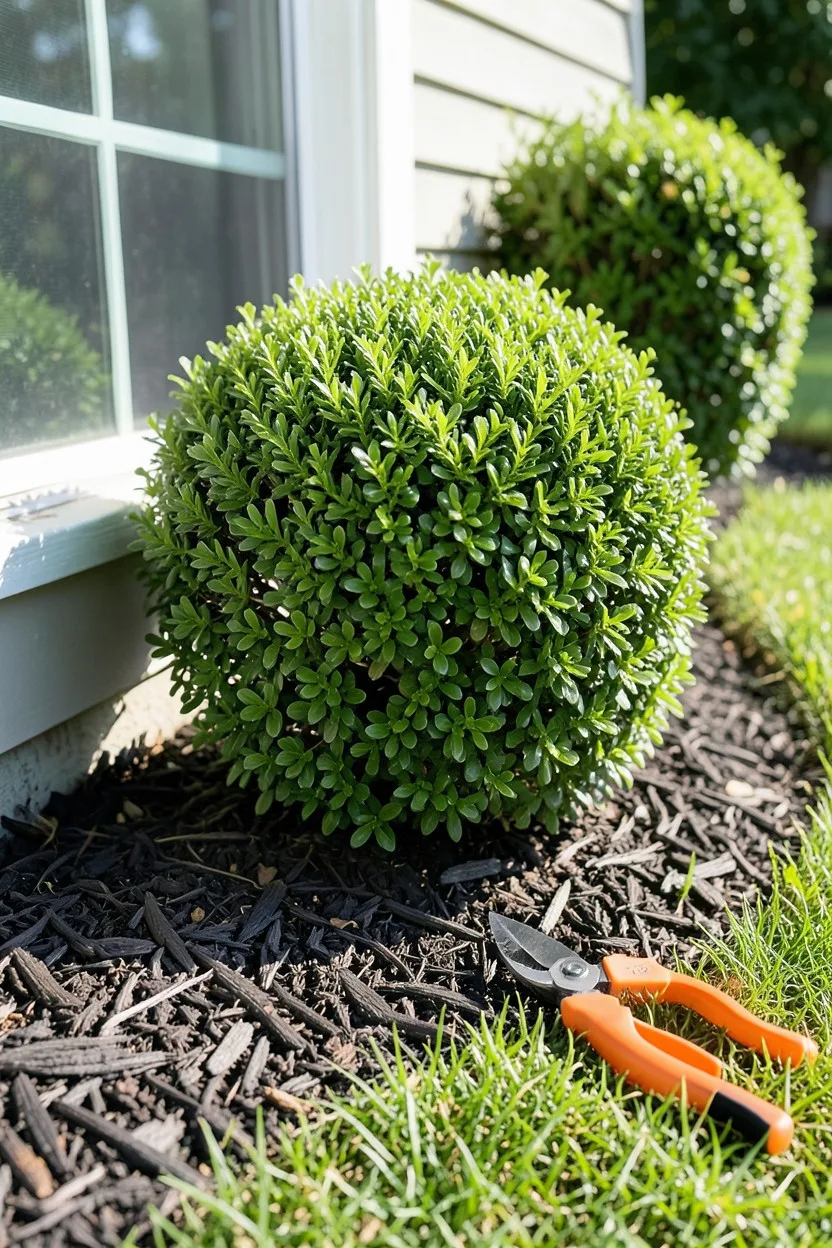
14. Mass Planting Evergreen Boxwood Globules
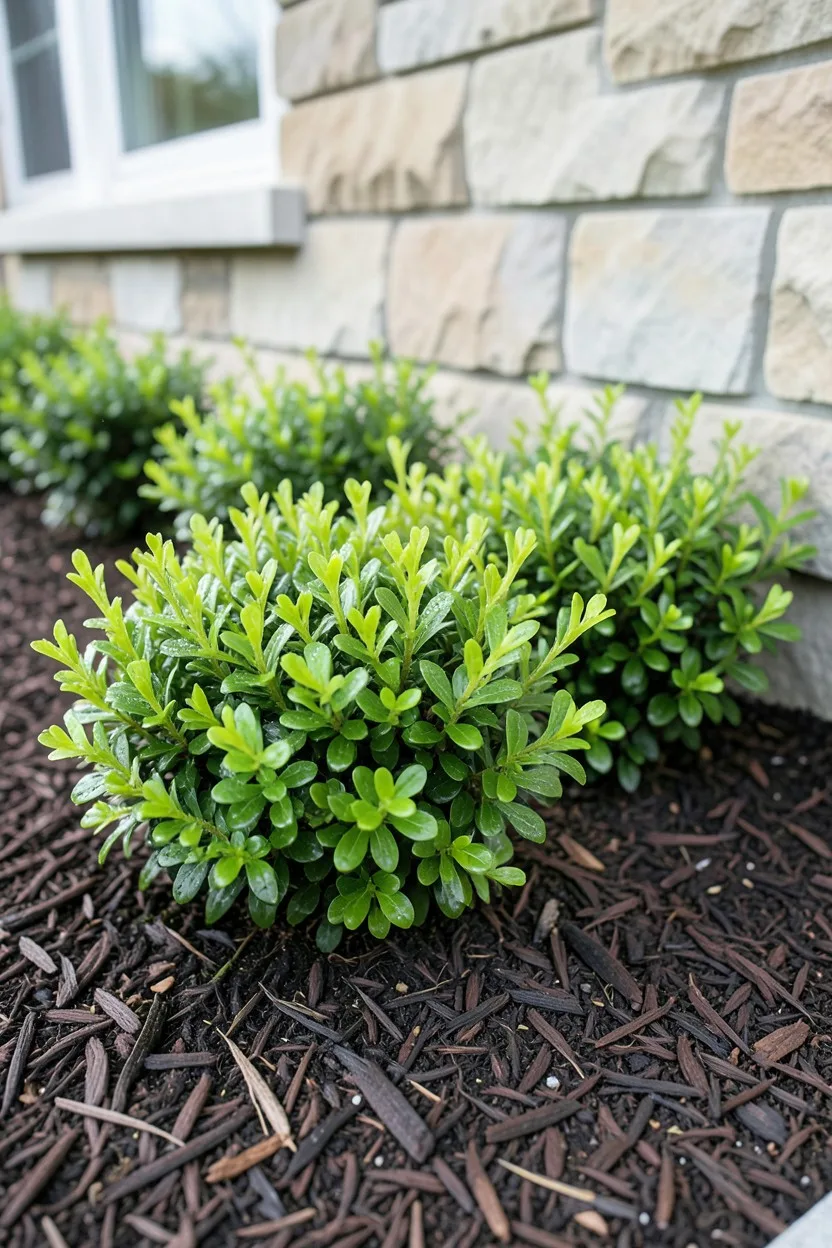
When winter hits, deciduous perennials die back to the ground, leaving your front yard looking barren and empty for four months. To maintain a structured look all year long, you need to anchor your beds with hardy, reliable dwarf evergreens.
Buy four or five small 1-gallon size Winter Gem boxwoods, which are highly resilient and cost about $25 each. Instead of dotting them randomly across the yard, plant them in a tight, structured row along your front foundation wall or in a gentle curve around a corner bed. Space them 24 inches apart from center to center. As they grow, they will knit together into a solid, deep green structural anchor that holds its shape through heavy snow and freezing temperatures.
Front Yard Strategy: Smart Investment vs. Waste
Worth Your Money
- Small 1-gallon shrubs that grow quickly
- Bulk organic shredded hardwood mulch
- Sharpened hand tools for clean manual cuts
- Die-cast aluminum solar lighting fixtures
Skip This Expense
- Overpriced 5-gallon mature nursery specimens
- Cheap dyed bag mulch that fades in months
- Flimsy plastic rolled landscape edging strips
- Budget plastic multi-pack dollar solar stakes
15. Pea Gravel Porch Accent Apron Zones
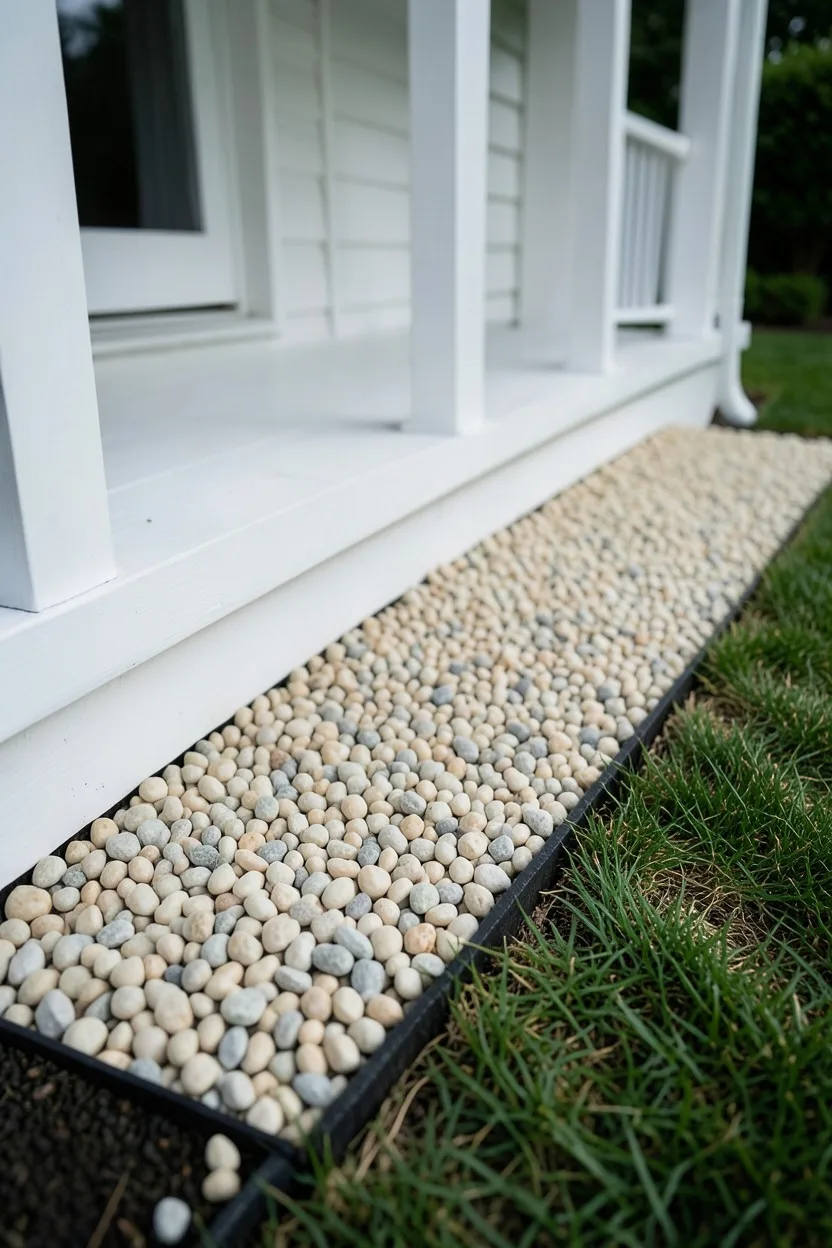
That awkward, narrow strip of dirt right beneath your porch decking where grass refuses to grow due to lack of sunlight is a persistent eyesore. Do not fight nature by trying to grow turf there; convert it into a crisp, clean pea gravel accent apron.
Dig out the top 3 inches of poor soil from the strip, lay down heavy-duty commercial landscape fabric, and pin it securely with steel staples. Head to your local stone yard and purchase ten to fifteen 50-pound bags of washed pea gravel or rounded river pebbles for around $60. Pour the stones over the fabric, rake it perfectly smooth, and frame the outer edge with a sharp spade-cut line. It looks clean, stops mud from splashing onto your porch siding during heavy downpours, and drains beautifully.
16. The Focal Point Specimen Shrub Upgrade

If your front garden bed feels flat and boring, it probably lacks a true focal point to draw the eye. Instead of buying dozens of tiny filler annuals, allocate your entire $200 budget toward a single, high-impact showstopper specimen plant.
Go to a dedicated local nursery and select one spectacular, healthy 5-gallon specimen shrub that offers multi-season interest. A Limelight hydrangea, a dwarf Japanese maple, or a vibrant doublefile viburnum make incredible choices. Plant this single specimen exactly two-thirds of the way down your main foundation bed, rather than dead-center. Surround it with simple mulch and low-growing groundcovers to let its unique shape, bark texture, or seasonal blooms command full attention from the sidewalk.
17. Natural Stacked Fieldstone Bed Retaining Walls
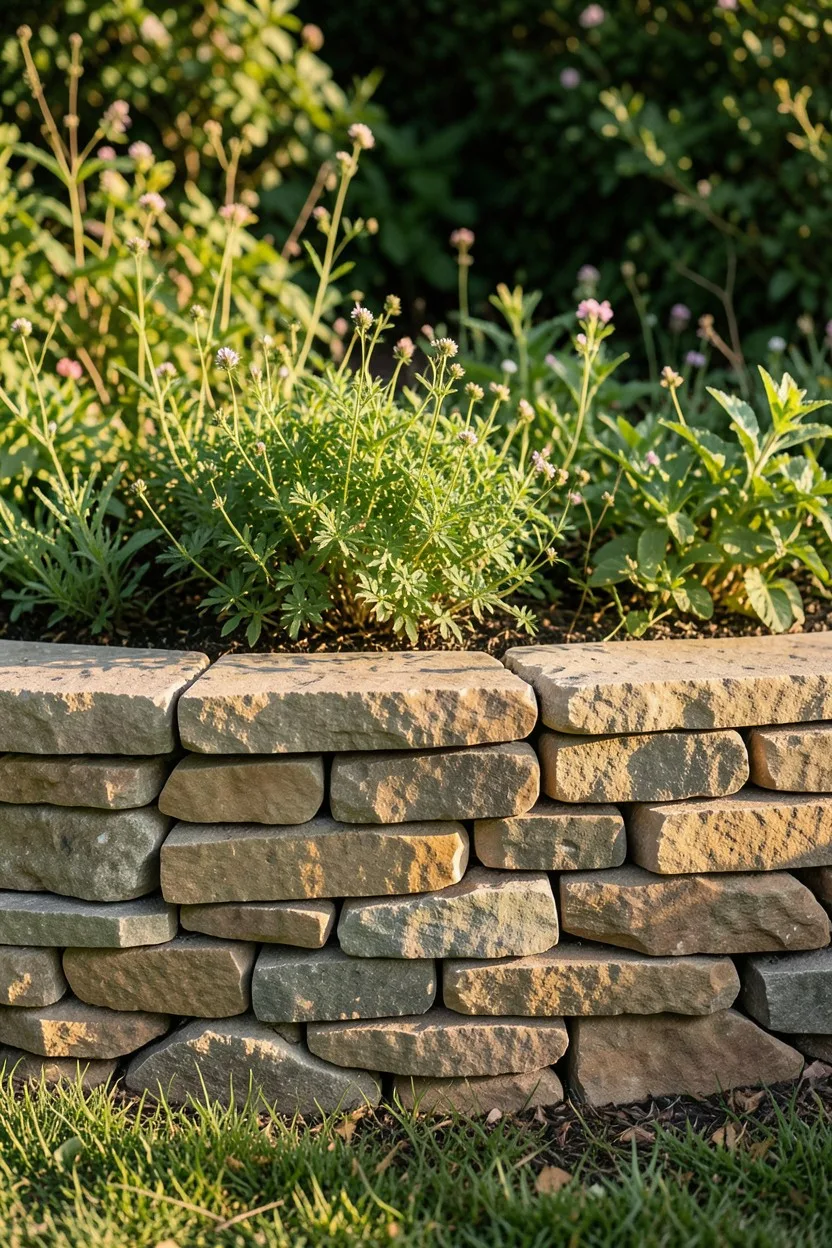
If your front lawn has a slight slope or hill near the walkway, your soil and mulch will constantly wash away during heavy rains. You can fix this issue permanently and introduce beautiful, rustic texture by building a low, dry-stacked natural stone retaining wall.
You do not need mortar or concrete for a small wall under 12 inches high. Buy a pallet of thin, flat palletized fieldstone or flagstone pieces from a local mason yard for around $150. Dig a shallow 2-inch deep trench along your wall line to establish a firm base. Lay your widest, flattest stones in the trench first, then stack successive rows upward, staggering the joints like bricks and tilting the wall slightly backward into the hill for maximum stability under soil pressure.
Avoid These Budget Landscaping Blunders
Frequently Asked Questions
How can I figure out how much mulch I need for my beds?
Multiply the length of your garden bed by the width to get the total square footage, then multiply that number by 0.25 for a 3-inch depth. Divide that final number by 27 to find the exact cubic yards needed for bulk orders, or multiply by 12 to know how many standard 2-cubic-foot bags to buy.
Where is the cheapest place to buy large landscaping stones?
Skip the commercial retail nurseries and big-box stores completely. Look up local stone yards, quarries, or masonry supply companies in your area. Buying stone by the ton or by the pallet directly from the source is often 50% cheaper than purchasing individual bagged or piece-rate options.
Will a dry-stacked stone wall fall over during a heavy freeze?
Not if you build it correctly. Because there is no rigid mortar holding the stones together, a dry-stacked wall remains flexible. It can naturally shift and settle slightly with the winter freeze-thaw cycles of the soil and then return to place without cracking or collapsing.
Can I use free wood chips from utility companies for my front yard?
Yes, but use them with caution. Fresh utility wood chips from tree-trimming services work great for rustic pathways or wide perimeter borders, but they often look a bit uneven and rough for formal foundation beds. They also deplete surface nitrogen briefly as they initial break down, so keep them away from delicate annuals.
Final Thoughts
If you only choose one project from this entire list to tackle this coming weekend, make it the deep spade-cut border edging. It costs absolutely nothing but your time and muscle, yet it provides the single biggest visual return for your front yard's curb appeal. A razor-sharp, dark mulched border immediately fools the eye into thinking you hired an expensive professional landscaping crew, giving your home a clean, intentional framework that makes even the simplest plants look like a million bucks.

John Smith is the founder and CEO of Karaoke Machines Guru. He is a karaoke tutor and karaoke enthusiast and has been passionate about karaoke since he was a child. He also writes about karaoke-related tips, guides, and product reviews on this website.
He overlooks the whole website and makes sure that everything is running smoothly. Learn more!